1. Navigating the Management Console
Note: Some of the Management Console applets display dialogs or warnings automatically. If you have installed a browser pop-up blocker on your administrator PC, these pop-ups may not appear. You can usually configure blocker software to allow pop-ups from specific domains or IP addresses.
The Wave Global Administrator Management Console is a portal to the applets and their associated dialogs that are used to configure and manage Wave ISM.
More information is available about how to use an applet:
| • | Administration tab applets. Click Help in an applet dialog. |
| • | Applications tab applets. See the documentation for that application. |
| • | Diagnostics tab applets. Click Help in an applet dialog. |
Note: If you are accessing the Management Console from an administrator PC running Microsoft Windows XP SP2 and you experience problems, for example applets appear to be disabled or hidden, see “Troubleshooting Management Console problems” in Appendix G in the Wave Server Installation Guide.
Navigating applet tree structures.
To start any applet, click its icon or name in the Management Console. Exiting an applet is slightly different depending on the applet type.
Dialog applets vs. remote access applets
There are two types of applets accessible from the Management Console, dialog applets and remote access applets.
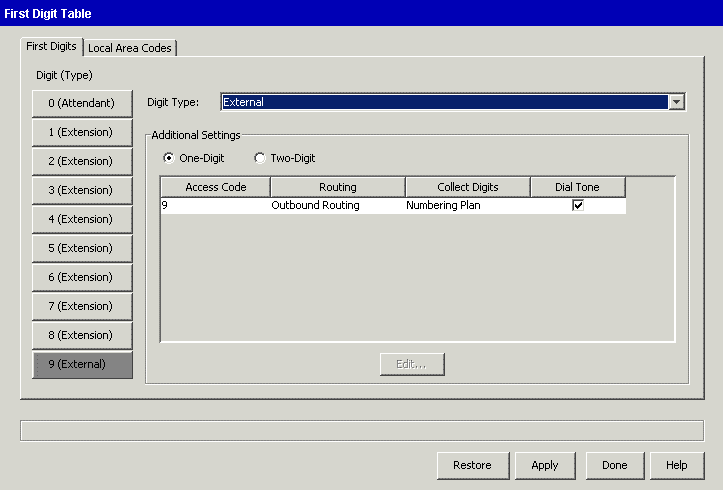
Most applets are dialog applets. Dialog applets directly open a master dialog, for example the First Digit Table applet:

Some applets consist of a single master dialog, while others may link to sub-dialogs.
Click Done or OK to close each sub-dialog until you return to the master dialog.
From most master dialogs, you can click any of the following:
| • | Done. Exits the dialog, prompting you to save any changes that you made. |
| • | Restore. Returns the fields in the dialog to the previous (unmodified) values. |
| • | Apply. Saves your changes without closing the dialog. |
| • | Help. Opens a Help topic that describes how to configure the settings in the master dialog and any associated sub-dialogs. |
Some Management Console applets (listed in the next table) open a Remote Desktop Connection to the associated application, for example the Date and Time applet:
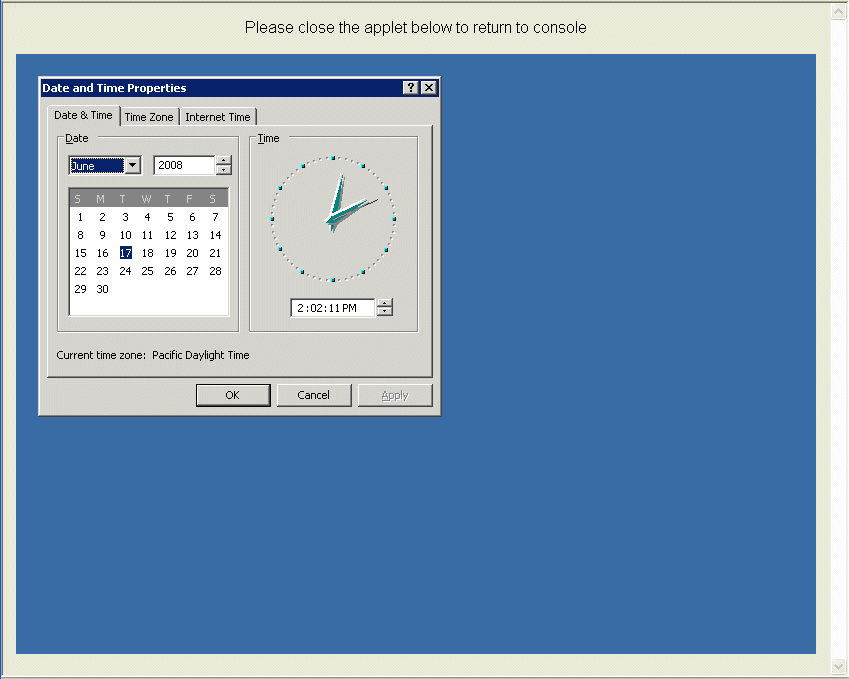
The following table lists the Management Console applets that are launched through remote access:
|
Applet |
For more information, see... |
|
|
Administration |
RAID 1 Configuration |
|
|
|
Date and Time |
“Setting the system date and time” in Chapter 6 in the Wave Server Installation Guide |
|
|
User/Group Management |
|
|
|
Local TAPI Configuration |
|
|
|
Microsoft RRAS |
|
|
|
Network Connections |
|
|
Diagnostics |
System Information |
Microsoft System Information Help |
|
|
Performance Monitor |
Microsoft Management Console Performance Help |
|
|
Task Manager |
Microsoft Windows Task Manager Help |
|
|
Event Viewer |
|
|
|
Network Monitor |
Microsoft Network Monitor Help |
Starting a remote access applet
When you start a remote access applet from the Management Console, Wave attempts to start a Remote Desktop Connection:
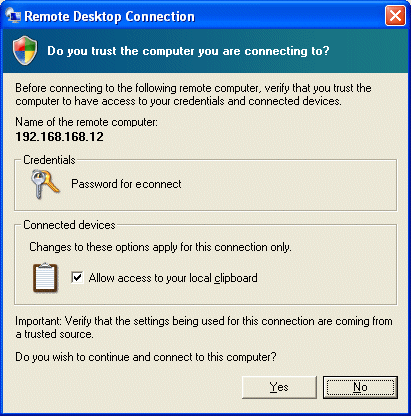
Click Yes to continue. For the User/Group Management applet only, you are presented with the Vertical Wave Global Administrator Log On dialog, with your logon credentials already filled in. Click OK to continue. See User/Group Management roadmap for more information.
Exiting a remote access applet
When you are done using the application, choose Exit from your browser’s File menu, or click the X at the upper right of the application window to return to the Management Console.
Important! You can click  System Desktop at the top of the Management Console in order to access other resources on the Wave Server (as opposed to running another Management Console applet.) To then return to the Management Console, you must log off from the Windows Desktop. If you do not log off, you will keep that remote session open, possibly locking out other administrators from being able to use Remote Desktop to access the same or another remote access applet, since only a limited number of remote sessions may be configured on your system.
To log off from the Windows Desktop, choose Start > Logoff.
If you are having trouble establishing the Remote Desktop Connection...
If you have trouble establishing a Remote Desktop Connection, check your browser proxy settings.
To check the proxy settings
| 1 | From the Tools menu of Internet Explorer, choose Internet Options. |
| 2 | Click the Security tab. |
| 3 | If necessary, click the Local intranet icon to select it. |
| 4 | Click the Sites button. |
| 5 | If necessary, select the Include all sites that bypass the proxy server option. |
| 6 | Click the Advanced button. |
| 7 | Enter the specific Wave host name in the Add this Web site to the zone field. |
| 8 | Click Add. |
| 9 | Click OK to save your changes until all dialogs are closed. |
Once a Remote Desktop Connection is established, a user with a left-handed mouse may notice that the mouse buttons suddenly appear to become unresponsive. In actuality, the mouse buttons have been reassigned to right-handed settings, and the buttons are now reversed. This happens because when you connect to a PC via a Remote Desktop Connection, mouse and keyboard settings are inherited from the PC to which you connect.
Navigating applet tree structures
Several of the Management Console applets employ tree structures to represent the items you are configuring. For example, the Trunk Configuration applet uses a tree structure to represent cards or modules and the trunks and channels you are configuring.
Navigating applet tree structures typically includes the following:
| • | Displaying and hiding items in a tree (for example, the channels of a card or module in the Trunk Configuration applet) |
| • | Selecting items in a tree |
Displaying and hiding items in a tree
To display items in a tree
| 1 | Open the appropriate applet, if it is not already open. |
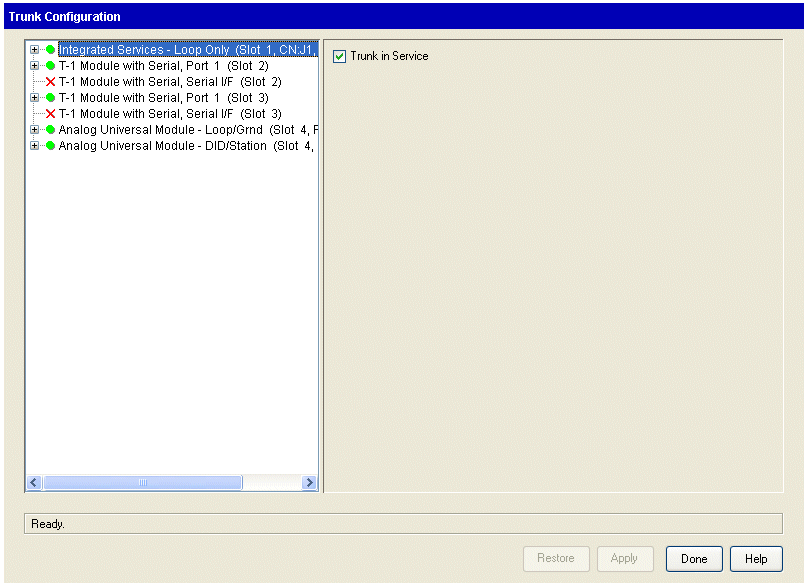
Note: A green dot next to a trunk, channel, port, or card, or module indicates that it is in service. A red X indicates that the item is not in service.
| 2 | Click the plus (+) sign next to the appropriate module or card to display the items within it. |
To hide items in a tree
| 1 | Complete any configuration changes you are making in dialogs opened from an applet, and return to that applet. The Station Ports applet is shown in the following example. |

| 2 | Click the minus (-) sign next to the appropriate trunk, module, or card to hide the items within it. |
To select items in a tree
| 1 | Open the appropriate applet, if it is not already open, and display the items within a trunk, card, or module. |
| 2 | Select the items you want to configure. |
| • | To select a contiguous range of items, select the first item in the range, then hold down the Shift key while you select the last item in the range. |
| • | To select a noncontiguous range of items, hold down the Ctrl key while you select each item. |
When you access dialogs containing values that apply to the selected channels, what you see depends on which channels are selected:
| • | If all channels selected have the same values, those values are displayed |
| • | If all channels selected have the same values, and those values are the default values, the word Default is displayed |
| • | If the channels selected have different values, the expression No Common Value is displayed. In the case of check boxes with different values, the check boxes are deselected and (No Common Value) is appended to their labels. |
User/Group Management is a remote access applet that lets you configure users as well as access many other Wave configuration and monitoring tools.
Accessing User/Group Management
To access User/Group Management
| 1 | From the Wave Global Administrator Management Console, click the User/Group Management icon, located in the PBX Administration section. |
| 2 | A remote access session opens, connecting you to the Vertical Wave Global Administrator Log On dialog, with your Wave logon credentials already entered. |
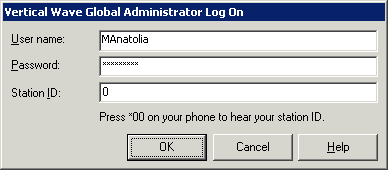
If your name and password do not appear, enter them.
Note: A username called “Admin” exists by default, with a password of 100. To create other administrators, you must add users and give them Global Administrator permissions.
| 3 | Do one of the following: |
| • | Enter your phone’s Station ID. To do so, press *00 on your telephone to retrieve your station ID, and then enter that number. You must enter your station ID if you will need to record an auto attendant prompt or user voice title using the audio controls. (See Using the audio controls.) |
| • | Leave Station ID set to 0 if you do not need to use the audio controls. The audio controls will be disabled in the various User/Group Management applet views. |
| 4 | Click OK. The User/Group Management applet opens. |
Note: Leaving the Admin user password as 100 is a security risk that can cost your company money due to toll fraud. For more information about system security, see Appendix A.
User/Group Management is composed of views (see Working in views). Each view enables you to configure, manage, or monitor an aspect of the Wave system.
|
View |
Description |
See |
|
Users
|
Manage Wave users. Includes changing passwords and allocating disk space to users for voicemail messages and greetings. |
|
|
Groups
|
Manage ViewPoint Groups (groups of related extensions or contacts). |
|
|
Pickup Groups
|
Manage Pickup Groups (groups of extensions that can be answered by all the users in the group). |
|
|
Dialing Services
|
View external first digits and configure how they appear in ViewPoint |
|
|
Auto Attendants
|
Manage auto attendants that handle and route inbound calls with voice menus. |
|
|
Queues
|
Manage groups of agents in Wave Contact Center queues. |
Wave Contact Center Administrator Guide |
|
Maintenance Log
|
View a log recording Global Administrator actions. |
|
|
Dial Plan
|
View and edit a complete list of internally dialable numbers. |
|
|
System Prompts
|
Listen to and change recordings used for standard system prompts and auto attendants. |
|
|
Call Log
|
View a record of all the calls made on the system. |
The Tools menu of the User/Group Management applet offers additional Wave features not available from the views:
|
Command |
Description |
See |
|
Update Access Codes |
Change the access code used for a particular dialing service. |
|
|
Recalculate Disk Usage |
Update each user’s total disk usage (how much space the user’s audio files are taking up), displayed in the Users view and when you edit an individual user. |
|
|
Analyze Security |
Analyze your system to identify users whose passwords do not fall within password security settings guidelines, and which may make your system vulnerable. |
|
|
User Templates |
Open the User Template dialog to create a new user template or edit an existing one. |
|
|
Columns |
Customize the columns that appear in each view. |
|
|
Options |
Customize the appearance of names, Call Log size, and defaults for station and extension numbers. |
|
|
System Settings |
Configure and customize several aspects of your Wave system. |
To open a view, click its button in the view bar on the left side of the User/Group Management applet window.
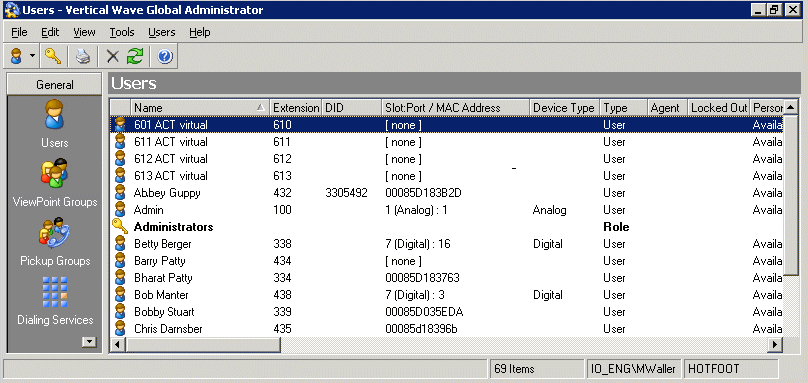
You can also open a view by clicking the View menu and choosing a view.
Note: If a view is not available to you, you may not have permission to view it.
The main part of a view contains rows of the items that pertain to that view. For example, in the Users view, each Wave user is displayed as an item on a row. Double-click an item to edit it.
A command always affects the item or items that are selected. To select multiple items, hold down the CRTL key as you click the items. You can perform a command using any of the following methods:
| • | Choose a command from the view’s menu. For example, in the Users view, click the Users menu and choose a command. |
| • | Click a toolbar button (see the next table). |
| • | Right-click an item and choose a command from the shortcut menu that opens. This is often the fastest way to perform a command. |
The User/Group Management applet toolbar is located on the main menu bar in each view. It gives you quick access to several User/Group Management applet commands that are also available through the User/Group Management applet menus.

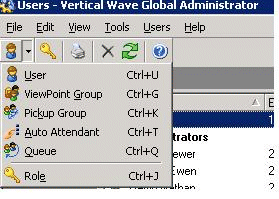
To create a new item when you are working in any Wave view, click the arrow next to the first button on the toolbar and select an item.
Click a column header to sort by that column. Click again to sort in the reverse order. The arrow in the column header shows by which column and in what direction the display is currently sorted.
You can resize column widths by dragging the sides of the column headers.
For each view in the User/Group Management applet, you can choose the columns that you want to see and the columns that you want to hide. Some views do not show all the available columns by default.
To show or hide columns in a view
| 1 | Choose Tools > Columns, or right-click a column header. The Columns dialog opens. |
| 2 | From the View drop-down list, choose the view you want to change. |
| 3 | Check a column to show it. Uncheck a column to hide it. For an explanation of the various columns, click Help. |
| 4 | Click OK. |
A voice file is an audio recording that is stored as a file. Wave stores system prompts, greetings, voice messages, and recorded conversations in voice files that you can play over your computer speakers or on the phone. You can record voice files using the phone.
Wave voice files are in WAV format, but you can import files of other formats.
Note: When archiving voice messages or call recordings you can specify MP3 as the file format. See Archiving call recordings and voicemail .
Wave’s audio controls make it easy to create and modify recordings of all types. The following controls appear in Wave wherever you can create and listen to recordings.

To create and play recordings, use the buttons on the audio controls as shown in the following table and speak into your phone.
|
View |
Description |
|
Record
|
When you are ready to record, pick up your phone, and then click Record. A beep signals that recording has begun. |
|
Play
|
Click Play to listen to the recording. |
|
Stop
|
When you are done recording, click Stop first and then hang up. If you simply hang up, you will introduce an audible click at the end of the recording. |
|
Fast Forward
|
Click Fast Forward to skip ahead while listening to the recording. |
|
Rewind
|
Click Rewind to skip back while listening to the recording. |
To move forward and backward within the recording, drag the slider bar.

Importing and exporting voice files
To import or export a voice file, use the import or export buttons on the recording control, as shown in the following table.
|
View |
Description |
|
Import
|
You can import a voice file in WAV format to use for any Wave recording (greetings, voice titles, and so on).
Wave can import WAV files with a frequency of 8Khz, 11.025 Khz, 22.05 Khz, or 44.1 Khz. |
|
Export
|
You can export any of your recordings, including system prompts and voice titles, to a WAV file or an MP3 file. |