Open topic with navigation
1. Using Auto Attendants to answer and route calls
You can configure an auto attendant if you want to have the inbound calls on your company’s main phone number answered automatically. The auto attendant usually consists of a recorded greeting followed by a menu of choices. For example, your main auto attendant might say: “Welcome to Barchetta Industries. You may dial an extension at any time. For Sales, press 1. For Customer Support, press 2. To hear a recorded message about our special offers, press 3. To speak to the Operator, please hold.”
You can set up an auto attendant to let callers do any of the following:
|
•
|
Dial a user by name in the dial-by-name directory |
|
•
|
Log in using a Wave extension and password |
|
•
|
Hear a recorded message |
|
•
|
Transfer to a user, Contact Center queue, ViewPoint Group, or IVR Plug-in |
|
•
|
Transfer directly to a voice mailbox to leave a message |
|
•
|
Transfer to another menu (another auto attendant) |
You can also specify an automatic action to take if callers do nothing.
Note: You can use the separately-licensed Wave Call Classifier add-on to create business rules and associate those rules with an auto attendant to identify callers, intelligently route calls, and present Contact Center agents with scripts and related caller information before calls are answered. For details about using the Call Classifier add-on, see Using the Call Classifier.
The Default Auto Attendant
Configuring an auto attendant
Creating a new auto attendant
Defining menu choices
Customizing login behavior from auto attendants
Avoiding the auto attendant ambiguous dialing delay
Scheduling transfers and greetings
Setting up an auto attendant’s hold music and greetings
Setting up custom data and skill requirements for an auto attendant
Deleting an auto attendant
Configuring the trunk group for the auto attendant extension
Configuring calls to be forwarded to the RNA forwarding target
The Default Auto Attendant
When Wave is installed, you must assign all trunk groups associated with trunks to the default auto attendant at extension 560. Whenever you add a trunk group, you must also assign it to an auto attendant. You can change assignments at any time
The Default Auto Attendant plays a greeting and offers the caller the following options:
|
•
|
Dial any Wave extension. |
|
•
|
Press 9 to access a dial-by-name directory. |
|
•
|
Press 0 to transfer to the Operator. |
|
•
|
Press # to log in to Wave. |
Note: If three seconds pass after the greeting has played without the caller pressing any key, the call is transferred to the Operator.
Configuring an auto attendant
Creating a new auto attendant
Defining menu choices
Customizing login behavior from auto attendants
Avoiding the auto attendant ambiguous dialing delay
Scheduling transfers and greetings
Setting up an auto attendant’s hold music and greetings
Setting up custom data and skill requirements for an auto attendant
Deleting an auto attendant
Configuring the trunk group for the auto attendant extension
Configuring calls to be forwarded to the RNA forwarding target
Configuring an auto attendant
Configuring an auto attendant consists of the following procedures:
The Default Auto Attendant
Avoiding the auto attendant ambiguous dialing delay
Configuring the trunk group for the auto attendant extension
Configuring the trunk group for the auto attendant extension
Configuring calls to be forwarded to the RNA forwarding target
Deleting an auto attendant
Configuring the trunk group for the auto attendant extension
Configuring calls to be forwarded to the RNA forwarding target
Creating a new auto attendant
To create an auto attendant
|
1
|
If necessary, click the Administration tab of the Management Console. |
|
2
|
Click User/Group Management, located in the PBX Administration section of the Management Console. |
|
3
|
Log on to the User/Group Management applet, which opens in a remote access window. See Accessing User/Group Management for more about logging on to the User/Group Management applet. |
|
4
|
Click the Auto Attendants icon in the view bar. The Auto Attendants view opens, showing all auto attendants that have been created so far. |
The Default auto attendant is automatically provided with Wave.
|
5
|
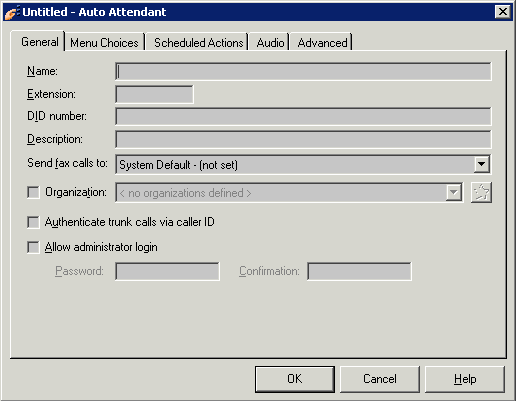
Choose File > New > Auto Attendant. The Auto Attendant dialog opens. |
|
6
|
Enter the following information on the General tab: |
|
•
|
Name. Required. Descriptive name for the new auto attendant, for example, “Sales auto attendant”. |
|
•
|
Extension. Required. Extension used to access the auto attendant. Wave users can transfer callers to the auto attendant at this extension. To test the auto attendant, call this extension. (The default auto attendant is assigned the extension 560.) |
Note: Extension 8888 is reserved and cannot be assigned to an individual user. Extension 8888 is reserved for the “send message to all users” feature. If a user enters extension 8888 when sending a voice message from his or her phone, the message is automatically sent to all users who have a voice mailbox configured.
|
•
|
DID number. This feature is not supported in this version. |
|
•
|
Description. Information that describes the auto attendant. |
|
•
|
Send fax calls to. Select the extension to which incoming faxes to this auto attendant will be automatically redirected. Select “System Default” from the drop-down list to use the system default for fax redirection as specified via the PBX tab of the General Settings applet. For information on setting the system fax redirect default extension, see Configuring Fax Redirect. |
Note: In the drop-down list, “System Default (not set)” means that no system fax redirect default extension has been specified.
|
•
|
Organization. Select this checkbox and select an Organization to have calls to this auto attendant logged with that Organization. Calls must end at the auto attendant to be logged with the selected Organization. If the call proceeds to a user, it will be logged with the user’s Organization. For information about Organizations, see Using Organizations. |
|
•
|
Authenticate trunk calls via caller ID. Select this checkbox to enable this auto attendant to automatically log in a user who calls from an authenticated number. |
|
•
|
If this checkbox is selected, whenever a user calls this auto attendant from an authenticated number, he or she is automatically logged in without being prompted to enter an extension or password. |
|
•
|
If this checkbox is not selected, a user will be prompted to enter an extension or password to log in, even if calling from an authenticated number. |
Note: You use authenticate one or more of a user’s numbers via the User dialog..
|
•
|
Allow administrator login. Select this checkbox to allow a Wave administrator to call into this auto attendant and manage its greetings over the phone, including listening to the greetings, re-recording an existing greeting, recording a new greeting, making a different greeting active, and deleting a greeting. |
Note: You must add an “Auto attendant configuration” menu choice to the auto attendant to support administrator login. When the administrator selects that menu choice, he or she is prompted to enter the password you specify here, and then hears a menu of greeting management options. See Defining menu choices.
Password/Confirmation. Enter and confirm the password required to log on.
|
7
|
Click OK or proceed to the next section. |
The Default Auto Attendant
Configuring an auto attendant
Defining menu choices
Customizing login behavior from auto attendants
Avoiding the auto attendant ambiguous dialing delay
Scheduling transfers and greetings
Setting up an auto attendant’s hold music and greetings
Setting up custom data and skill requirements for an auto attendant
Deleting an auto attendant
Configuring the trunk group for the auto attendant extension
Configuring calls to be forwarded to the RNA forwarding target
Defining menu choices
An auto attendant can present a series of menu choices to callers. For example, callers might be prompted to press 1 to transfer to the Sales department, 2 to transfer to the Customer Service department, and so forth. When a caller reaches an auto attendant, the auto attendant’s greeting plays, followed by its menu choice prompts in the order you specify.
Caution! If your auto attendant supports extension dialing, try to avoid menu choices conflicting with extension numbers. For example, if you assign the 2 key to a menu choice, consider avoiding extensions beginning with 2. Otherwise callers trying to dial the extension might select the menu choice instead.
Each menu choice can contain the following:
|
•
|
Prompt. Recorded message that explains the option to the caller. For example, “For Sales, press 1.” |
|
•
|
Key. Phone key callers must press to select the option. |
|
•
|
Action. Action the system takes when the key is pressed. |
|
•
|
Language. Language for subsequent system prompts. When callers enter the key associated with this menu choice, all subsequent prompts are in the specified language. You can choose from the languages that are currently installed on the Wave Server. (See Setting up system-wide audio options for more about how to install additional languages.) |
|
•
|
Custom data and skill requirements. Extra information attached to the call. Whenever a caller selects the menu choice, you can attach custom data variables and/or Contact Center queue agent skill requirements with the values you define. These values can be seen by users or used to automate call handling. |
Note that you can also attach custom data variables and skill requirements at the auto attendant level, as opposed to the menu choice level described here. See Setting up custom data and skill requirements for an auto attendant.
Menu choice actions
Adding a menu choice
Setting general menu options
The Default Auto Attendant
Configuring an auto attendant
Creating a new auto attendant
Customizing login behavior from auto attendants
Avoiding the auto attendant ambiguous dialing delay
Scheduling transfers and greetings
Setting up an auto attendant’s hold music and greetings
Setting up custom data and skill requirements for an auto attendant
Deleting an auto attendant
Configuring the trunk group for the auto attendant extension
Configuring calls to be forwarded to the RNA forwarding target
Menu choice actions
The following table lists the actions that you can choose.
|
|
Transfers the call to the user that you specify.
|
|
|
Transfers the call to the voice mailbox of the user that you specify.
|
|
|
Plays a message that you record using the audio controls.
|
|
|
Offers the caller the Wave login prompt to the Voicemail/account menu, letting the caller check voicemail and change account settings.
|
|
|
Offers callers the dial-by-name directory.
|
|
|
Transfers the call to another auto attendant that you specify. (See When a call may be disconnected automatically for a special case.)
|
|
|
Transfers the call to the Contact Center queue that you specify.
|
|
|
Transfers the call to the hunt group you specify. See Configuring hunt groups of extensions.
|
|
|
Allows a Wave administrator to manage this auto attendant’s greetings over the phone, including listening to the greetings, re-recording an existing greeting, recording a new greeting, making a different greeting active, and deleting a greeting. When the administrator selects this menu choice and enters the required password, he or she hears a menu of greeting management options.
To access this feature, you must enable administrator login and provide the required password on the General tab of the Auto Attendant dialog.
|
When a call may be disconnected automatically
Adding a menu choice
Setting general menu options
Defining menu choices
When a call may be disconnected automatically
The system automatically disconnects a call if the caller does not press a key during 3 consecutive jumps between auto attendants. This situation could occur if you if you configured an auto attendant’s Nothing menu choice to perform the Jump to auto attendant action and then specified the same auto attendant. After 3 jumps without selecting a menu choice, the caller is presumed to have hung up.
Menu choice actions
Adding a menu choice
Setting general menu options
Defining menu choices
Adding a menu choice
|
1
|
In the User/Group Management applet, in the Auto Attendants view create a new auto attendant or double-click an existing auto attendant to edit it. The Auto Attendant dialog opens. |
|
2
|
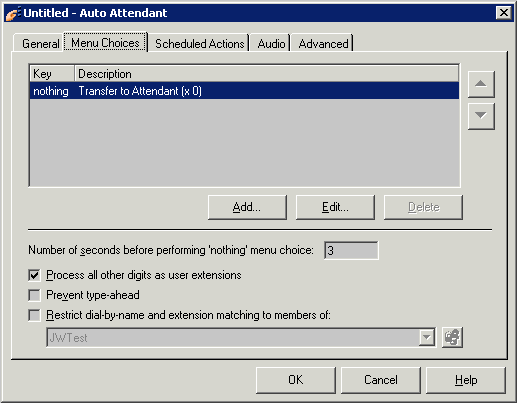
Click the Menu Choices tab. |
|
3
|
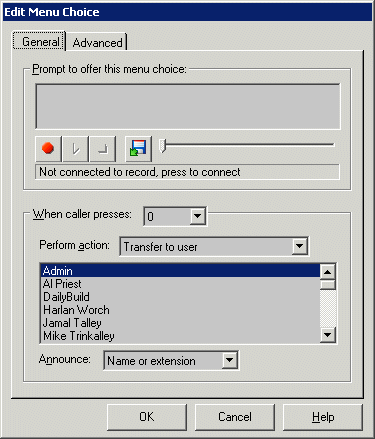
Click Add to create a new menu choice, or click Edit to modify the selected menu choice. The Edit Menu Choice dialog opens. |
|
4
|
On the General tab, type the text of the Prompt to offer this menu choice, for example, “For Sales, press 1.” Use the audio controls to record a new prompt or import a WAV file containing the prompt. (See Using the audio controls.) |
|
5
|
In When caller presses, select the key that callers must press to select the menu choice. Valid keys are 0-9, *, or #. |
|
6
|
In the Perform action drop-down list, select the action to perform when callers press the key. |
For transfers to a user, IVR Plug-in, or queue, select an optional Announce prompt, which determines what callers hear when they select this menu choice:
|
•
|
Nothing. The call is transferred with no announcement. |
|
•
|
Name or extension. Announces the name of the user, IVR Plug-in, or queue, using the voice title if available. If no voice title is available, the auto attendant announces the extension to which the call is transferring. |
|
•
|
One moment please. Announces “One moment please” as the call is transferred. |
|
7
|
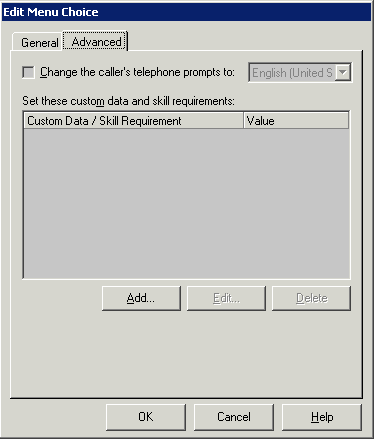
Click the Advanced tab. |
|
8
|
To change the language of subsequent prompts, check Change the caller’s telephone prompts to checkbox. Then select another language from the drop-down list. When callers press the key for this menu choice, all subsequent prompts are in the language you specify here. |
|
9
|
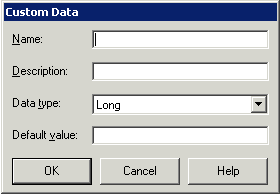
To set the value for one or more custom data variables or Contact Center queue skill requirements whenever this menu choice is selected, click Add. The Custom Data / Skill Requirement dialog opens. |
|
•
|
To attach a custom data variable to the call when this menu choice is selected, click Custom data, select the variable from the drop-down list, then enter the value to be assigned to the variable when the menu choice is selected. To create a new custom data variable, click  . . |
|
•
|
To attach an agent skill requirement to the call when this menu choice is selected, click Agent skill and then select the skill from the drop-down list. To create a new skill, click  . . |
For Minimum value and Maximum value, enter the range (from 0 to 100) that an agent’s skill value must be within to qualify for taking the call.
Custom data variables stay attached to the call as long as it remains within the original Wave where it was attached and are historically logged. For complete information on creating custom data variables and Contact Center skill requirements, see the Wave Contact Center Administrator Guide.
|
10
|
Click OK to return to the Edit Menu Choice dialog. |
|
11
|
Click OK to save the menu choice and return to the Auto Attendant dialog. |
|
12
|
On the Menu Choices tab, use the arrows to change the order in which menu choices are presented to callers. |
|
13
|
Add more menu choices or click OK to save the auto attendant. |
Menu choice actions
Setting general menu options
Defining menu choices
Setting general menu options
|
1
|
In the User/Group Management applet, in the Auto Attendants view create a new auto attendant or double-click an existing auto attendant to edit it. The Auto Attendant dialog opens. |
|
2
|
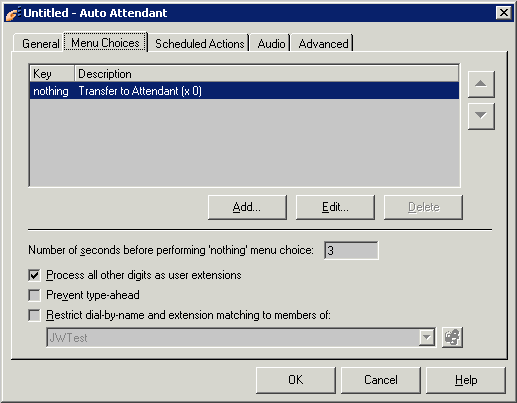
Click the Menu Choices tab. |
|
3
|
In Number of seconds before performing ‘nothing’ menu choice, enter the number of seconds that the auto attendant will wait without a menu choice being selected, before performing the action associated with the Nothing menu choice. The wait begins after the final menu choice prompt finishes playing. You can choose the action for the Nothing menu choice using the following steps. |
|
4
|
To permit callers to dial other extensions while in this auto attendant, select the Process all other digits as user extensions checkbox (the default setting). |
Note: Some extensions cannot be dialed from an auto attendant. If a caller enters the dial-by-name directory extension (the default is 411) or the extension of another auto attendant (for example, 560 for the default auto attendant), the caller hears “That extension does not exist” and the call is not transferred. (The same prompt is played if the caller enters an invalid extension.)
|
5
|
To disable type-ahead for this auto attendant, check Prevent type-ahead. |
Type-ahead enables users to enter a sequence of commands together. For example, with a series of auto attendants set up as submenus, a caller could press 123 to choose menu choice 1, menu choice 2 from the submenu, and menu choice 3 from the final submenu. The problem with type-ahead is that if a caller enters a non-existent extension (for example, 123), the auto attendant processes the digits as type-ahead commands and sends the user to the appropriate menu or submenu. With type-ahead disabled, callers dialing non-existent extensions are never sent to menu choices. However, callers selecting menu choices must wait until they hear the prompts for each menu before entering commands for that menu.
|
6
|
To dedicate this auto attendant to a ViewPoint Group, so that only users in the Group can be dialed from it, check Restrict dial-by-name and extension matching to members of, and select the ViewPoint Group. |
Menu choice actions
Adding a menu choice
Defining menu choices
Customizing login behavior from auto attendants
By default, the User login menu choice prompts for extension and password, then sends users to Wave’s voicemail/account menu (see Appendix A of the Wave ViewPoint User Guide for details). However, you can customize the user login destination, so that users who successfully log in are sent to a specific extension.
Note the following:
|
•
|
When sending login calls to a custom destination, the standard Wave alert prompts do not play, for example the prompts alerting the user to DND status, active call forwarding, and nearly full voice mailbox. However, the user still is prompted to change his or her password if that is required. |
|
•
|
Customizing user login changes the login behavior through this auto attendant only. Users logging in from a station’s dial tone always have the default behavior. |
To customize user login
|
1
|
In the User/Group Management applet, in the Auto Attendants view create a new auto attendant or double-click an existing auto attendant to edit it. The Auto Attendant dialog opens. |
|
2
|
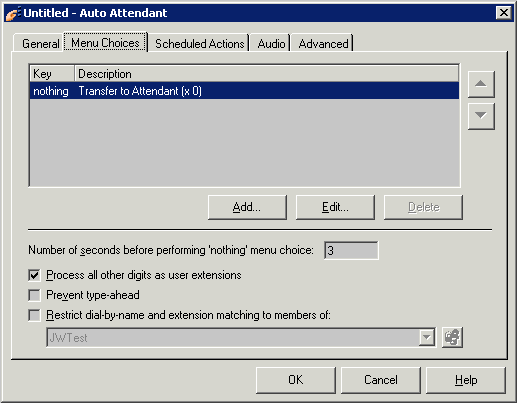
Click the Menu Choices tab. |
|
3
|
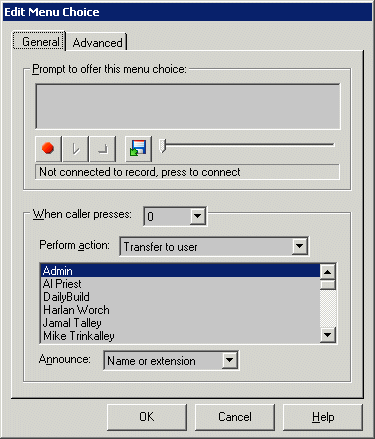
Click Add. The Edit Menu Choice dialog opens. |
|
4
|
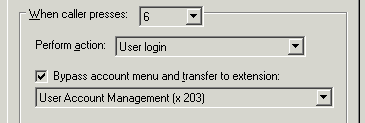
In When caller presses, select the key that callers must press to select the menu choice to login from the auto attendant. Valid keys are 0-9, *, or #. |
|
5
|
From the Perform action drop-down list, select User login. |
|
6
|
Select the Bypass account menu and transfer to and then select the destination extension from the drop-down list. |
The Default Auto Attendant
Configuring an auto attendant
Creating a new auto attendant
Defining menu choices
Avoiding the auto attendant ambiguous dialing delay
Scheduling transfers and greetings
Setting up an auto attendant’s hold music and greetings
Setting up custom data and skill requirements for an auto attendant
Deleting an auto attendant
Configuring the trunk group for the auto attendant extension
Configuring calls to be forwarded to the RNA forwarding target
Avoiding the auto attendant ambiguous dialing delay
By default, when a caller dials an ambiguous number at an auto attendant, there is a 3-second delay while the system waits to see if the number is complete. For example, if the auto attendant has a menu choice accessed by pressing 2, and an extension 200, a caller pressing 2 will experience the delay while the auto attendant waits to see if more digits are coming.
You can bypass or change the delay in the following ways:
|
•
|
The caller can press # after dialing the number. This signals that the number is complete, and the caller is connected without delay. |
|
•
|
You can modify your dialing plan to eliminate ambiguous numbers. |
|
•
|
You can turn off extension dialing, if the auto attendant is meant to be used only for menu choices. To do so, uncheck Process all other digits as user extensions on the Menu Choices tab. This bypasses any ambiguities between menu choices and extension numbers, enabling menu choices to be dialed without the delay. |
|
•
|
You can modify the length of the delay by changing the Wave Advanced Setting AutoAttendantInterdigitTimeout. Be careful when modifying this setting if ambiguous numbers exist, because callers may find themselves connected to the wrong number. |
The Default Auto Attendant
Configuring an auto attendant
Creating a new auto attendant
Defining menu choices
Customizing login behavior from auto attendants
Scheduling transfers and greetings
Setting up an auto attendant’s hold music and greetings
Setting up custom data and skill requirements for an auto attendant
Deleting an auto attendant
Configuring the trunk group for the auto attendant extension
Configuring calls to be forwarded to the RNA forwarding target
Scheduling transfers and greetings
You can customize an auto attendant to automatically change its behavior based on time of day or on special dates. You can schedule the following actions:
|
•
|
Playing of a different main greeting, which replaces the auto attendant’s regular greeting. For example, you can schedule a “We’re closed” greeting to be played to all callers after business hours and on weekends. |
|
•
|
A transfer to any other extension, including another auto attendant, user, queue, hunt group, or ViewPoint Group. For example, to provide extended customer support coverage, support calls that arrive after your California office closes in the evening can transfer automatically to the main auto attendant at your facility in New Zealand. |
Note: If you have scheduled a greeting and a transfer to occur at the same time, the transfer always takes precedence and the greeting does not play. Also, if you have two greetings or two transfers scheduled for overlapping times, the top-most scheduled item always takes precedence.
To schedule transfers or greetings
|
1
|
In the User/Group Management applet, in the Auto Attendants view create a new auto attendant or double-click an existing auto attendant to edit it. The Auto Attendant dialog opens. |
|
2
|
Click the Scheduled Actions tab. |
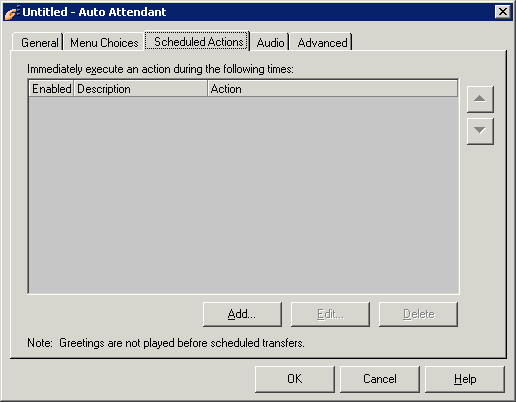
The following table shows the information that is displayed for each scheduled action already defined for this auto attendant.
|
|
If checked, the action will be performed as scheduled. If unchecked, the action is temporarily disabled.
|
|
|
Time period during which the action will be performed.
|
|
|
Action that will be performed.
|
|
3
|
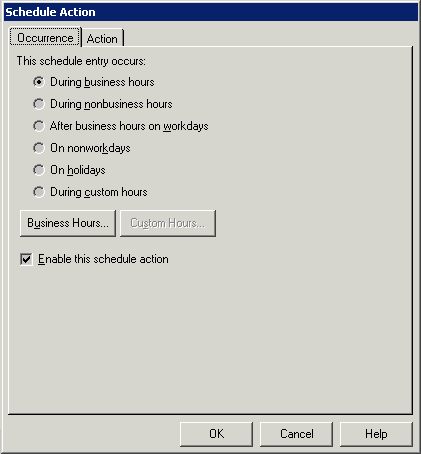
Click Add to schedule a new action, or click Edit to modify the selected action. The Schedule Action dialog opens. |
|
4
|
On the Occurrence tab, select one of the periods of time during which the action will occur. |
Note: If your system uses several sets of business hours, click Business Hours before you click OK in the Schedule Action dialog and verify that the action will take place according to the set of business hours that you want to use.
If you choose During custom hours, click Custom Hours and set your hours in the dialog that opens.
|
5
|
Check Enable this schedule action to activate this action as soon as you save the auto attendant. If unchecked, the action is temporarily disabled. |
|
7
|
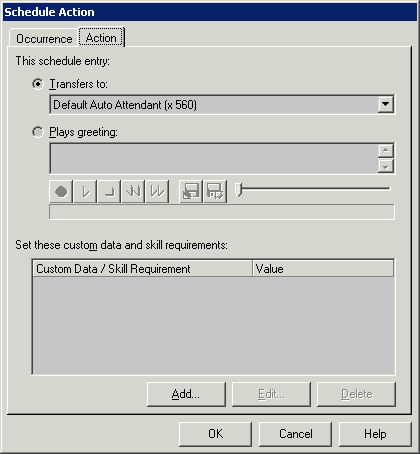
Under This schedule entry, select the action that the auto attendant will perform immediately when a call arrives during the period covered by the schedule entry: |
|
•
|
Transfers to. Immediately transfers callers to the extension that you select from the drop-down list during the scheduled time period. |
|
•
|
Plays greeting. Immediately plays the greeting that you record during the scheduled time period. |
|
8
|
Using the Set these custom data and skill requirements section, you can have the auto attendant automatically attach custom data variables or apply skill requirements to all calls handled by the schedule rule. |
|
9
|
Click OK. The Schedule Action dialog closes. |
|
10
|
On the Scheduled Actions tab in the Auto Attendant dialog, use the arrows to move a scheduled transfer or greeting to a different position on the list. If you have two greetings or two transfers scheduled for overlapping times, the one that is at the top of the list will be used. If a greeting and a transfer are scheduled for the same time, the greeting is not played. |
|
11
|
Click OK in the Auto Attendant dialog to save your changes. |
The Default Auto Attendant
Configuring an auto attendant
Creating a new auto attendant
Defining menu choices
Customizing login behavior from auto attendants
Avoiding the auto attendant ambiguous dialing delay
Setting up an auto attendant’s hold music and greetings
Setting up custom data and skill requirements for an auto attendant
Deleting an auto attendant
Configuring the trunk group for the auto attendant extension
Configuring calls to be forwarded to the RNA forwarding target
Setting up an auto attendant’s hold music and greetings
You use this tab to do the following:
|
•
|
Configure a music-on-hold source for the auto attendant. Each auto attendant can have its own music-on-hold source as described below, or default to the system source (see Configuring Music On Hold.). A caller hears this music while the auto attendant is transferring him or her to an extension and continues to hear it while on hold until reaching a part of Wave that uses different hold music, such as a Contact Center queue or another auto attendant that has different hold music settings. |
Important! In some call scenarios (calls handled by certain SIP carriers, and calls transferred to an external number), the caller will not hear music on hold, only silence, no matter what you specify here.
|
•
|
Record greetings for the auto attendant. You can record multiple greetings for an auto attendant for use at different times of day, after hours, on holidays, and so forth, and make any one of them the active greeting. |
To set up hold music and greetings for an auto attendant
|
1
|
In the User/Group Management applet, in the Auto Attendants view create a new auto attendant or double-click an existing auto attendant to edit it. The Auto Attendant dialog opens. |
|
3
|
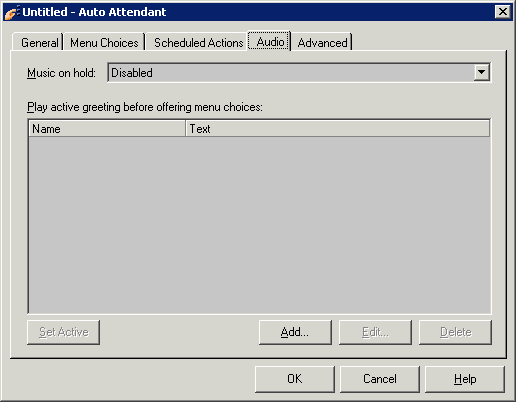
Select the Music on hold source you want to use for this auto attendant from the drop-down list. |
|
•
|
(Use system default). Use the system-wide hold music source as specified in the General Settings applet. |
|
•
|
Disabled. Do not play music to callers on hold. |
Hint: It is highly recommended that you specify a music-on-hold source or use the system default so that a caller does not hear extended ringing or silence, which may result in a hang-up.
|
•
|
External (Audio Input Jack). Play hold music from an external device, typically a CD player, radio, or specialized music-on-hold device. |
|
•
|
Song n (<song title>). Play the selected WAV file to callers on hold. |
Note: The system default music-on-hold source (if specified) as well as the other items listed in this drop-down list are set up via the General Settings applet. For more information, see Configuring Music On Hold.
|
4
|
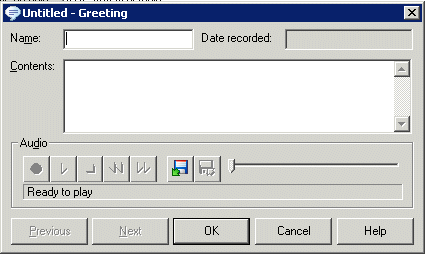
To record a new greeting to be played to callers who reach the auto attendant, click Add. (To re-record an existing greeting, select it and click Edit.) The Greeting dialog opens. |
|
5
|
Enter the following information about the greeting: |
|
•
|
Name. Greeting name, for example “After Hours - Holiday Season”. |
|
•
|
Contents. Text of the greeting or a description of it, for example “Includes extended holiday shopping hours”. |
The date and time when the greeting was recorded or last edited is displayed in the Date recorded field.
|
7
|
Click OK to save the greeting. The new greeting is added to the list of all greetings that have been recorded so far. |
|
8
|
Select a greeting and click Set Active to make it the active greeting to be played when a caller reaches this auto attendant, before any of the auto attendant’s menu choices are played to the caller. |
The Default Auto Attendant
Configuring an auto attendant
Creating a new auto attendant
Defining menu choices
Customizing login behavior from auto attendants
Avoiding the auto attendant ambiguous dialing delay
Scheduling transfers and greetings
Setting up custom data and skill requirements for an auto attendant
Deleting an auto attendant
Configuring the trunk group for the auto attendant extension
Configuring calls to be forwarded to the RNA forwarding target
Setting up custom data and skill requirements for an auto attendant
Custom data and skill requirements are extra information attached to a call. Whenever a call is handled by the auto attendant, you can attach custom data variables and/or Contact Center queue agent skill requirements to the call with the values you define. These values can then be seen by users or used to automate call handling.
Note: You can also attach custom data variables and skill requirements at the menu choice level, as opposed to the auto attendant level described here. See Defining menu choices.
To set up custom data or skill requirements for an auto attendant
|
1
|
In the User/Group Management applet, in the Auto Attendants view create a new auto attendant or double-click an existing auto attendant to edit it. The Auto Attendant dialog opens. |
|
2
|
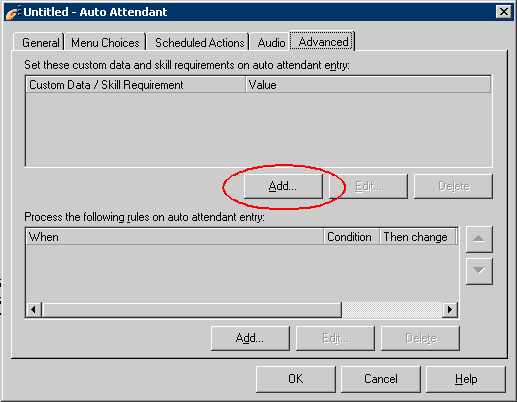
Click the Advanced tab. To set the value for one or more custom data variables or Contact Center queue skill requirements whenever this auto attendant handles a call, click Add. |
|
3
|
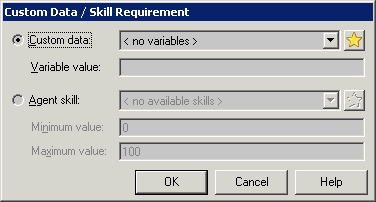
The Custom Data / Skill Requirement dialog opens. |
|
•
|
To attach a custom data variable to all calls handled by this auto attendant, click Custom data, select the variable from the drop-down list, then enter the value to be assigned to the variable when the menu choice is selected. To create a new custom data variable, click  . . |
|
•
|
To attach a Contact Center queue skill requirement to all calls handled by this auto attendant, click Agent skill and then select the skill from the drop-down list. To create a new skill, click  . . |
For Minimum value and Maximum value, enter the range (from 0 to 100) that an agent’s skill value must be within to qualify for taking the call.
For complete information on creating custom data variables and Contact Center skill requirements, see the Wave Contact Center Administrator Guide.
The Default Auto Attendant
Configuring an auto attendant
Creating a new auto attendant
Defining menu choices
Customizing login behavior from auto attendants
Avoiding the auto attendant ambiguous dialing delay
Scheduling transfers and greetings
Setting up an auto attendant’s hold music and greetings
Deleting an auto attendant
Configuring the trunk group for the auto attendant extension
Configuring calls to be forwarded to the RNA forwarding target
Deleting an auto attendant
To delete an auto attendant, in the User/Group Management applet, right-click the auto attendant and then select Delete.
Important! A warning is displayed if you try to delete an auto attendant that is currently being used as a target location of any kind, for example “This auto attendant is currently being used as a routing list target: [Name] (extension). Edit or delete these locations before deleting this auto attendant.”
The warning is displayed if you try to delete an auto attendant that is currently being used as any of the following:
|
•
|
Forward-to extension: [Name] (extension) |
|
•
|
Intercept destination: [Name] (Trunk Group) |
|
•
|
Also ring extension: [Name] (Trunk Group) |
|
•
|
Call notification: [Name] (extension, Cascading Notification Rule: [Rule Name]) |
|
•
|
Call notification: [Name] (extension) |
|
•
|
Routing List target: [Name] (extension) |
|
•
|
Menu choice for Auto Attendant: [AA Name] extension) |
|
•
|
ViewPoint group member: [Group Name] |
|
•
|
Operator: [Name] (extension) |
The Default Auto Attendant
Configuring an auto attendant
Creating a new auto attendant
Defining menu choices
Customizing login behavior from auto attendants
Avoiding the auto attendant ambiguous dialing delay
Scheduling transfers and greetings
Setting up an auto attendant’s hold music and greetings
Setting up custom data and skill requirements for an auto attendant
Configuring the trunk group for the auto attendant extension
Configuring calls to be forwarded to the RNA forwarding target
Configuring the trunk group for the auto attendant extension
After creating auto attendants, or even if you are using only the default auto attendant, you should configure the Trunk Group to correctly route the auto attendant extension.
There are some advanced uses for auto-attendants that may not require that they be routed through a trunk group, for example internal auto-attendants, auto-attendants that route to other auto-attendants, auto-attendants that are scheduled in other auto-attendants, and so forth.)
To configure the trunk group for an auto attendant
|
1
|
If necessary, click the Administration tab of the Management Console. |
|
2
|
Click Trunk Groups, locate din the Trunk Administration section. |
|
3
|
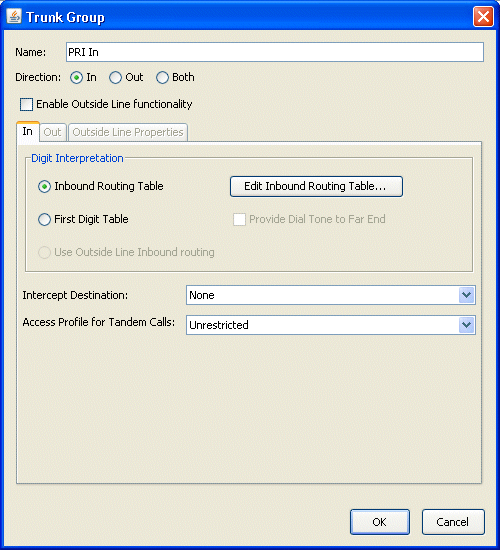
Select the trunk group you are using for phone lines, and then click Edit. The Trunk Group dialog opens at the In tab. |
|
4
|
Choose one of the following methods to route calls to the auto attendant: |
|
•
|
For simple routing, set Intercept Destination to the auto attendant. |
|
•
|
For scheduled routing, click Edit Inbound Routing Table, click Add, and in the Destination cell enter the auto attendant’s extension. Then use the other fields to set route calls according to the schedule you want. |
For more information about the Inbound Routing table, see Configuring inbound routing tables.
|
5
|
Click OK until you return to the Management Console. |
The Default Auto Attendant
Configuring an auto attendant
Creating a new auto attendant
Defining menu choices
Customizing login behavior from auto attendants
Avoiding the auto attendant ambiguous dialing delay
Scheduling transfers and greetings
Setting up an auto attendant’s hold music and greetings
Setting up custom data and skill requirements for an auto attendant
Deleting an auto attendant
Configuring calls to be forwarded to the RNA forwarding target
Configuring calls to be forwarded to the RNA forwarding target
Select the Use Forwarding Target of Last Destination in Chain check box in the General Settings applet, PBX (Advanced) tab to specify that calls are forwarded to the ring no answer (RNA) forwarding target of the last destination in a chain of calls.
The following illustration shows call flow if the Use Forwarding Target of Last Destination in Chain checkbox is selected:
When this check box is selected, calls flow as follows:

The following illustration shows call flow if the Use Forwarding Target of Last Destination in Chain checkbox is not selected:
When the check box is not selected, calls flow as follows:

Note: Calls forwarded to Voice Mail are always forwarded to the Voice Mail of the dialed number.
To configure calls to be forwarded to the RNA destination of the last destination:
|
1
|
If necessary, click the Administration tab of the Management Console. |
|
2
|
Click General Settings, located in the General Administration section. |
|
3
|
Select the PBX (Advanced) tab. |
|
4
|
Select the Use Forwarding Target of Last Destination in Chain check box. |

|
5
|
Click Apply to save your changes. |
|
6
|
Click Done to return to the Management Console. |
The Default Auto Attendant
Configuring an auto attendant
Creating a new auto attendant
Defining menu choices
Customizing login behavior from auto attendants
Avoiding the auto attendant ambiguous dialing delay
Scheduling transfers and greetings
Setting up an auto attendant’s hold music and greetings
Setting up custom data and skill requirements for an auto attendant
Deleting an auto attendant
Configuring the trunk group for the auto attendant extension


 .
.  .
. 


 .
.  .
. 


