Open topic with navigation
1. Configuring Inbound Call Routing
The following topics describe how to configure inbound call routing on the Wave Server:
Configuring trunk groups for inbound call routing
To configure trunk groups for inbound call routing
|
1
|
If necessary, click the Administration tab of the Management Console. |
|
2
|
Click Trunk Groups, located in the Trunk Administration section. |
|
3
|
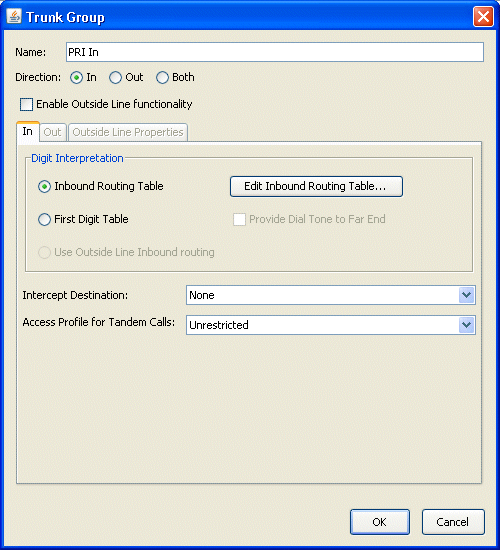
Select and edit a trunk group for inbound call traffic. The Trunk Group dialog opens. |

|
4
|
On the In tab, specify how to interpret received digits from an inbound call: |
|
•
|
Inbound Routing Table. Select this option if Wave will be receiving calls from a central office switch. If you choose this option, refer to Configuring inbound routing tables, for detailed instructions about setting up your inbound routing tables. Click Edit Inbound Routing Table to make changes to the table. |
|
•
|
First Digit Table. Select this option if Wave will be receiving calls from another PBX, rather than from a central office switch. Refer to “Configuring extension ranges” on page 1-1, for detailed instructions about setting up the First Digit Table. |
Check the Provide Dial Tone check box if Wave must provide dial tone to the far end.
|
•
|
Use Outside Line Inbound Routing. This field is only enabled if this is an outside line-enabled trunk group. If this option is selected, inbound calls to associated digital phones will be terminated with no digit manipulation. See {paranum[TitleNumChap]} for more about creating outside line-enabled trunk groups. |
|
5
|
In the Intercept Destination field, enter the extension or hunt group to which you want to send calls that cannot be routed using Inbound Routing Table rules. All calls received on this inbound trunk group that fail for any reason will be sent to the station or hunt group that you specify. Examples of failed calls are a misdialed number or an external number that is blocked by this trunk group’s tandem access profile. |
Note: If you select None, callers who cannot be routed simply hear a fast-busy tone.
Caution! Do not configure the Wave Server to route inbound calls to the Intercept Destination by default. This might cause your calls to be routed incorrectly. If you would like to create a true inbound call default destination, create a default step in the inbound routing table.
|
6
|
Select None if your call routing does not provide for tandem (or trunk-to-trunk) calls, and go to step 7. |
Important! This step only applies if you have configured the Wave Server for tandem call routing.
To restrict the use of the Wave Server in a tandem call routing configuration to prevent toll fraud, select the Access Profile for Tandem Calls from the drop-down list. (For information about tandem calls, see “Tandem call routing” on page 1-1.)
If you configure the Wave Server to handle tandem calls, you must also select the Allow External Trunk-to-Trunk Connections option in the General Settings applet, PBX (Advanced) tab, Trunking group box. In this scenario, a call is physically connected across two external trunks through the Wave Server. If you enable external trunk-to-trunk connections, the Wave Server allows calls to be forwarded, transferred, and conferenced between external numbers.
Note: Trunk-to-trunk connections involving analog loop-start trunks are not included in this option by default because such connections may not terminate properly even when a call is completed, resulting in a trunk remaining unavailable even when it is not actively being used. It is recommended that you accept this default.
Note: If your particular needs require that users be able to make analog loop-start external trunk-to-trunk connections, make the following additional settings in the Trunking group box:
|
•
|
Select the Allow Analog Loop-Start Trunk-to-Trunk Connections option. |
|
•
|
Choose a maximum duration for trunk-to-trunk connections from the Trunk-to-Trunk Maximum Connect Time (Minutes)drop-down list. This setting limits the amount of time a trunk may be unavailable when not actively being used, but it also determines the maximum duration of active calls. Be sure to choose a setting that won’t result in active calls being cut off prematurely. |
|
7
|
Click OK to save your changes. |
Inbound call routing
Configuring inbound routing tables
Configuring extension ranges
Tandem call routing
Configuring inbound routing tables
For information about and examples of inbound routing tables, see “Inbound call routing” on page 1-1.
To configure an inbound routing table
|
1
|
If necessary, click the Administration tab of the Management Console. |
|
2
|
Do one of the following: |
|
•
|
Click Trunk Groups, located in the Trunk Administration section. On the In tab, click Edit Inbound Routing Table. |
|
•
|
Click IP Telephony, located in the PBX Administration section. Select the Call Recording folder, and then click Edit Inbound Routing table. |
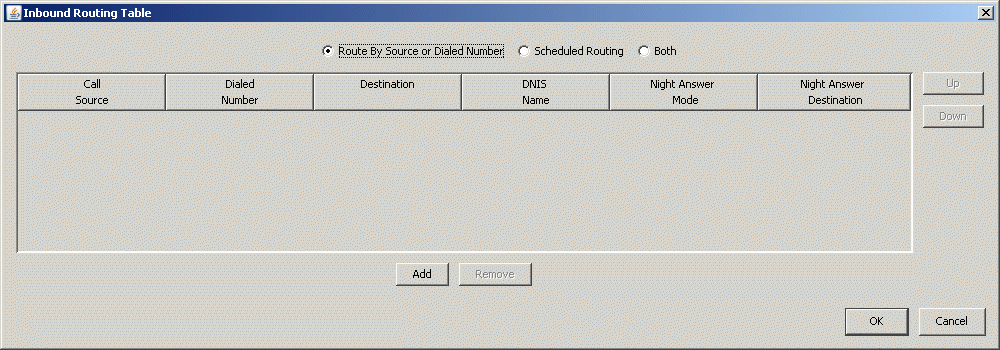
The Inbound Routing Table dialog opens.

|
3
|
Select one of the following routing methods for the routing rules in the inbound routing table. |
Warning! It is generally recommended that you use the "Both" method all the time. This is because any routing rules entered and saved in the inbound routing table will be lost if you change to another routing method at a later time. (For example, if you initially set up the inbound routing table rules using the “Route By Source” method and then want to change to use “Scheduled Routing” , the data in the routing table will be deleted when the new method is selected.) When you select "Both" when you set up your inbound routing table rules, you have access to all routing method fields available when you choose either of the other methods, and you do not run the risk of having to re-enter all of your routing rules if they get deleted when you change methods.
|
•
|
Route By Source or Dialed Number. Using this setting you can decide how calls on this trunk group get routed based on the Caller ID (or ANI) sent with the call, or the digits the caller dialed (DID, Lead Telephone Number, or DNIS). |
|
•
|
Scheduled Routing. Use this format to set time and day restraints on the destination to which inbound calls from the specified trunk are routed. This choice is ideal for trunks that receive no digits and require no translation. |
|
•
|
Both. This setting is ideal if calls to the main company number and all numbers are sent to the same trunk group. This setting also gives you access to all routing method fields available when you choose Route By Source or Dialed Number or Scheduled Routing. |
|
4
|
Click Add to insert a new rule into the table. |
|
•
|
If you selected Scheduled Routing in step 3: |
|
•
|
Select the checkboxes for any days of the week when you want this rule to be applied. |
|
•
|
Select times in the Start Time and End Time fields during which you want this rule to be applied. |
|
•
|
If you selected Route By Source or Dialed Number in step 3, click the appropriate table cells to enter values in the following columns: |
|
•
|
Call Source. No value required. May be any string of digits representing Caller ID or ANI source number. |
|
•
|
Dialed Number. “Default” (wildcard value, indicating that any number received, of any length, is accepted.), or contains a string of zero or more digits, followed by a string of 0 or more x characters. This string may be as large as 32 characters. The dialed number column directly represents the digits expected to be sent from the CO with an inbound call. For example, enter a three-digit number beginning with a 2 as the value 2xx. |
|
•
|
If you selected Both in step 3, you can create a rule using any of the fields described for the other 2 methods. |
|
5
|
Enter the destination information. |
|
•
|
Destination. Contains a string of zero or more digits, followed by a string of 0 or more x's. This string may be as large as 32 characters. This number is interpreted as if dialed from an internal station. For example, enter a three-digit extension number beginning with a 1, as the value 1xx. If the destination is an external telephone number, append the external access digit (configured in the First Digit Table) before the telephone number. |
|
•
|
DNIS Name. No value required. If the value in the Dialed Number field is a DNIS number, enter a description up to 32 characters long. This description overwrites the calling party (call source) information and is displayed on the display panel of the destination extension. This string identifies the number that the caller dialed. |
|
6
|
Enter one of the following Night Answer modes from the drop-down list. |
|
•
|
Not Used. Disables the Night Answer Mode |
|
•
|
Use System Default. Uses the Default Night Answer Destination specified in the General Settings applet |
|
•
|
User Defined. Uses the destination that you enter in the Night Answer Destination field and overrides the system default specified in the General Settings applet |
|
7
|
Select a rule, and click Up and Down to rearrange the rule order. |
If you selected Scheduled Routing in step 3 and there is overlap in the schedule, the rules must appear in order of precedence.
|
8
|
Click OK to return to the host applet. |
|
9
|
Click Apply to save your changes. |
|
10
|
Click Done to return to the Management Console. |


