1. Initial Call Routing Configuration
The following topics describe how to configure initial call routing options on the Wave Server:
| • | About the First Digit Table |
| • | Configuring extension ranges |
| • | Setting the home area code |
| • | Configuring 10-digit dialing |
| • | Configuring the VoiceMail extension |
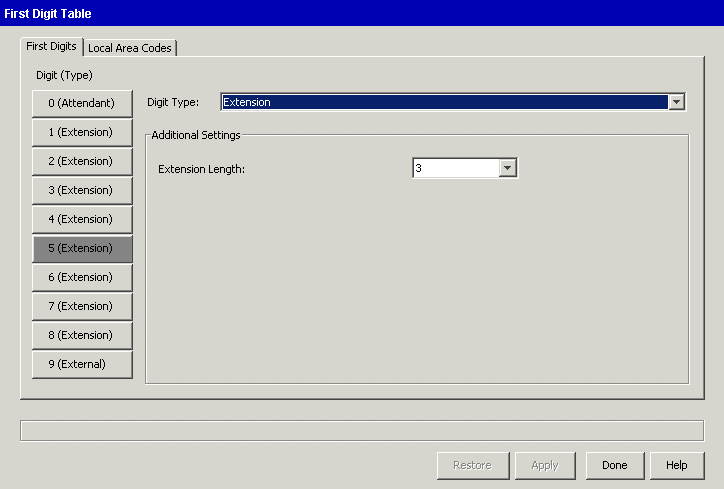
First Digit Table settings are used to assign telephone dial pad numbers 0 to 9 to various call types--including internal, external, off-premise, and attendant--based on the call destination. The First Digit Table settings affect many other Wave settings for trunks, the PBX, extensions, AutoAttendant, and Voice Mail.
The First Digit table is preconfigured with the most commonly-used settings—9 for an external line, 0 for the company operator, and so forth. If the default first digit settings listed below are satisfactory, you do not need to reconfigure the First Digit Table applet.
Caution! Any changes you want to make to the first digit table defaults should be made before trunk and PBX configuration.
|
FIRST DIGIT TABLE DEFAULT SETTINGS |
||
|
First Digit |
Default Setting |
Use |
|
0 |
Attendant |
Instructs the PBX to connect to the system operator. The system operator extension is specified when you configure the Attendant hunt group via the Hunt Groups applet. |
|
1, 5 |
Extension |
Instructs the PBX to connect calls beginning with these digits to an internal or off-premise extension of the length defined. |
|
2, 3, 4, 6, 7, 8 |
Not configured |
Instructs the PBX that calls beginning with these digits are not valid. If a user dials a first digit that has not been configured, the PBX plays a “fast busy” signal immediately to indicate that the first digit dialed is invalid. |
|
9 |
External |
Instructs the PBX that an outbound, external call (to be routed through the Central Office) is beginning. For example, the default 9 requires all users to press 9 on their telephone dial pad before dialing any number outside the building on the public switched telephone network (PSTN). You can change the External access code to any number between 1 and 9 |
| • | Configure extension ranges. See Configuring extension ranges. |
| • | Set the home area code. See Setting the home area code. |
| • | Configure 10-digit dialing. See Configuring 10-digit dialing. |
| • | Configure the external first digit for outbound call routing. See Configuring the external first digit. |
You use the User/Group Management applet to configure the VoiceMail extension. See Configuring the VoiceMail extension.
In this task you will configure the digits extensions can begin with, and the number of digits in extension numbers.
The default ranges for extensions are as follows:
| • | User extensions are 100-199 (first digit 1, length 3) |
| • | System extensions are 500-599 (first digit 5, length 3) |
For example, Wave Server modems are preconfigured to use extension 570.
Note: If you have already configured extensions, and you want to change the extension length, you must first delete all the extensions, hunt groups, and voice mailboxes that begin with the first digit in the range you want to modify.
To configure extension ranges
| 1 | If necessary, click the Administration tab of the Management Console. |
| 2 | Click First Digit Table, located in the PBX Administration section. |
| 3 | The First Digit Table applet starts. |
| 4 | Select one of the Digit (Type) buttons from the left side of the applet, and then select Extension from the Digit Type drop-down list. |

| 5 | Select an extension length between 2 and 7 digits from the Extension Length drop-down list. For example, selecting Digit 1 with an extension length of 3 will provide you with extension numbers in the range 100-199. |
| 6 | Click Apply to save your changes. |
| 7 | Click Done to return to the Management Console. |
When the user dials a seven-digit local telephone number, automatic route selection uses the home area code to find a matching rule in the area code tables.
Note: If you change the Wave Server system locale setting), you may need to update existing area codes to reflect the lengths allowed for the new locale.
To specify your home area code
| 1 | If necessary, click the Administration tab of the Management Console. |
| 2 | Click First Digit Table, located in the PBX Administration section. |
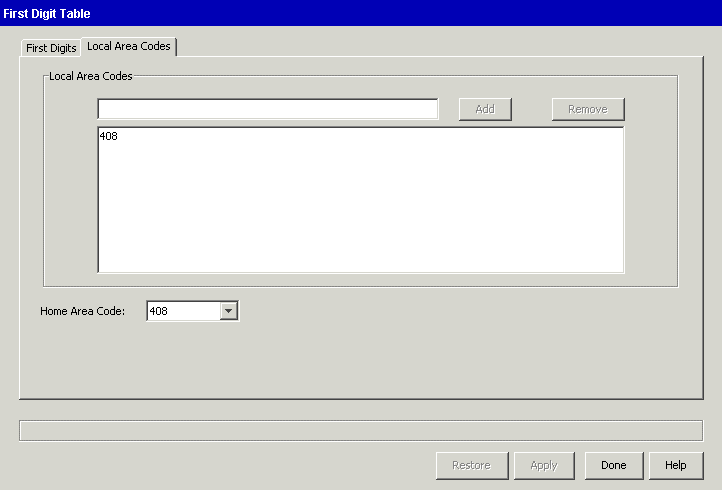
| 3 | Click the Local Area Codes tab. |

| 4 | Enter your home area code in the Local Area Codes text box, and then click Add. |
The area code is displayed in the list below the field.
Do not specify any additional area codes unless your calling area requires 10-digit dialing for local area codes. See Configuring 10-digit dialing.
The area code that you enter is also displayed in the Home Area Code drop-down list.
| 5 | Select your Home Area Code from the drop down list. |
| 6 | Click Apply to save your changes. |
| 7 | Click Done to the Management Console. |
Configure 10-digit dialing when certain telephone numbers that include the area code do not require that a 1 be dialed before dialing the telephone number.
To configure 10-digit dialing
| 1 | If necessary, click the Administration tab of the Management Console. |
| 2 |
 Click First Digit Table, located in the PBX Administration section. Click First Digit Table, located in the PBX Administration section. |
| 3 | Click the Local Area Codes tab. |
| 4 | Enter each area code in the Local Area Codes text box, and click Add to add it to the list. |
Note: If you must dial a 1 before using an area code, do not enter that area code in the Local Area Codes list.
Note: Be sure that your home area code is selected in the Home Area Code drop-down list.
| 5 | Click Apply to save your changes. |
| 6 | Click Done to return to the Management Console. |
Note: In some cases you might want to have users dial ten digits but your service provider requires 11 digits for calls to specific area codes. You will need to add a 1 to the number before placing the call. To configure this digit manipulation, see Configuring outbound routing tables.
Configuring the VoiceMail extension
The VoiceMail default extension (550) is adequate for most Wave configurations, If you want to use a different extension number to access voicemail, perform the following steps.
To configure the VoiceMail extension
| 1 | If necessary, click the Administration tab of the Management Console. |
| 2 | Click User/Group Management, located in the PBX Administration section. |
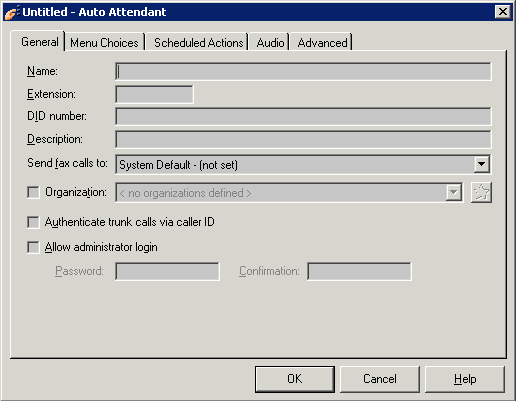
| 3 | Click File > New > Auto Attendant. |

| 4 | Enter the following information on the General tab: |
| • | Name. Required. Descriptive name for the new auto attendant, for example, “VoiceMail”. |
| • | Extension. Required. Extension used to access VoiceMail. |
| 5 | Click OK to close the Auto Attendant dialog. |
| 6 | Click Done to return to the Management Console. |
| 7 | Click General Settings, located in the General Administration section. |
| 8 | In the General Settings dialog, click the System tab and then select the newly-created auto attendant from the Voice Mail System drop-down list. |
| 9 | Click Apply to save your changes. |
| 10 | Click Done to return to the Management Console. |