Open topic with navigation
1. Configuring Outbound Call Routing
Outbound call routing determines how calls that originate within Wave Server and that terminate at an external destination are handled.
You use the Outbound Call Routing applet to perform the following tasks:
Configuring automatic route selection
To set up your Wave Server for automatic route selection, you need to complete the following tasks:
Configuring the external first digit
In this task you will configure an external first digit for outbound call routing by automatic route selection.
To configure the external first digit
|
1
|
If necessary, click the Administration tab of the Management Console. |
|
2
|
Click First Digit Table, located in the PBX Administration section. |
|
3
|
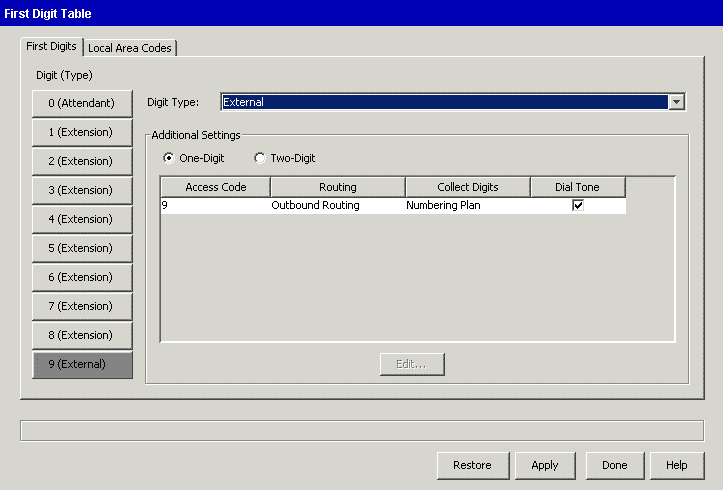
Select a Digit (Type) button and set Digit Type to External. |
The external digit configuration options appear in the Additional Settings
group box.
|
4
|
Specify whether you want this first digit to support One-Digit or Two-Digit external dialing. |
If you select Two-Digit external dialing, access codes x0 through x9 (where x is the first digit) appear in the Additional Settings table.
|
5
|
Check to make sure the settings for the access code (or for each access code, if Two-Digit support is selected) are as follows. If not, double-click the access code to display the Edit External Access Code dialog and make the necessary changes. |
|
•
|
Routing. Leave this option set to the default of Outbound Routing. |
|
•
|
Collect Digits. Leave this option set to the default of Numbering Plan. |
This setting automatically selects the numbering plan for your locale. For North America this is the North American Numbering Plan (NANP).
|
•
|
Dial Tone. If you want Wave to provide a dial tone when the external digit or digits are dialed, leave the Dial Tone check box selected. If not, deselect the check box. |
|
6
|
Click Apply to save your changes. |
|
7
|
Click Done to return to the Management Console. |
Configuring how first digit extensions appear in ViewPoint
Automatic Line Selection
Configuring automatic route selection
Configuring the Global Access Profile
Configuring specific access profiles
Configuring outbound routing tables
Outbound call routing
Configuring how first digit extensions appear in ViewPoint
You can give an external first digit a name, to make it easier for users to select in ViewPoint. You can also hide an external first digit so that it does not appear in ViewPoint and cannot be dialed. Hiding first digits can be useful when you want to use them for testing purposes.
To configure an external first digit for ViewPoint
|
1
|
If necessary, click the Administration tab of the Management Console. |
|
2
|
Click User/Group Management, located in the PBX Administration section. The User/Group Management applet opens. |
See User/Group Management roadmap for information about navigating in the User/Group Management applet.
|
3
|
Click the Dialing Services icon in the view bar. The Dialing Services view opens, displaying all external first digits that you have defined so far. |
|
4
|
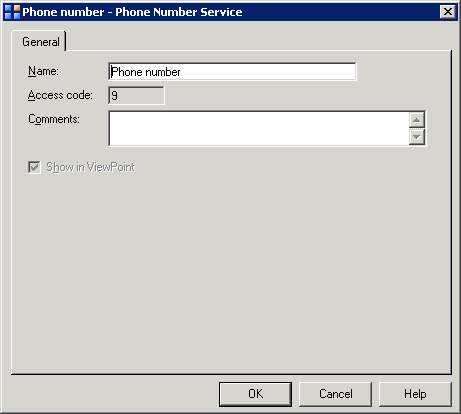
To edit a dialing service, double-click it in the view. The Dialing Service dialog opens. |
|
5
|
Type the dialing service Name. |
|
6
|
Add any notes about the dialing service in Comments. |
|
7
|
Select the Show in ViewPoint checkbox if you want this dialing service to be available for use in all Call Using lists in ViewPoint. |
Automatic Line Selection
Configuring automatic route selection
Configuring the external first digit
Configuring the Global Access Profile
Configuring specific access profiles
Configuring outbound routing tables
Outbound call routing
Configuring the Global Access Profile
Wave examines the Global Access Profile settings prior to examining the specific access profile for an outbound call.
Note: To support automatic dialing from ViewPoint over analog phone lines, you must reconfigure the Global Access Profile. For instructions, see Configuring the Area Code table for ViewPoint analog dialing.
To edit the Global Access Profile
|
1
|
If necessary, click the Administration tab of the Management Console. |
|
2
|
Click Outbound Routing, located in the Trunk Administration section. |
|
3
|
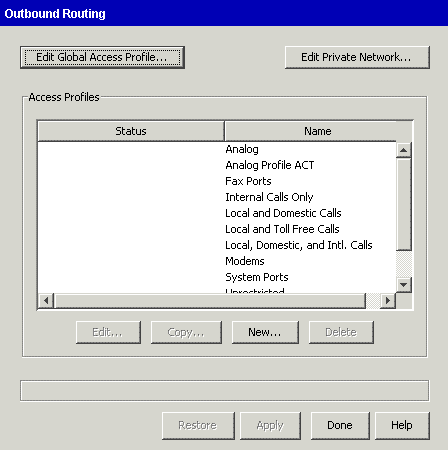
The Outbound Routing dialog opens: |
|
4
|
Click Edit Global Access Profile to open the Global Access Profile dialog. |
|
5
|
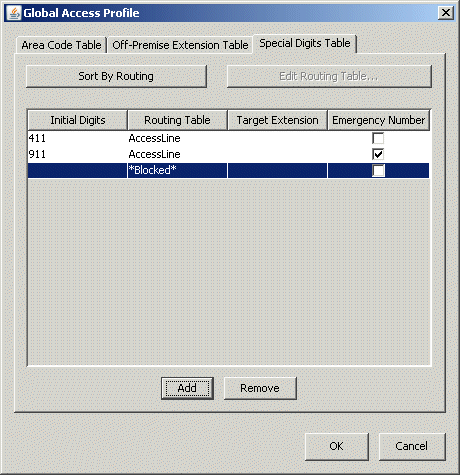
Click the Special Digits Table tab. You use the Special Digits Table to enter any digits or strings of digits that you want Wave to process before processing the rules in the other tables. |
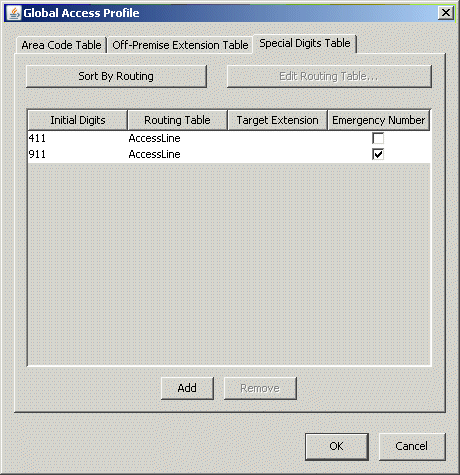
Note: The default emergency number for your locale (911 for North American systems and 112 for EU systems) is automatically configured as a special digit string and is routed to the Voice Analog routing table. For more about setting up emergency dialing via the Outbound Routing applet, see Setting up emergency dialing.
|
6
|
Click Add to add a new special digit string. A new row is added to the table. |
|
7
|
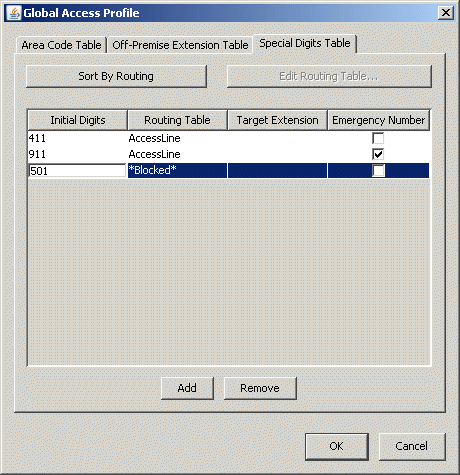
Double-click in the Initial Digits column in the new row to open a text box, and then enter the special digit string. |
|
8
|
To specify how to handle calls that start with this special digit string, click in the Routing Table column to open a drop-down list. |
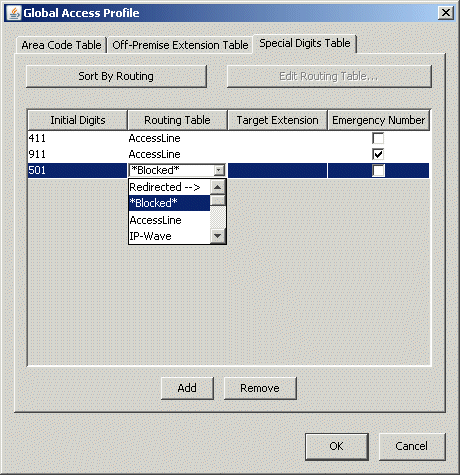
Select one of the following options from the drop-down list:
|
•
|
A routing table that has already been defined. Calls that start with this special digit string will be handled by the routing table that you select.
|
|
•
|
Redirected -->. Select this option to redirect calls that start with this special digit string to another extension. |
|
•
|
*Blocked*. Select this option to block all calls that start with this special digit string. |
|
•
|
(New Routing Table). Select this option to create a new routing table to handle calls that start with this special digit string. See Configuring outbound routing tables for more information. |
|
9
|
If you selected Redirected --> in the previous step, click in the Target Extension column to open a drop-down list, and then select the extension to which you want to redirect the call. |
|
10
|
Click Sort By Routing to arrange the rules in the order they should be applied during outbound call routing. |
|
11
|
Select the Area Code Table tab. |
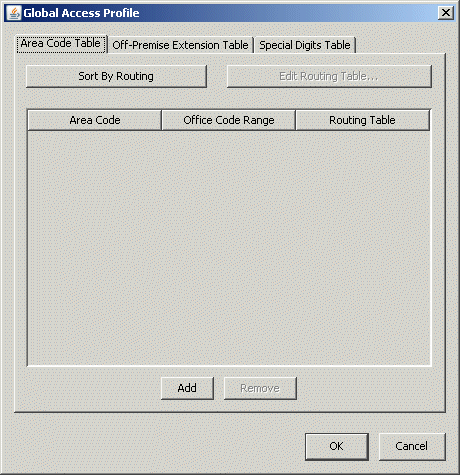
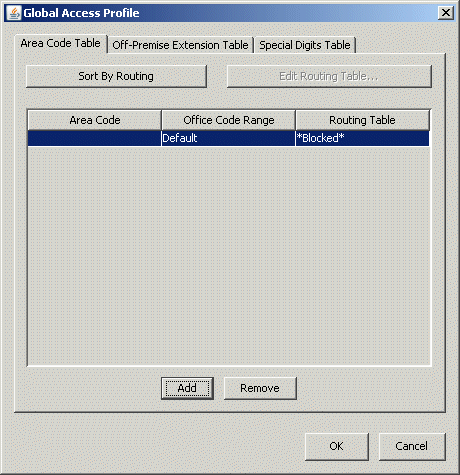
The Area Code Table is where Wave looks for matching area codes or office codes (or combinations of area and office codes) to determine how to route calls containing those numbers. You can use the Global Access Profile Area Code Table to block undesirable toll calls.
The rules that you specify in the Global Access Profile Area Code Table override the rules that you set for the specific access profiles area code tables you will configure later in this section. If you want to block or route certain numbers for all users in the system, enter the rules in this table.
|
12
|
Click Add to add an entry to the Global Access Profile Area Code Table. A new row is added to the list. |
|
13
|
To enter the Area Code and Office Code Range for the new area code, double-click in each column in the new row, and then enter the codes for which you are providing routing instructions. |
|
•
|
Area Code. Enter the area code for which you want to specify routing instructions that apply to all outgoing calls. You might want to add an entry to block outbound calls with an area code of 900. Enter Default to allow all area codes. |
|
•
|
Office Code Range. Enter the office code (or a range of office codes) within the specified area code. Enter Default to match any office code within the specified area code. |
|
14
|
Click in the Routing Table column to open a drop-down list. |
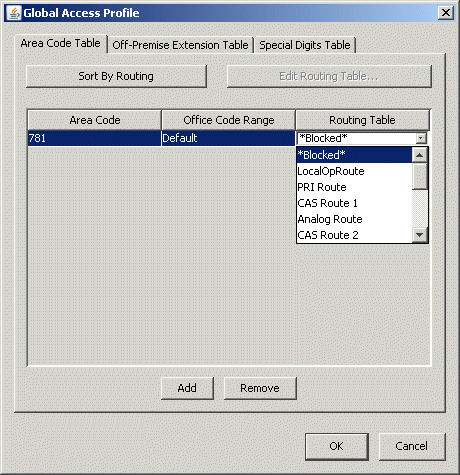
Select one of the following options from the drop-down list:
|
•
|
A routing table that has already been defined. Calls to this area code will be handled by the routing table that you select.
|
|
•
|
*Blocked*. Select this option to block all calls to this area code. |
|
•
|
(New Routing Table). Select this option to create a new routing table to handle calls to this area code. See Configuring outbound routing tables for more information for instructions. |
|
15
|
Repeat steps 12 through 14 to enter additional area code and office code routing entries. |
|
16
|
Click Sort By Routing to arrange the rules in the order they should be applied during outbound call routing. |
|
17
|
When you are finished editing the Global Access Profile , click OK and save your changes. |
|
18
|
Click Apply to save your changes. |
|
19
|
Click Done to return to the Global Administrator Management Console. |
Configuring the Area Code table for ViewPoint analog dialing
Automatic Line Selection
Configuring automatic route selection
Configuring the external first digit
Configuring specific access profiles
Configuring outbound routing tables
Outbound call routing
Configuring the Area Code table for ViewPoint analog dialing
You must configure Wave as follows to support automatic dialing from ViewPoint over analog lines.
|
1
|
If necessary, click the Administration tab of the Management Console. |
|
2
|
Click Outbound Routing, located in the Trunk Administration section. The Outbound Routing applet opens. |
|
3
|
Click Edit Global Access Profile. The Global Access Profile dialog opens. |
|
4
|
Click the Area Code Table tab if it is not already selected. |
|
5
|
Add the following rules to the Area Code Table: |
|
•
|
To add support for 11-digit dialing for specific exchanges, add a new entry in the area code table, enter the area code and a range of Office Codes (exchanges), then create a new routing table and specify to keep the last 7 digits and to prepend 1+XXX where XXX is the area code. |
|
•
|
To add support for 10-digit dialing for specific exchanges, add another entry in the area code table, enter the area code, a non-overlapping range of Office Codes (exchanges), then create a new routing table and specify to keep the last 7 digits and to prepend XXX where XXX is the area code. |
|
•
|
To support 7-digit dialing for the remaining exchanges, add yet another entry in the area code table, enter the area code, leave the Office Code at “Default”, then create another routing table and specify to keep the last 7 digits and prepend nothing. |
Automatic Line Selection
Configuring automatic route selection
Configuring the external first digit
Configuring the Global Access Profile
Configuring specific access profiles
Configuring outbound routing tables
Outbound call routing
Configuring specific access profiles
Before going to the Outbound Routing applet, identify the different calling privileges that will be associated with groups of users. From the Outbound Routing applet, you can create, edit, copy, and delete access profiles that you can assign to specific extensions, trunk groups, digital connections, and SIP signaling control points (SCPs). You can edit the existing access profiles or create new ones.
To configure a specific access profile
|
1
|
If necessary, click the Administration tab of the Management Console. |
|
2
|
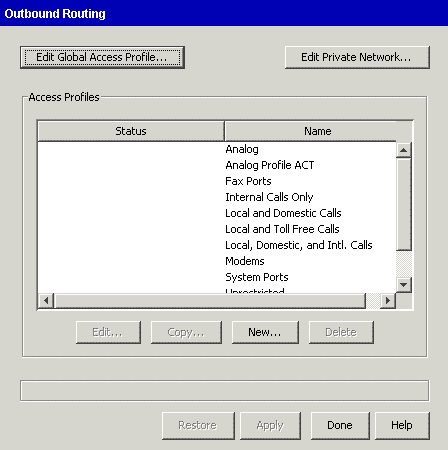
Click Outbound Routing, located in the Trunk Administration section. |
|
3
|
Select an access profile from the list, then click Edit, or click New to create a new access profile. |
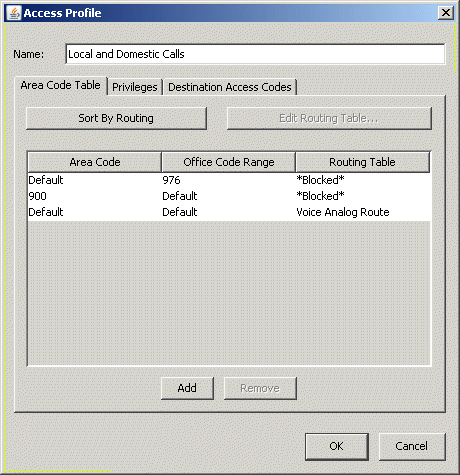
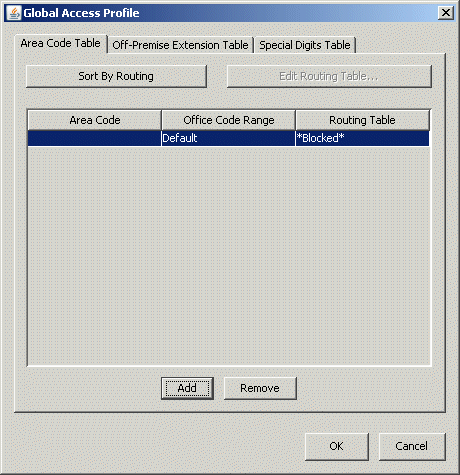
In the Area Code Table you can configure Wave to do the following:
|
•
|
Route calls that do not match rules in the Global Access Profile. |
|
•
|
Specify routing for area code and office code combinations. |
|
4
|
Click Add to add an entry to the Area Code Table. A new record is added to the list. |
|
5
|
Edit the Area Code and Office Code Range for the new area code by double-clicking in each field and entering the codes for which you are providing routing instructions. |
|
•
|
Area Code. Enter the area code for which you want to specify routing instructions that apply to all outgoing calls. You might want to add an entry to block outbound calls with an area code of 900. Enter Default to allow all area codes. |
|
•
|
Office Code Range. Enter the office code (or a range of office codes) within the specified area code. Enter Default to match any office code within the specified area code. |
|
6
|
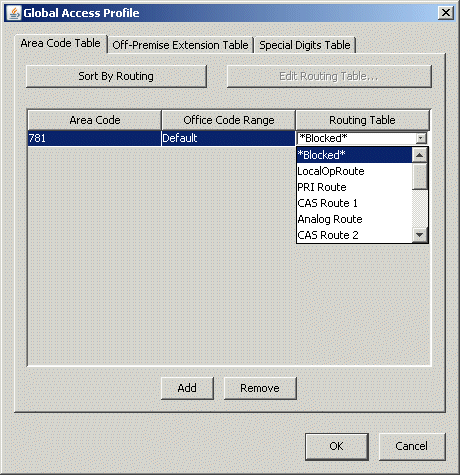
Click in the Routing Table column and select one of the following from the drop-down list: |
|
•
|
A routing table that has already been defined.
|
|
•
|
*Blocked*. Select this option to block all calls to the area or office code. |
|
7
|
Repeat steps 4 through 6 for additional area code and office code routing entries. |
|
8
|
Click Sort By Routing to arrange the rules in the order they should be accessed during call routing. |
|
9
|
Click the Privileges tab. |
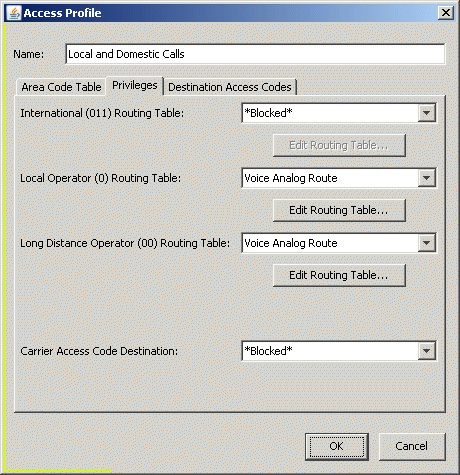
The Privileges tab is where you can specify the routing table to which Wave will send calls, depending on the call type. The call type is determined by the first digits entered in the telephone number. You can send calls to different routing tables depending on the following digit strings:
|
•
|
011 = International Routing Table |
|
•
|
0 = Local Operator Routing Table |
|
•
|
00 = Long Distance Operator Routing Table |
|
•
|
Carrier Access Code Destination = A carrier access code is a code (seven digits, beginning with 101) that you dial to access a long-distance carrier, for example 10-10-321. |
|
10
|
For International Routing Table, Local Operator Routing Table, and Long Distance Operator Routing Table, select one of the following from the drop-down list: |
|
•
|
A routing table that has already been defined.
|
|
•
|
*Blocked*. Select this option to block all calls to the area or office codes. |
To edit the currently-selected routing table, click Edit Routing Table to open the Routing Table dialog.
|
11
|
For Carrier Access Code Destination leave the *Blocked* option selected unless you want your users to dial carrier access codes. Otherwise, select one of the following from the drop-down list: |
|
•
|
A trunk group for the call. Note that you cannot assign a routing table to the carrier access code since no translation is required. |
|
•
|
*Ignored*. This option strips the carrier access code and routes the call as a regular long distance call. |
|
12
|
Click the Destination Access Codes tab. |
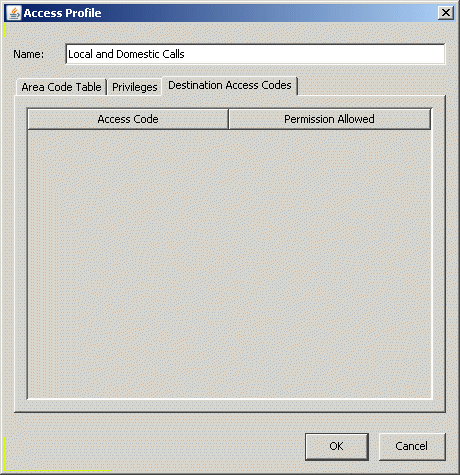
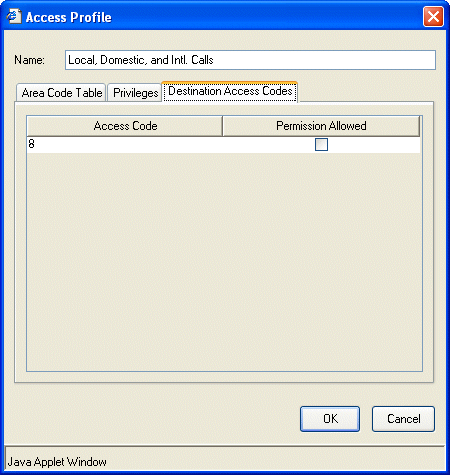
This tab allows you to specify which external access codes configured in the First Digit Table may be used by this access profile. External access codes may be used to provide access to external paging systems or specific trunks on the Wave Server. (If this tab is blank, you have not configured any external access codes in the First Digit Table.)
|
13
|
To allow users with the access profile you are creating or editing to use an access code, select the code in the list and select the Permission Allowed check box. To block users with this access profile from using the access code, leave the check box deselected. |
|
14
|
Click OK to close the Access Profile dialog. |
|
15
|
Click Apply to save your changes. |
|
16
|
Click Done to return to the Management Console. |
Automatic Line Selection
Configuring automatic route selection
Configuring the external first digit
Configuring the Global Access Profile
Configuring outbound routing tables
Outbound call routing
Configuring outbound routing tables
You can access outbound routing tables through the Outbound Routing applet.
To add or edit an outbound routing table
|
1
|
If necessary, click the Administration tab of the Management Console. |
|
2
|
Click Outbound Routing, located in the Trunk Administration section. |
|
3
|
Click an Edit Routing Table button or choose (New Routing Table) from any of the following places. |
|
•
|
Off-premise extension table |
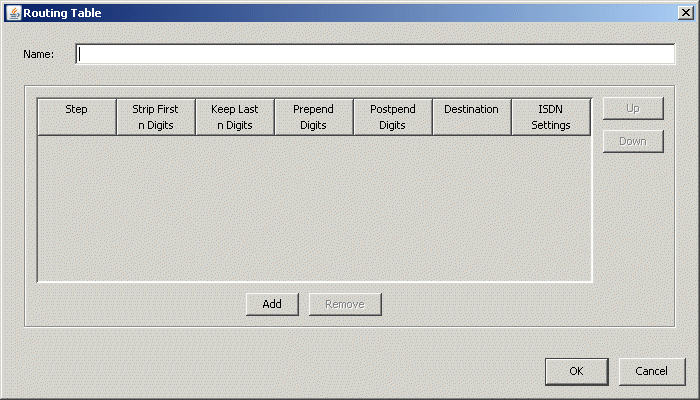
The Routing Table dialog opens.
|
4
|
If this is a new routing table, enter a descriptive Name. |
|
5
|
Click Add to add a new step to the routing table. |
|
6
|
For each step, you can click in the fields and edit the following settings, depending on the translation your CO requires. |
|
•
|
Strip First n Digits. Enter the number of digits, if any, that you want to strip from the beginning of the outgoing telephone number. |
Note: The external access code digit (for example, 9) does not need to be stripped. It is not included in any call routing decisions after the call type is determined.
|
•
|
Keep Last n Digits. Enter the number of digits, if any, that you want to keep at the end of the outgoing telephone number. |
Note: For a particular route step, you can enter a value into either the Strip First Digits or Keep Last Digits field. Entering 0 for Strip First Digits will not remove any digits. Entering 0 for Keep Last Digits will remove all the digits.
|
•
|
Prepend Digits. Enter the digits that you want to add to the beginning of the outgoing telephone number. |
|
•
|
Postpend Digits. Enter the digits that you want to add to the end of the outgoing telephone number. |
|
•
|
Destination. Select a destination trunk group (or Signaling Control Point for IP telephony) from the drop-down list. (Signaling Control Points have the following format: IP|Signaling Control Point name. |
|
•
|
ISDN Settings. If you selected a trunk group that is associated with an ISDN trunk in the Trunk Configuration applet, you can select an ISDN setting from the drop-down list. If you do not select a trunk group that is associated with an ISDN trunk, this field is disabled. For more information about how to configure ISDN settings, refer to “Configuring digital channels for ISDN” on page 1-1. |
|
7
|
Repeat steps 5 and 6 to add steps to the routing table. |
|
8
|
Click the Up or Down to move a selected step up or down in the list. |
The order of the routing steps is important. Wave tries placing the call to the destination specified in the first step. If the specified trunk is busy, disabled, or disconnected, the system tries the next routing step, and so on. The caller will hear a fast busy tone if all steps have been tried unsuccessfully.
|
9
|
Click OK to close the Routing Table dialog. |
All routing tables are available throughout the Outbound Routing applet. You can use the same routing tables for different outbound routing steps and requirements, but be aware that some places in the applet may require different translation, hence different routing tables.
|
10
|
Click Apply to save your changes. |
|
11
|
Click Done to return to the Management Console. |
Automatic Line Selection
Configuring automatic route selection
Configuring the external first digit
Configuring the Global Access Profile
Configuring specific access profiles
Outbound call routing
Configuring off-premise extension routing
To set up Wave Server to dial off-premise telephone numbers as if they were extensions, you need to complete the following tasks:
Creating off-premise extension ranges
Use the procedure Configuring extension ranges to create your off-premise extension ranges if you want to use numbers that begin with a different first digit than those you are using for your local extensions.
For example, if you are using 100-150 for your local extensions and you want to use 159-199 for your off-premise extensions you do not need to configure an additional extension digit in the First Digit Table. Configuring the off-premise extension table.
Off-premise extensions
Configuring off-premise extension routing
Configuring extension ranges
Creating off-premise extension ranges
Configuring the off-premise extension table
Outbound call routing
Configuring the off-premise extension table
|
1
|
If necessary, click the Administration tab of the Management Console. |
|
2
|
Click Outbound Routing, located in the Trunk Administration section. |
|
3
|
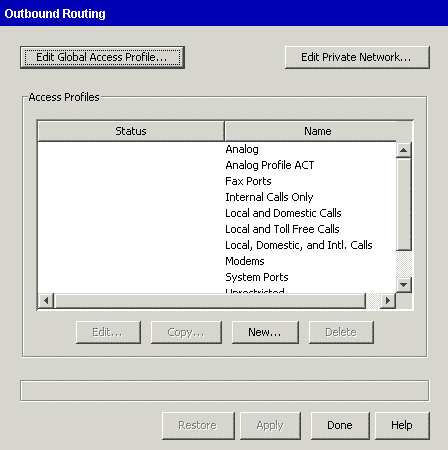
The Outbound Routing dialog opens: |
|
4
|
Click Edit Global Access Profile to open the Global Access Profile dialog. |
|
5
|
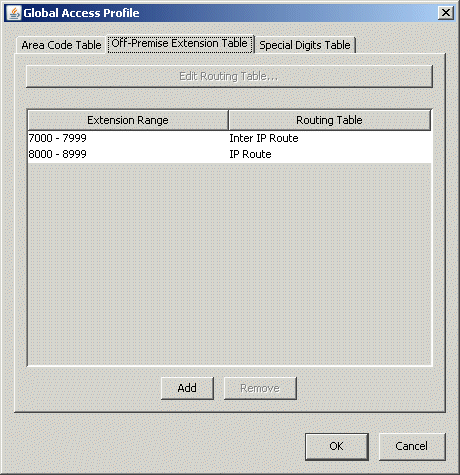
Click the Off-Premise Extension Table tab. |
|
6
|
Click Add to add a range of off-premise extensions. |
A new entry is displayed in the list.
|
7
|
Click the Extension Range field and enter the range of off-premise extensions you want to configure. |
You need to add a new entry for each new range of off-premise extensions.
Note: The First Digit Table must specify the first digit of the off-premise extensions, must have a type of Extension, and must have the same amount of digits as the extensions you specify here.
Note: Do not configure off-premise extensions in User/Group Management or the Hunt Groups applet. However, overlap is permitted if you have local extensions that are the same as the off-premise extensions.
|
8
|
Create a routing table to translate the digits to go to the telephone company. To do so, click in the Routing Table column and select (New Routing Table). See Configuring outbound routing tables for more information for instructions. |
|
9
|
Click OK to close the Global Access Profile dialog, and return to the Management Console. |
Off-premise extensions
Configuring off-premise extension routing
Configuring extension ranges
Creating off-premise extension ranges
Configuring outbound routing tables
Outbound call routing
Configuring destination access code routing
Sometimes you may want to configure a direct access code to a trunk group. Most commonly, this is done to enable users to make outbound calls to access a CO-based paging system.
This section provides information about configuring outbound calls using destination access codes. See Destination access code/direct to trunk group for examples and information about why you might use this type of call routing. To set up Wave to use destination access codes, you need to complete the following tasks:
Note: By configuring a destination access code to a trunk group instead of via the Outbound Routing applet, there is no way to enforce toll restrictions. Care must be taken to ensure that users who are enabled to use this code (for paging or other functions) will not be able to circumvent other dialing restrictions.
Destination access code/direct to trunk group
Outbound call routing
Creating destination access codes
Perform the following steps to create destination access codes in the First Digit Table applet.
To create destination access codes
|
1
|
If necessary, click the Administration tab of the Management Console. |
|
2
|
Click First Digit Table, located in the PBX Administration section. |
|
3
|
Click the button with the number that you want to configure. |
|
4
|
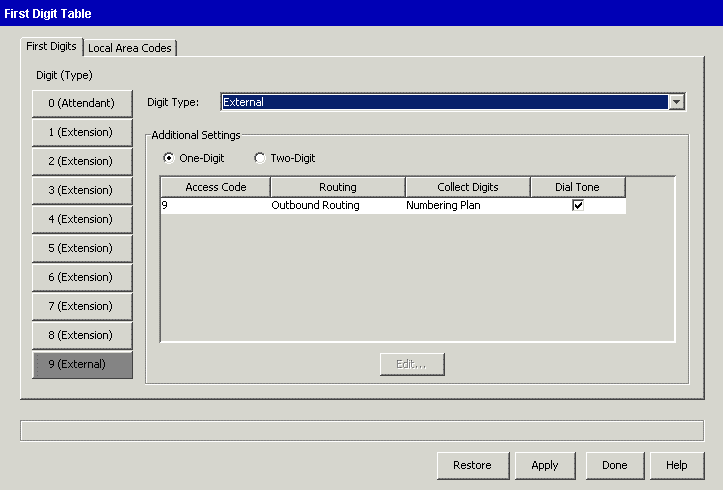
Choose External from the Digit Type drop-down list. |
The external digit configuration options appear in the Additional Settings group box.
|
5
|
Specify whether you want this first digit to support One-Digit or Two-Digit external access codes. |
If you select Two-Digit support, access codes x0 through x9, where x is the first digit, appear in the Additional Settings group box.
|
6
|
Configure the settings for each access code. |
|
•
|
Routing. Choose the trunk group or IP Signaling Control Point you want to use for routing. |
|
•
|
Collect Digits. Choose one of the following: |
|
•
|
Specify the number of outgoing digits to collect before the number is sent to the central office. This setting is ideal if you want to limit the number of digits a user can dial using an access code, for example limiting this access code to 11 digits will allow local and long distance calls, but not international calls. |
|
•
|
Select Numbering Plan to collect the digits expected for the numbering plan specific to your locale. For example, the North American Numbering Plan expects telephone numbers to be 7, 10, or 11 digits (when preceded by a 1). |
|
•
|
Dial Tone. Check the Dial Tone check box if you want Wave to provide dial tone after the destination access code is dialed. |
|
•
|
VM Networking. Do not check. |
|
7
|
Click Apply to save your changes. |
|
8
|
Click Done to return to the Management Console. |
Enabling destination access codes
Destination access code/direct to trunk group
Enabling destination access codes
By default all users are restricted from using new destination access codes. You must enable them in the specific access profiles in the Outbound Routing applet. Enable the access codes only in the specific access profiles that you will assign to groups of users who are permitted to use the codes.
If you haven’t already done so, follow the instructions in Creating destination access codes.
To enable destination access codes
|
1
|
If necessary, click the Administration tab of the Management Console. |
|
2
|
Click Outbound Routing, located in the Trunk Administration section. |
|
3
|
Select an access profile from the list, then click Edit, or click New to create a new access profile. |
|
4
|
Click the Destination Access Codes tab. |
|
5
|
Select the Permission Allowed check box to enable this access profile to use the specified destination access code. |
|
6
|
Click OK to close the Access Profile dialog. |
|
7
|
Repeat steps 3 through 6 for each access profile that you want to edit or add. |
|
8
|
Click Apply to save your changes. |
|
9
|
Click Done to return to the Management Console. |
Later, when you are configuring extensions and telephones, you will assign specific access profiles to each extension.
Enabling destination access codes
Destination access code/direct to trunk group
Configuring private networking
Configuring private networking is a four-step process. You need to determine a numbering scheme for your private network. You need to configure outbound routing and the First Digit Table to recognize the digits that access the remote Wave systems. Then, you need to go back to the Outbound Routing applet to enable the private networking destination access codes.
The following sections describe how to configure Wave for private networking:
Determining a numbering scheme for private networking
Before you can configure your Wave Servers for private networking, you must determine a private networking numbering scheme for your Wave network. The numbering scheme includes the following components:
|
•
|
External access code (one or two digits). The first one or two digits that you dial to access the private network. |
|
•
|
Location code (between 2 and 6 digits, inclusive). The code that identifies each Wave Server on the network. |
|
•
|
Extension (between 2 and 7 digits, inclusive). The telephone extension for each user. |
The following diagram shows an example of a numbering scheme for private networking:

You need to make decisions about or determine the following things:
|
•
|
Which external first digit do you want to use for your access code? |
|
•
|
Do you want to use a one-digit or two-digit external access code? |
|
•
|
What length do you want your location codes? |
When you dial within the private network, you will be prepending the location code to the extension of the person you are calling. Be sure to specify a length long enough to accommodate all the Wave Servers on your network. You can specify a location code length of 2, 3, 4, 5, or 6 digits. The default value is 3. A location code cannot start with a 0.
|
•
|
Determine a Home Location Code for each Wave Server in your network. |
Configuring outbound routing for private networking
Configuring the First Digit Table for private networking
Enabling the new destination access code
Outbound call routing
Configuring outbound routing for private networking
You need to specify the following information about your private network in the Outbound Routing applet:
|
•
|
Length of your location codes |
|
•
|
Length of your user extensions |
|
•
|
Home Location Code for this Wave Server. |
You also need to specify ranges of location codes and identify the routing table that you want to use with each range.
To configure location codes in the Outbound Routing applet
|
1
|
If necessary, click the Administration tab of the Management Console. |
|
2
|
Click Outbound Routing, located in the Trunk Administration section. |
|
3
|
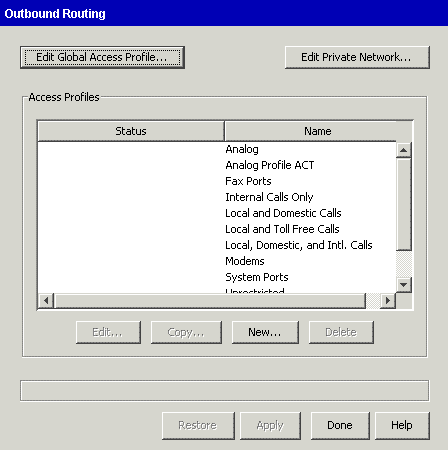
The Outbound Routing dialog opens.: |
|
4
|
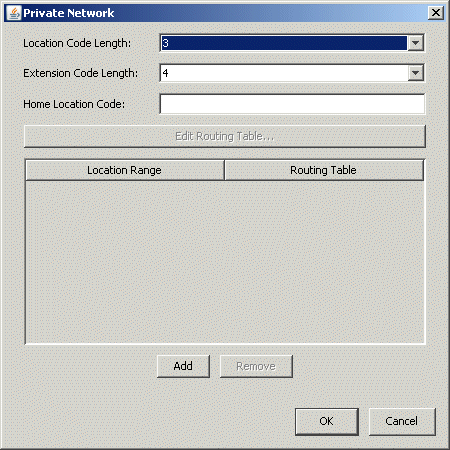
Click Edit Private Network. The Private Network dialog opens. |
|
5
|
Select the length you want your location codes to be from the Location Code Length drop-down list. Location code length can be 2-6 digits. The default length is 3. |
|
6
|
Select the length of your Wave extensions in the Extension Code length drop-down list. |
|
7
|
Enter a Home Location Code that identifies this Wave Server for internal routing. Home Location Code must be the same number of digits as the number you specified for Location Code Length. |
|
8
|
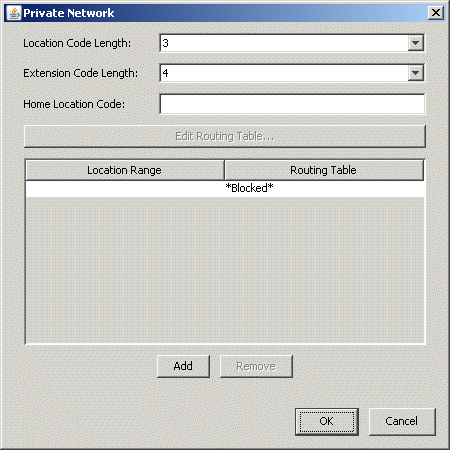
Click Add to specify a routing table for a range of location codes. A row is added to the table with a blank Location Range and Routing Table set to *Blocked*. |
|
9
|
Double-click in the Location Range column and enter a range of location codes for which you want to specify a routing table. |
Note: You can add multiple ranges of location codes and direct each range to a different routing table.
|
10
|
Click in the Routing Table column and select one of the following from the drop-down list:
|
|
•
|
A routing table that has already been defined.
|
|
•
|
*Blocked*. Select this option to block all calls to the area or office codes. |
|
11
|
Click OK to return to the Outbound Routing table. |
|
12
|
Click Done to save your changes and return to the Management Console. |
Determining a numbering scheme for private networking
Configuring the First Digit Table for private networking
Enabling the new destination access code
Outbound call routing
Configuring the First Digit Table for private networking
You need to specify which first digit to use to access private networking.
To configure the First Digit Table for private networking
|
1
|
If necessary, click the Administration tab of the Management Console. |
|
2
|
Click First Digit Table, located in the PBX Administration section. |
|
3
|
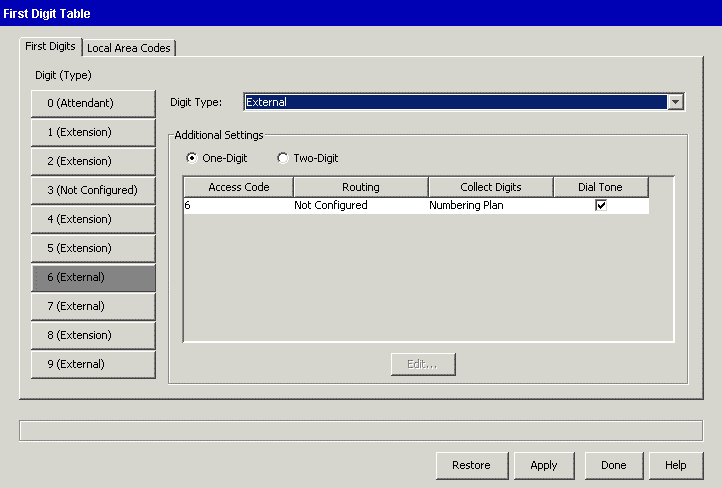
In the First Digit Table dialog, select a first digit in the Digit (Type) list. If the digit is not already an external digit, select External from the Digit Type drop-down list. |
|
4
|
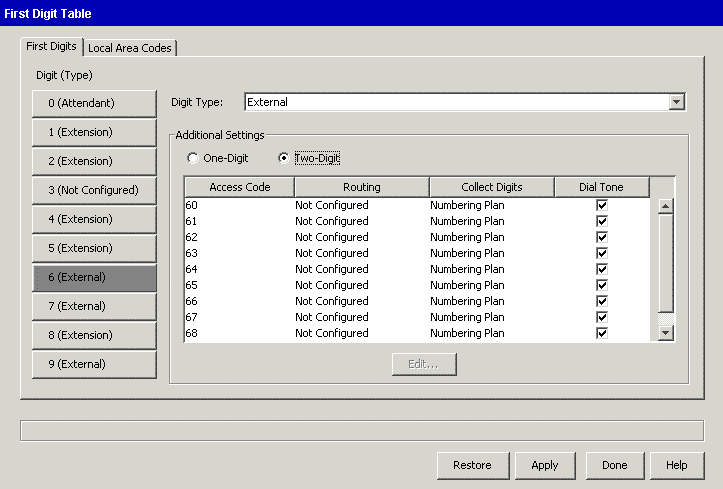
Depending on the type of destination access code you want, select One-Digit or Two-Digit. If you select Two-Digit, access codes n0 through n9, where n is the first digit, appear in the list. |
|
5
|
Select the Access Code that you want to configure, then click Edit. |
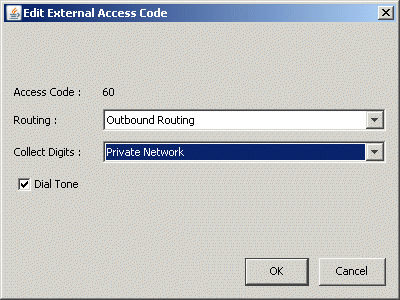
The Edit External Access Code dialog opens.
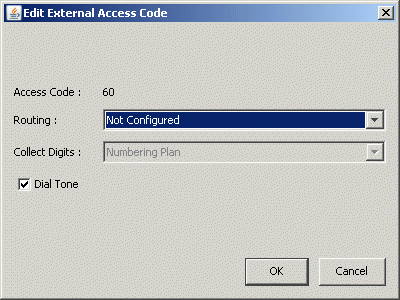
Note: The Collect Digits field remains grayed out until you select a routing table from the Routing drop-down list.
|
6
|
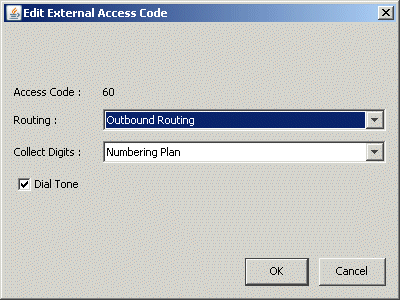
Select Outbound Routing from the Routing drop-down list. |
|
7
|
Select Private Network from the Collect Digits drop-down list. |
|
8
|
Click OK to return to the First Digit Table applet. |
|
9
|
If you are configuring multiple external access codes, repeat steps 5 through 8 for each. |
|
10
|
Click Done in the First Digit Table applet to save your changes and return to the Management Console. |
Determining a numbering scheme for private networking
Configuring outbound routing for private networking
Enabling the new destination access code
Outbound call routing
Enabling the new destination access code
Every external first digit that is configured in the First Digit Table for a private network is displayed in the Destination Access Codes tab of the Access Codes dialog in the Outbound Routing applet. By default, an access profile does not allow access to a destination access code until permission is granted by the system administrator.
If there are users that do not need access to your private network, you can set up an Access Profile for those users and not grant permission for the new destination access code(s).
So, the last step in configuring private networking is to grant permission for the new destination access code.
To enable the new destination access codes
|
1
|
If necessary, click the Administration tab of the Management Console. |
|
2
|
Click Outbound Routing, located in the Trunk Administration section. |
The Outbound Routing applet starts.
|
3
|
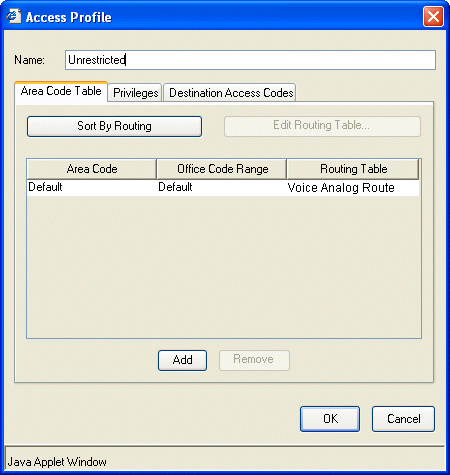
Select the access profile you want to configure for private networking, then click Edit. |
Alternatively, you can select New to add an access profile. Refer to Configuring specific access profiles for information about adding access profiles.
|
4
|
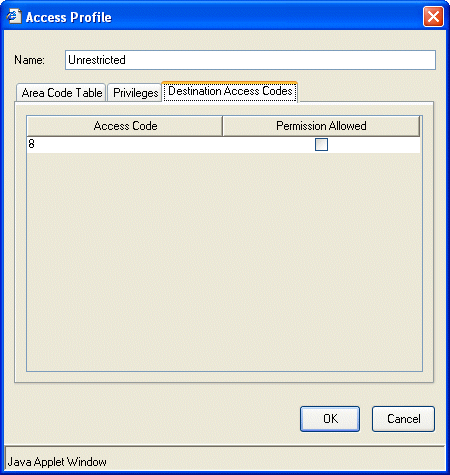
Select the Destination Access Codes tab. |
|
5
|
Select the Permission Allowed check box for each access code for which you want to grant permission for the selected access profile. |
|
6
|
Click OK to return to the Outbound Routing applet. |
|
7
|
Click Done in the Outbound Routing applet to save your changes and return to the Management Console. |
Determining a numbering scheme for private networking
Configuring outbound routing for private networking
Configuring the First Digit Table for private networking
Outbound call routing
Changing an access code in a user’s saved numbers
When a user saves phone numbers in ViewPoint that can be speed-dialed or auto-dialed, the dialing service used to make the call is saved with them. Such numbers include contact phone numbers and the phone numbers specified in call forwarding and routing lists. You can do a global replace of one dialing service for another across all users’ saved numbers. For example, you can specify that all numbers saved with the “9 - Phone number” service now use your “8 - Centrex” service.
To replace all occurrences of one saved dialing service with another
|
1
|
If necessary, click the Administration tab of the Management Console. |
|
2
|
Click User/Group Management, located in the PBX Administration section. The User/Group Management applet opens. |
See User/Group Management roadmap for information about navigating in the User/Group Management applet.
|
3
|
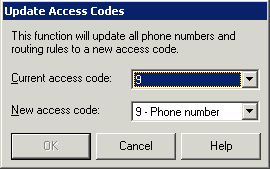
Choose Tools > Update Access Codes. The Update Access Codes dialing box opens. |
|
4
|
Choose the dialing service you want to replace under Current access code and the dialing service you want to replace it with under New access code. |
|
5
|
Click OK. All phone numbers that users have entered in theWave database with the Current access code are changed to use the New access code. |
Setting default access codes for callbacks
When users return calls or voice messages using the telephone commands or ViewPoint, the system automatically uses a default access code.
To set a default access code for callbacks
|
1
|
If necessary, click the Administration tab of the Management Console. |
|
2
|
Click User/Group Management, located in the PBX Administration section. The User/Group Management applet opens. |
See User/Group Management roadmap for information about navigating in the User/Group Management applet.
|
3
|
Choose Tools > System Settings. The System Settings dialog opens. |
|
4
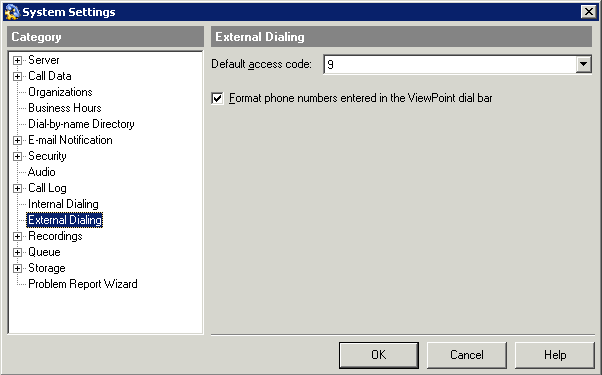
|
Choose the External Dialing tab. |
|
5
|
From the Default access code drop-down list, select the access code for the dialing service that will be used to return a call from a phone number from the Call Log and Voice Messages views. The default is 9. You can select a routing service or any dialing service that takes phone numbers as inputs. You typically would use a routing service or a Phone Number dialing service. |
Where the default access codes are displayed
Outbound call routing
Where the default access codes are displayed
In the User/Group Management applet, the Default column of the Dialing Services view shows the current defaults for phone number and Internet callbacks.
In ViewPoint, the Place Call To dialog always opens with the current default dialing service for phone numbers selected (the user can also choose a different dialing service to place a call). When you import contacts, new phone numbers and IP addresses automatically receive the default access codes.
Setting default access codes for callbacks
Outbound call routing
Dialing phone numbers entered in the ViewPoint dial bar exactly as entered
This procedure is primarily of interest for systems located in EU countries. To support EU dialing requirements, Wave allows phone numbers entered via the ViewPoint dial bar to be dialed as entered including access code, without any formatting, exactly as if the user entered the same digits from the phone.
Typically, for North American systems formatting rules are applied to numbers entered in the ViewPoint dial bar—this is the default setting, and does not need to be changed as described in the following steps.
To dial phone numbers exactly as entered in the ViewPoint dial bar
|
1
|
If necessary, click the Administration tab of the Management Console. |
|
2
|
Click User/Group Management, located in the PBX Administration section. The User/Group Management applet opens. |
See User/Group Management roadmap for information about navigating in the User/Group Management applet.
|
3
|
Choose Tools > System Settings. The System Settings dialog opens. |
|
4
|
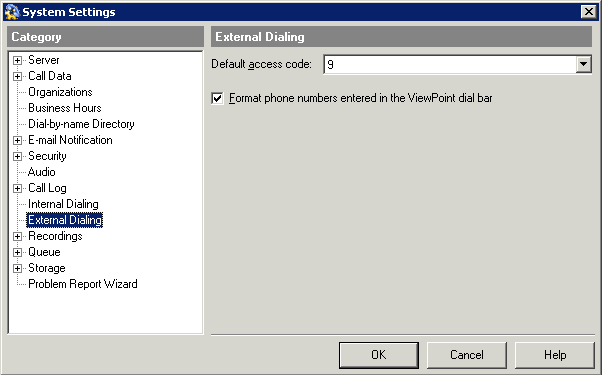
Choose the External Dialing tab. |
|
5
|
Deselect the Format phone numbers entered in the ViewPoint dial bar checkbox. (If this checkbox is selected, which is by default, numbers entered via the ViewPoint dial bar will be reformatted according to the dialing rules you have set up.) |
Setting up emergency dialing
Wave supports various emergency dialing scenarios:
|
•
|
In North America, standard 911 emergency dialing service does not require additional hardware. All standard 911 calls use a Wave trunk and go through the phone company to the emergency dispatching center. A user can make an emergency call from any Wave phone (including from a phone that is not assigned to any user), even if the user is blocked from making external calls. |
|
•
|
On EU systems, users typically dial 112 to access emergency services. No dialing prefix is required to make emergency calls, and Caller ID is never blocked. |
You can further customize emergency dialing by defining one or more emergency numbers in the Special Digits Table of the Global Access Profile. There is no limit to the number of entries that can be configured as emergency numbers. See Defining emergency numbers.
Note: Emergency numbers were handled differently prior to Wave ISM 2.0. If you upgrade from an earlier version, any emergency numbers that you configured previously will be displayed in the Special Digits Table and flagged as emergency numbers.
Requiring users to dial an access code before dialing an emergency number
By default, Wave allows users to dial emergency numbers directly. In order to help prevent accidental emergency calls, you can configure Wave to require users to dial an external access code before dialing an emergency number.
Important! If you require an external access code to dial an emergency number, be sure that all users know about this requirement, and that they know the access code to use.
For more information, see Requiring an access code for emergency number dialing.
Defining emergency numbers
Outbound call routing
Defining emergency numbers
Perform these steps to define one or more emergency numbers:
|
1
|
If necessary, click the Administration tab of the Management Console. |
|
2
|
Click Outbound Routing, located in the PBX Administration section. The General Settings applet opens. |
|
3
|
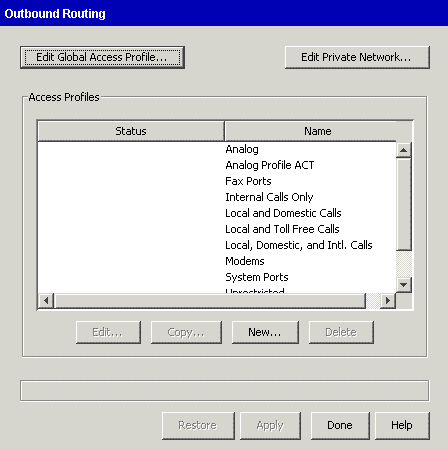
The Outbound Routing dialog opens: |
|
4
|
Click Edit Global Access Profile to open the Global Access Profile dialog. |
|
5
|
Click the Special Digits Table tab. |
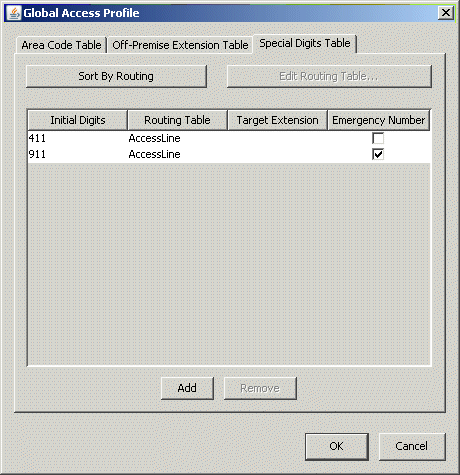
You use the Special Digits Table to enter any digits or strings of digits that you want Wave to process before processing the rules in the other tables. For complete details on how to use this table, including adding new entries, see Configuring the Global Access Profile.
|
6
|
Select the Emergency Number checkbox for any Initial Digits entry that you want to be processed as an emergency number. You can select all of the entries in the table. |
Note: At least one entry in the Special Digits Table must be flagged as an emergency number. If not, an error message is displayed when you try to close this dialog.
|
7
|
Click OK. Your changes will take effect the next time that the Wave Server is restarted. |
Setting up emergency dialing
Outbound call routing


