1. Tracking and Distinguishing Calls
Wave provides several ways to track groups of similar calls for purposes of record-keeping, billing, or automated call handling.
The most basic way to track related calls is by sorting the Call Log (see Using the Call Log view ), and by running reports using the Wave Contact Center Reporter. For information about basic Contact Center Reporter reports available on all Wave systems, see Chapter 13 in the Wave ViewPoint User Guide. For information about the complete suite of reports available to licensed Contact Center installations, see Appendix A in the Wave Contact Center Administrator Guide.
This chapter describes the following more advanced methods of tracking and distinguishing calls:
| • | Using Organizations. Organizations enable two or more separate businesses or contractors to share a Wave Server and trunks, yet be independent of each other in terms of caller experience and internal billing. See Using Organizations. |
| • | Using account codes. With user-entered account codes you can distinguish any group of calls for reporting and accounting purposes. For example, if your office contains employees or contractors whom you bill separately for their phone use, you can use account codes to mark calls by the user they belong to. Other uses of account codes include marketing campaigns, case and issue tracking, and more. See Using account codes. |
| • | Using custom data variables. Custom data variables enable you to attach information to incoming calls, for example, the name of the product that the caller is calling about. Users can view custom data variables in their Call Monitors, and you can set up automatic call handling based on custom data values. You can also report on calls involving custom data variables. See Using custom data variables. |
| • |
|
| • |
|
| • |
|
| • |
|
With Organizations, multiple separate businesses or other groups can share a Wave Server, yet remain independent. Callers dialing a user in one Organization will never know that other businesses exist on the same phone system, and internal billing can be kept strictly separate.
Once you have defined Organizations and assigned each user to the appropriate Organization, you can do the following:
| • | Log calls by Organization for purposes of tracking or billing. |
| • | Restrict callers at the auto attendant from dialing extensions of users in other Organizations than the one that they called. |
| • | Distribute outbound trunk use between Organizations. |
| • | Display a call’s Organization in the ViewPoint Call Monitor. |
How calls are logged by Organization
For each call that is associated with an Organization, the Organization name appears in the Organization column in the Call Log:
| • | Outbound calls display the Organization of the user who placed the call. |
| • | Inbound calls display the Organization of the user who answered the call (the Answered By user.) |
| • | Conference calls display the Organization of the user who initiated the conference. |
Creating and populating an Organization
You can create an Organization and add users in either of the following ways:
| • | Via the Organizations applet as described in Creating and populating an Organization via the Organizations applet. When you use this method, you can create an Organization and also assign all of its members at the same time. |
| • | Via the User/Group Management applet as described in Creating and populating an Organization via the User/Group Management applet. When you use this method, after creating the Organization, you must edit each user individually to assign that user to the Organization. |
Once you have created an Organization, you can add users at a later time using either method.
Note: A user can belong to only one organization. Also, users in different Organizations cannot have identical extensions—even if they belong to different organizations, each Wave user must still have a unique extension.
Creating and populating an Organization via the Organizations applet
To define an Organization via the Organizations applet
| 1 | If necessary, click the Administration tab of the Management Console. |
| 2 | Click Organizations, located in the PBX Administration section of the Management Console. |
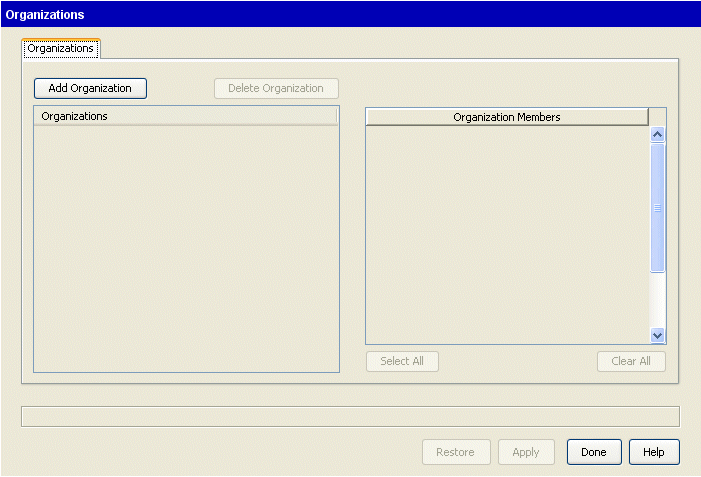
| 3 | The Organizations dialog opens. |

| 4 | Click Add Organization. |
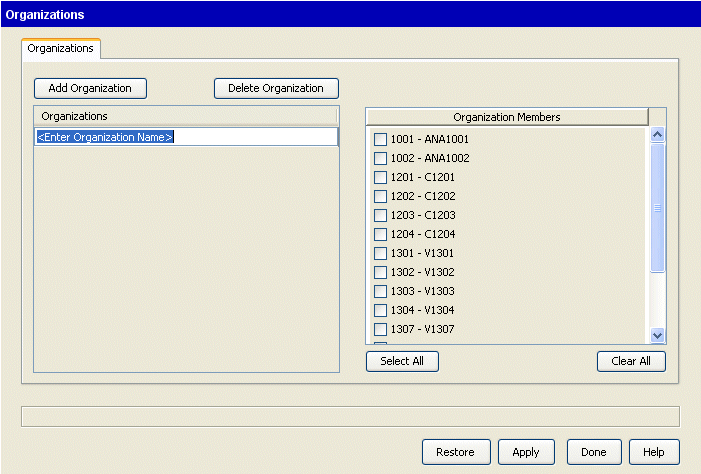
| 5 | Enter a name for the new Organization. |
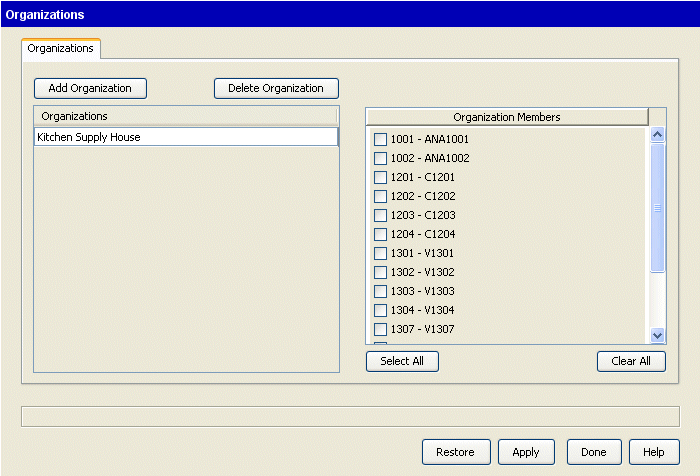
| 6 | To add members to the organization, click the Organization name. |
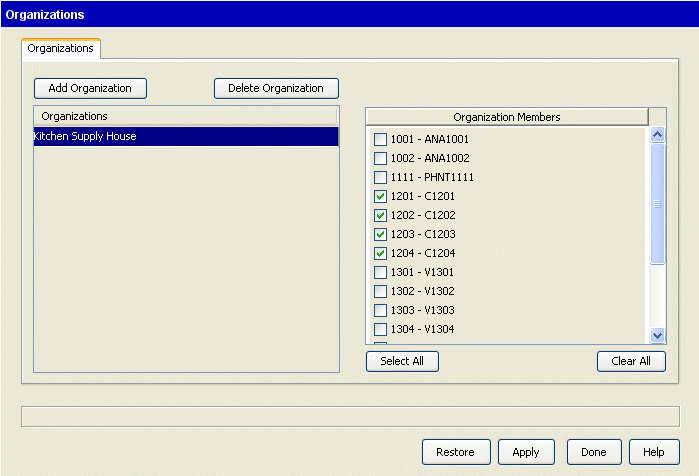
| 7 | In the right pane, select one or more user’s checkbox to add the user to the Organization. Deselect a user’s checkbox to remove the user from the Organization. |
| 8 | Click Apply (to save your changes and continue working) or Done (to save your changes and close the Organizations applet.) |
Creating and populating an Organization via the User/Group Management applet
To create an Organization via the User/Group management applet
| 1 | If necessary, click the Administration tab of the Management Console. |
| 2 | Click User/Group Management, located in the PBX Administration section of the Management Console. |
| 3 | Choose Tools > System Settings. The System Settings dialog opens. |
| 4 | Choose the Organizations tab, which lists the Organizations you have defined so far. |
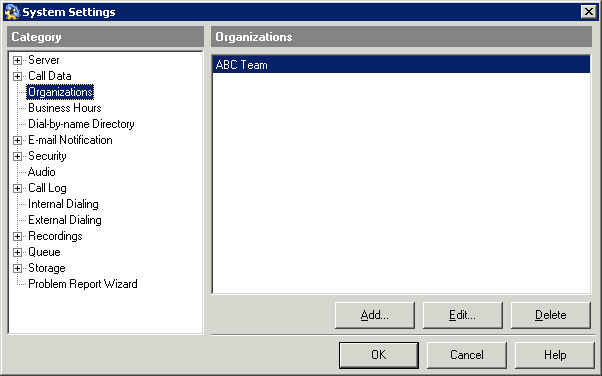
| 5 | To add a new Organization, click Add. The Organization dialog opens. |

| 6 | Enter the name of the Organization, for example, the name of the company that is sharing the Wave Server. |
| 7 | Click OK to return to the Organizations dialog. |
| 8 | When you are done adding Organizations, click OK to close the System Settings dialog. |
To assign a user to an Organization via the User/Group management applet
| 1 | In the Users view, double-click the user to open the User dialog, and choose the User \ Call Log tab. |
| 2 | Select the Organization checkbox and then select the Organization to which the user should belong. Click  to create a new Organization. to create a new Organization. |
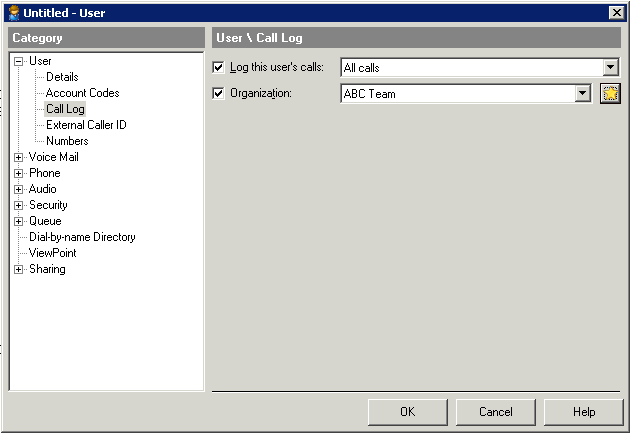
See Creating and populating an Organization via the Organizations applet.
| 3 | Click OK. |
Note: If a Contact Center queue agent is configured to place calls as the queue, the agent’s Organization is still displayed for the call, not the queue’s Organization.
Creating an auto attendant for each Organization
You can define a separate auto attendant for each Organization, if each Organization has its own phone number. Callers will hear a greeting and menu choices specific to the Organization that they are calling, and they will be unable to accidentally dial users in other Organizations, either by extension or via the dial-by-name directory.
To create an auto attendant for an Organization
| 1 | Create a public ViewPoint Group containing the same users that are the members of the Organization. For instructions see Creating a ViewPoint Group . |
| 2 | Define an auto attendant as described in Configuring an auto attendant. Check Restrict dial-by-name and extension matching to members of on the Menu Choices tab, and select the ViewPoint Group. |
| 3 | Route the trunk(s) corresponding to the Organization’s phone number to the auto attendant. To associate a DID number with an auto attendant, edit the appropriate Trunk Groups entry via the Trunk Configuration applet, and map the DID number to the auto attendant’s extension. |
Configuring Operators for multiple Organizations
At several places in the Wave system, callers can press 0 to transfer to an Operator. With multiple Organizations, you might want to have a different Operator for each Organization. To set up multiple Operators and make sure that callers reach the right Operator for the Organization they are calling, do the following:
| 1 | Decide which extensions will be the Operators for the different Organizations. For example, 101 for Company ABC, and 102 for company YYZ. These examples are used in the following steps. |
| 2 | Edit each user. On the User \ Details tab use the Operator field to select the Operator extension appropriate to the user’s Organization. For example, if a user belongs to Organization ABC, select extension 101. This ensures that callers pressing 0 while leaving a user voicemail are handled correctly. |
| 3 | If you are using Wave Contact Center queues, edit each queue. On the General tab under Operator, select the extension appropriate to the queue’s Organization. For example, if the queue belongs to Organization ABC, select extension 101. This ensures that callers pressing 0 while leaving the queue voicemail are handled correctly. |
See the Wave Contact Center Administrator Guide for complete information on creating and using a Contact Center.
With Wave, you can track your phone traffic by either optionally allowing or requiring users to enter an account code for each call. Account codes can represent any aspect of your phone traffic that you want to track—customer number, product line, department, and so forth. You define the available account codes and tell your users the codes that they should or must enter under specific circumstances.
Some of the ways you can use account codes include:
| • | Billing clients. With account codes you can track calls to various customers whom you bill for the phone time you spend with them. You can associate account codes with contacts for automatic customer tracking. |
| • | Internal accounting. If phone bills are a significant part of your company’s expenses, you can use account codes to perform detailed expense analyses. For example, you can track phone use by department. |
| • | Marketing campaigns. By setting up an account code for the campaign and having agents use it whenever they place or receive campaign calls, you can track the time, resources, and results of the campaign. |
For example, your legal office is working on the Gould case and the Avellanos case. You assign the Gould case an account code of 88 and the Avellanos case an account code of 55. Whenever users place or receive calls that relate to the Gould case, they enter 88. Whenever they place or receive calls relating to the Avellanos case, they enter 55. You can then run a Call Log report that sorts calls by account code and see the phone traffic for the Gould and Avellanos cases separately. (You can also run a report that sorts by user, so that you can see how much phone time a specific user spent on each case.)
Available user account code modes
In the current version, you specify whether account code entry is optional or required on a per-user basis. A user’s account code mode can be different for inbound vs. outbound calls. With some modes, the value entered by a user is checked against a list of valid codes.
The following user account code modes are available:
| • | Optional non-verified. Do not prompt the user to enter account codes on outbound calls. If the user enters an account code, accept it without verification. |
| • | Optional verified. Do not prompt the user to enter account codes on outbound calls. If the user enters an account code, verify it. |
| • | Forced non-verified - All calls. Prompt the user to enter an account code on all outbound calls, if one has not already been entered. Accept the account code without verification. |
| • | Force verified - All calls. Prompt the user to enter account code on all outbound calls, if one has not already been entered, and verify it. |
| • | Forced non-verified - Long distance calls only. Prompt the user to enter an account code on all outbound long-distance calls, if one has not already been entered. Accept the account code without verification. |
| • | Force verified - Long distance calls only. Prompt the user to enter account code on all outbound long-distance calls, if one has not already been entered, and verify it. See Creating a valid account code list for details on how to create the account code list used when a user is assigned the account code mode Optional verified or Forced verified. |
You should tell users what account codes to enter and in which circumstances. Users can enter account codes in the following ways:
| • | When prompted to do so after placing an outbound call. Only users forced to enter account codes will hear this prompt. |
By default the account code prompt is a beep. You can change this to a verbal prompt that says, “Please enter an account code.” See Using the verbal account code prompt instead of a beep.
| • | . When a user places a call from ViewPoint to a contact with an associated account code, the account code is automatically entered for the call. You can enter account codes for public contacts, and users can enter them for private contacts. For more about contacts, see Chapter 9 of Wave ViewPoint User Guide. |
| • | After a call has finished. In ViewPoint, a user can enter an account code for a completed call by selecting the call in the Call Log and choosing Actions > Enter account code. The user must have the Wave permission Access Call Log folder set to “View and Edit”. |
How the end of an account code is detected
When users use the phone to specify an account code, Wave detects the end of the account code when any of the following occurs:
| • | The account code reaches the maximum number of digits. To define the maximum number of digits, see Setting system-wide account code options. (This is a system-wide account code setting.) |
| • | The user presses #. |
| • | Three seconds elapse after the user entered a digit. The system assumes that the digits already entered are the account code that the user intended to enter. |
If a user does not enter an account code before 5 seconds have elapsed after the beep or prompt, the system beeps or prompts the user to enter the account code again.
Note: If you have a high maximum number of digits and your account codes can be of variable lengths, you should encourage phone users to press # when they reach the end of an account code.
Users can cancel an account code entry while they are entering it by pressing *.
Viewing account code information in the Call Log or Call Monitor
The Call Log view contains an Account Code column that shows the account code associated with each call. If the Account Code column is blank, no account code was entered for the call. Click the Account Code column header to sort the Call Log by account code. For more information, see Using the Call Log view .
Note: In the Call Log, you can change a call’s account code or enter a new one. Select the call and choose Call Log > Enter Account Code.
ViewPoint’s Call Monitor view also contains an Account Code column, but it is hidden by default. In the Call Monitor view, choose View > Show Columns to display it.
Reporting on account code information
You can view call activity by account code by generating the Call Log report using the Wave Contact Center Reporter. For information about basic Contact Center Reporter reports available on all Wave systems, see Chapter 13 in the Wave ViewPoint User Guide. For information about the complete suite of reports available to licensed Contact Center installations, see Appendix A in the Wave Contact Center Administrator Guide.
You can also export the Call Log, with its account code information, to a CSV file that you can then view in spreadsheet or reporting applications. Note that you can only export the Call Log as an administrator via User/Group Management, as described in Exporting the Call Log. You cannot export a user’s Call Log from ViewPoint.
Setting system-wide account code options
Before setting up account code modes for individual users, you should configure the system-wide account code options as follows:
| 1 | If necessary, click the Administration tab of the Management Console. |
| 2 | Click User/Group Management, located in the PBX Administration section of the Management Console. |
| 3 | Choose Tools > System Settings. The System Settings dialog opens. |
| 4 | Choose the Call Data \ Account Codes tab. |
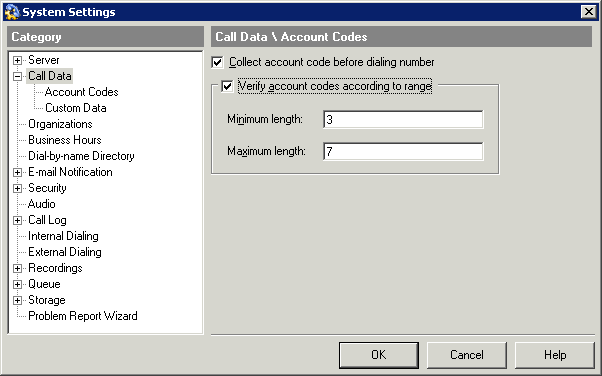
| 5 | Select the Collect account code before dialing number checkbox to prompt for an account code after the user dials an access code (for example, 9). |
| 6 | Select the Verify account codes according to range checkbox to have the system verify that an account code contains the correct number of digits. If the account code entered contains too many digits or too few digits, a user is prompted to enter it again. |
Specify the Minimum length and Maximum length to be used for validation. For example, if account codes in your system can be two, three, or four digits, enter a Minimum length of 2 and a Maximum length of 4.
Note: It is more efficient to set Minimum length and Maximum length to the same number and use account codes that are all the same length. When set up this way, the system immediately recognizes when users finish entering an account code, so they do not need to press # at the end of the account code. When account codes are of variable length, users must press # to end the account code or there will be a slight pause while the system waits for more digits.
If Minimum length and Maximum length are both set to 0, account codes will not be verified by length.
| 7 | Click OK. |
Displaying account codes for contacts in the ViewPoint Call Monitor
On an incoming call from a ViewPoint contact, Wave can automatically display the contact’s account code information along with the call in the ViewPoint Call Monitor.
This system-wide option is disabled by default. In this version, you enable this option via a registry setting. To do so:
| 1 | Add the following DWORD registry setting: |
HKLM\Software\Artisoft\TeleVantage\Server\Settings\
SetAccountCodeFromContact
| 2 | Set the registry setting to 1. The setting will take effect the next time the Wave Server is restarted. |
Setting a user’s account code modes
On a per-user basis, you can specify whether account code entry is optional or required. A user’s account code mode can be different for inbound vs. outbound calls.
Creating a valid account code list
If you want to verify account codes for some or all users, you must first create a text file that lists all of your valid account codes. When a user whose account code mode requires verification enters an account code, Wave checks the account code against the contents of the text file. If the account code is not listed in the text file, Wave prompts the user to re-enter it.
The text file must be called Accountcode.txt and it must reside in the \Accountcode directory on the Wave Server computer. The default location is:
C:\Program Files\Artisoft\TeleVantage Server\Accountcode\
Accountcode.txt
Use a text editor such as Notepad to create and maintain the account code file.
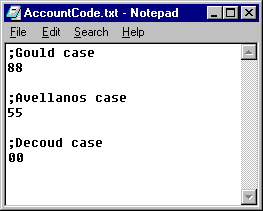
Note the following:
| • | Enter each account code as a separate line in the text file. |
| • | Blank lines are ignored, and can make the list easier to view and maintain. |
| • | Comment lines are ignored, and must start with a semicolon (;). |
| • | Account codes can contain numbers, letters, and other characters. However, only ViewPoint users can enter numbers and other characters via the keyboard. If you have users who will only enter account codes using the phone, be sure to use numeric-only account codes. |
| • | The account codes that you enter in the text file must meet the minimum and maximum account code range that you specified or they will be ignored. For example, if you specified that account codes must be between 2 and 4 digits, a 5-digit account code will be ignored even if it is displayed in the text file. See Setting system-wide account code options for instructions on setting account code length requirements. (Account code length requirements is a system-wide account code setting.) |
| • | You can use the wild card characters ? and % when you enter account codes in the text file: |
| • | Question mark (?). Indicates any single digit. For example, an account code entry of 12? would make 123, 124, and 129 all valid account codes. In this case, however, neither 12 nor 1233 would be valid account codes. |
| • | Percent sign (%). Indicates any number of digits, including none. For example, an account code entry of 12% would make 12, 123, 1233, and 12789213120 all valid account codes. |
If you use either wild card character in an account code, it must be the final character in an account code, and if you use both wild card characters in the same account code, the % character must be the final character.
|
Valid |
Invalid |
|
12? |
1?2 |
|
12?? |
1%2 |
|
12% |
?12 |
|
12?% |
%12 |
|
12?????% |
12%? |
Note that account codes that are identical except for wild card characters will conflict with each other. For example, 1234 conflicts with 1234? and 1234%. In the case of conflicting entries, only the first entry in the text file is used to verify account codes.
Using the verbal account code prompt instead of a beep
By default, the account code prompt is a single beep—Wave ISM users need to understand that they must enter an account code when they hear the beep.
Optionally, you can use an alternate verbal account code prompt instead that may work better for your users. The alternate verbal prompt included in Wave says, “Please enter an account code.”
Important! If you perform the following steps to use the verbal account code instead of the beep, you must repeat the steps after upgrading Wave, because the upgrade process reinstalls the original beep prompt.
To use the verbal account code prompt instead of the beep
| 1 | Find the file that contains the beep prompt, AccountCodePrompt.wav, in the user directory. The default location is: |
C:\Program Files\Artisoft\TeleVantage Server\VFiles\user\
AccountCodePrompt.wav
| 2 | Rename the file, for example, to AccountCodePrompt.wav.beep. |
Users now hear the verbal prompt instead of the beep when they are prompted to enter an account code.Although this verbal prompt is also called AccountCodePrompt.wav, it is located in your language directory (not the user directory). The default path for the English language verbal prompt file is:
C:\Program Files\Artisoft\TeleVantage Server\VFiles\EN00\
AccountCodePrompt.wav
You can rerecord this file (or any other language version). See "Recording over system prompts"
Wave lets you attach extra information to incoming calls, using custom data variables. The information is displayed to users in ViewPoint’s Call Monitor, and can also be used to automate call handling. For example, based on the caller’s auto attendant choice, set a variable called Product to the name of the product that the caller is calling about. For example, callers who press 1 have Product=“Widget,” while callers who press 2 have Product=“Advanced Widget.” When users answer the calls they see the product name in the Call Monitor in a column labeled “Product.”
Note: Custom data variables are case sensitive.
Using custom data variables is a two-step process:
| 1 | Defining a custom data variable |
| 2 | Setting the value for a custom data variable |
Defining a custom data variable
You can define as many custom data variables as you want.
| 1 | If necessary, click the Administration tab of the Management Console. |
| 2 | Click User/Group Management, located in the PBX Administration section of the Management Console. |
| 3 | Choose Tools > System Settings. The System Settings dialog opens. |
| 4 | Choose the Call Data \ Custom Data tab, which lists the custom data variables created so far. |
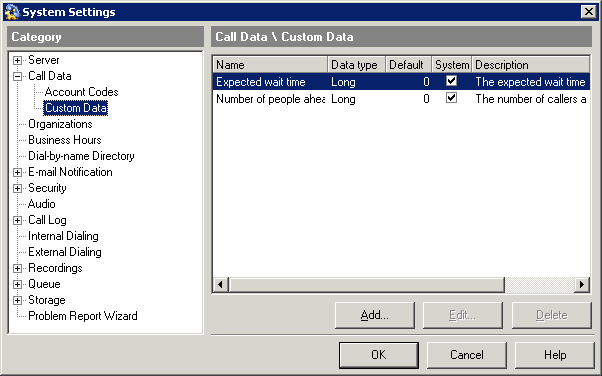
Each custom data variable is attached to every incoming call, though a given variable might not be used for every call.
Note: If you have purchased the Wave Call Center module, two system variables are present by default, Expected wait time and Number of people ahead. For instructions on using them, see the Wave Contact Center Administrator Guide.
| 5 | To create a new custom data variable, click Add. The Custom Data dialog opens. |
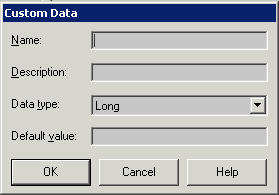
| 6 | Enter the following information for the custom data variable: |
| • | Name. Enter a name for the variable. Keep the name relatively short, as it will appear in a column header in the ViewPoint Call Monitor. Custom data variable names are case sensitive. |
| • | Description. Enter a description that helps you remember how the variable is used. |
| • | Data Type. This field determines the type of information that the variable holds. Select one of the following from the drop-down list: |
| • | Long. Variable holds integer numbers only. |
| • | Double. Variable can hold integer numbers or decimal point numbers. |
| • | Boolean. Value must be either 0 or 1. |
| • | String. Variable holds text. Text variables are sorted alphabetically. For example, you can have a Hold prompt play if a variable is in the “range” from A to E. In that case, any text string beginning with A, B, C, D, or E would cause the prompt to play. Note that numbers can be part of a text string, but they are treated as text characters. |
| • | Default value. Enter the value that the variable assumes if no other action sets a value. For example, if callers are prompted to enter their Customer Priority Numbers to set this variable, and a caller chooses not to enter the data, you can have the variable default to a low-level Customer Priority Number. For string variables you can leave the field blank, indicating that the variable is empty by default. For numeric variables you must enter a number, usually 0. |
| 7 | Click OK to add the custom data variable to the list. |
| 8 | Click OK to close the System Settings dialog. |
The variable you created is now available to be attached to any incoming call (for example, by an auto attendant or Contact Center queue). Users have a corresponding column in the Call Monitor where they can view the variable’s value for each call.
Setting the value for a custom data variable
You can have Wave set the value of a custom data variable in the following ways:
| • | Auto attendant menu choice. When defining an auto attendant menu choice, you can have it set the value of one or more custom data variables. See Defining menu choices. |
| • | Contact Center queue. You can have a queue set the value of a custom data variable based on caller data entry. See the Wave Contact Center Administrator Guide. |
| • | IVR Plug-in. An IVR Plug-in can set the value of custom data variables based on a variety of methods, including when it was called and caller data entry. For more information see Appendix G of the Wave Server Installation Guide. |
| • | Wave Call Classifier. The Wave Call Classifier can set custom data variables based on database queries, Caller ID name or number, account codes, or other custom variables. |