The following topics describeseveral methods of monitoring and maintaining your Wave system via the User/Group Management applet.
| • | Managing your dial plan with the Dial Plan view |
| • | Using the Maintenance Log view |
| • | Using the Call Log view |
| • | Viewing the Wave Event Log |
| • | Monitoring and Maintenance |
| • | Monitoring database and disk usage |
| • | Changing special Wave directories |
| • | Identifying password security risks |
| • | Reporting problems to your Wave provider |
You can also monitor your system using the Wave Contact Center Reporter, which lets you run reports on a variety of system elements, including trunk use, call traffic, queues, agents, identified callers, account code use, and more. For information about basic Contact Center Reporter reports available on all Wave systems, see Chapter 13 in the Wave ViewPoint User Guide. For information about the complete suite of reports available to licensed Contact Center installations, see Appendix A in the Wave Contact Center Administrator Guide.
Another way to monitor your Wave system is to automatically record all calls for later review. See Recording All Wave Calls.
Managing your dial plan with the Dial Plan view
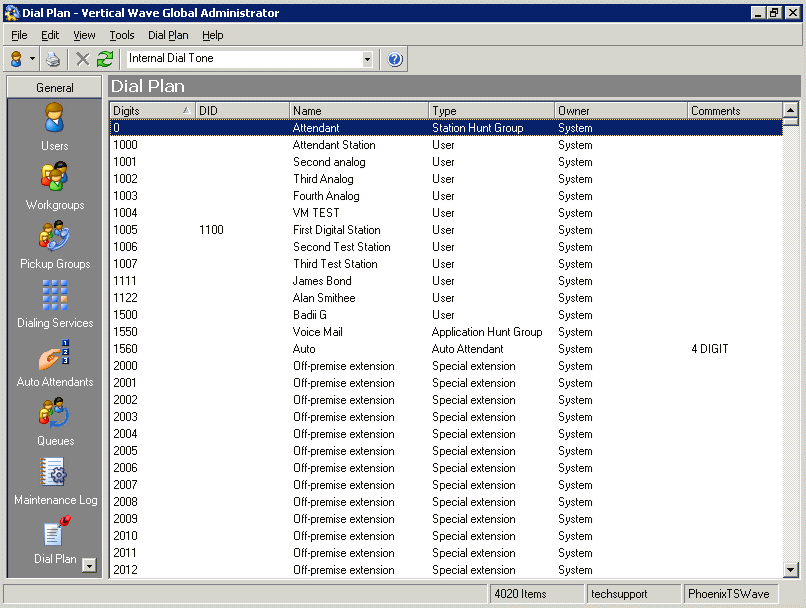
You can view and manage your dial plan as a whole using the Dial Plan view.

The Dial Plan view shows each number in your system that can be dialed from an internal dial tone, identified by name and type. It lists only numbers beginning with the digits 0-9, and so does not include Wave phone commands such as those beginning with Flash or *. It does include the following:
| • | All enabled extensions (users, auto attendants, Contact Center queues, and so forth.) |
| • | Users’ contacts dialable by the user's extension + PIN |
| • | User extensions plus * for direct-to-voice-mail dialing, if the feature is enabled (see Setting general options ) |
| • | Dialing service access codes |
| • | System extensions such as 411 for the dial-by-name directory |
You can filter the Dial Plan view using the toolbar drop-down list to show only those numbers that are dialable from external phones (PSTN) or SIP servers.
You can use the Dial Plan view to check your dial plan for ambiguous numbers and correct them when they occur.
You can edit a dial plan entry by selecting it and choosing Dial Plan > Open. The appropriate dialog for editing that number opens.
Note: If the Dial Plan > Open option is unavailable, you may not have permission to access or edit the selected item.
You can delete a dial plan entry using the Delete button or the toolbar Delete icon.
Using the Maintenance Log view
The Maintenance Log view displays tracked actions and presents details about each action. Information contained in the log is stored in the database. To open the Maintenance Log view, click its button in the view bar. The Maintenance Log tracks many administrative actions, including:
| • | Restarting a device |
| • | Starting the Wave Server |
| • | Stopping the Wave Server |
| • | Scheduling a Wave Server shutdown |
| • | Changing a user’s password |
| • | Changing a queue’s password |
| • | Logging on to the User/Group Management applet |
| • | Logging out of the User/Group Management applet |
| • | Account lockout |
| • | Trunk hangup after maximum login attempt |
| • | Changing any editable item in any User/Group Management applet view |
| • | Deleting an item from a view |
| • | Enabling or disabling a device |
The following columns appear in the Maintenance Log view:
| • | Action taken |
| • | Item that was acted upon (if applicable) |
| • | Date and time of the action |
| • | Name of the user who was logged on when the change was made |
| • | Name of the computer from which the change was made |
| • | Details about the action |
Navigating the Maintenance Log view
The Maintenance Log view shows 50 entries at a time, in a default order starting with the most recent. You can show the next or previous 50 entries by choosing Maintenance Log > Next 50 entries or Maintenance Log > Next 50 entries.
You can also jump to a particular date by choosing Maintenance Log > Jump to date. Enter the date in the dialog that opens and click OK.
To clear the Maintenance Log, click  in the toolbar.
The Call Log view displays a record of the calls placed and received on the Wave system. Each call is displayed as a row in the view. You can use the Call Log view to analyze system usage patterns, and you can export Call Log records to generate traffic analysis reports.
To open the Call Log view, click its button in the view bar.
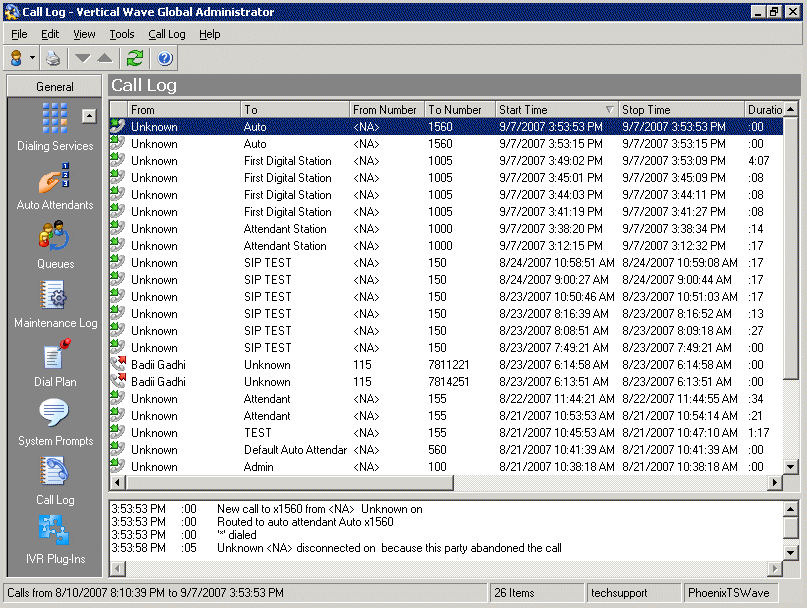
The following table shows the information that is displayed for each call. Several columns are hidden by default. To show and hide columns, right-click the columns header and choose Columns.
|
Column |
Description |
|
From |
Name of the person who placed the call. On incoming calls, “Unknown” is displayed unless the user identified the caller as a contact. On outgoing calls, this column contains the user’s name. |
|
To |
Name of the party who received the call. On incoming calls, the user’s name is displayed. On outgoing calls, “Unknown” is displayed unless the user identified the person as a contact. |
|
Answered By |
Name of the user who answered an incoming call or was last dialed. On unanswered calls, the name of the user who was dialed. On answered calls that were subsequently transferred, the name of the transfer recipient, whether or not they answered. |
|
Number |
On incoming calls, Caller ID name and number if available. On outgoing calls, the number the user dialed. On a call to or from another Wave user, this field contains <NA>. |
|
From Number |
On incoming calls, the caller’s extension or external phone number. On outgoing calls, the user’s extension. |
|
To Number |
On incoming calls, the user’s extension or, if the user called into Wave externally, the external number. On outgoing calls, the external number or extension the user called. |
|
Callback Number |
If a caller enters a callback number, it is displayed with the prefix “Callback:” |
|
Called Number |
On incoming calls, your Direct Inward Dial (DID) number if the caller used it to call you. The field is blank for incoming calls without DID. On outgoing calls, the number you dialed. |
|
Start Time |
Date and time that the call started. |
|
Wait Time |
On incoming calls, the length of time between dialing the user’s extension and the call being answered. On outgoing calls, Wait Time is always 00:00. |
|
Duration |
Length of time that the parties are connected. |
|
Call ID |
The Wave ID number of the call. The call ID number also is displayed in queue logs to identify the call (see Appendix A of the Wave Contact Center Administrator Guide). |
|
Result |
How the caller's wait ended. The assigned values for the possible outcomes are:
Abandoned. Caller hung up before call was answered. Connected. Caller was connected to a party. To voicemail. Caller went to voicemail, but did not necessarily leave a message. Blind transfer. A blind transfer sent the caller to another party. Supervised transfer. A supervised transfer sent the caller to another party. Login. Caller logged in to a valid Wave user account. No Answer. Outbound call that was not answered. Login failed. The caller attempted to log in to a Wave account, but failed to enter a valid password for the maximum number of retries (see Enforcing strong password security ). Unknown. Wave was unable to identify the outcome of the call. |
|
Account Code |
The account code entered for the call, if any. |
|
Message |
If checked, the caller left a voice message. |
|
Recorded by User |
If checked, this call was recorded by a user who handled it. |
|
Recorded by Queue |
If checked, this call was automatically recorded by a Contact Center queue. |
|
From Device |
On incoming calls, the trunk or extension from which the call originated. On outgoing calls, the user’s station number. |
|
To Device |
On incoming calls, the user’s station number. On outgoing calls, the trunk used for the call. If an incoming call was transferred, this column shows the last station that took the call. |
|
Parties |
Number of people who took part in the call, including the caller, the called party, anyone to whom the call was transferred, and any conference call participants. |
|
Dial String |
Digits that Wave actually dialed over the trunk, which may be different than the digits Wave displays in a contact's phone number. For example, a dial string may contain an international or long-distance access code, a dialing prefix, or a dialing suffix. |
|
From Type |
Type of incoming call: Phone or Internet. |
|
From Code |
Access code of the dialing service that will be used to return this call. Only applicable to calls coming in from remote Wave Servers over an Internet trunk. |
|
From Rules |
If checked, Wave's routing rules will be applied when returning this call. |
|
To Type |
Type of outgoing call: Phone, Centrex, or Internet. |
|
To Code |
Access code used to dial an outbound call. |
|
To Rules |
If checked, routing rules were used to make an outbound call. |
|
Organization |
Organization associated with the call, if any. Organizations are associated with outbound calls only, and represent the Organization to which the calling party belongs. For more information see Using Organizations. |
|
Custom Data |
Custom data, if any, associated with the call. |
Choosing Edit > Copy with a Call Log entry selected copies that Call Log entry as text, including call history.
When you select a call in the Call Log, its history in the system is displayed in the History pane below. The History pane shows the complete “cradle-to-grave” record of the call from the moment it entered the Wave system until it was disconnected. You can see how a call was routed or transferred, and how it ended.
By default call history data is automatically purged from the system after 5 days to conserve disk space. To adjust the number of days, see Setting Call Log options .
You can choose whether to log calls, and which type of calls are logged in the Call Log. To do so:
| 1 | If necessary, click the Administration tab of the Management Console. |
| 2 | Click User/Group Management, located in the PBX Administration section of the Management Console. |
| 3 | Choose Tools > System Settings. The System Settings dialog opens. |
| 4 | Choose the Call Log tab. |
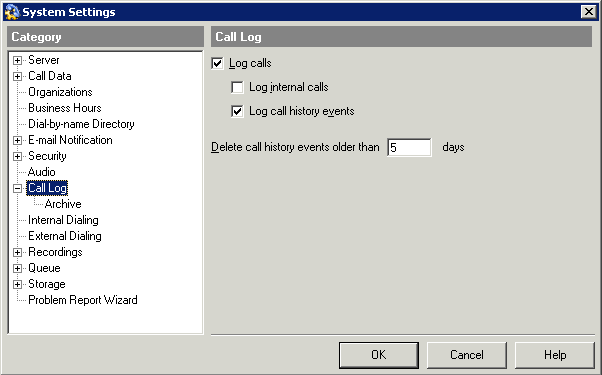
| 5 | Use the following fields to set up your call logging choices: |
| • | Log calls. If checked, Wave logs calls in the Call Log according to the selections you make on this tab. If unchecked, the Call Log is not used. |
| • | Log internal calls. Check to have internal (station-to-station) calls logged in the Call Log. If unchecked, the Call Log only logs calls that involve a trunk. |
| • | Log call history events. Select this checkbox to have call history events logged for recent calls displayed in the Call Log. Note that call history events are purged after a number of days, as defined below. |
| • | Delete call history events older than __ days. Enter the number of days that call history text remains in the system before being automatically deleted. |
| 6 | Click OK. |
Displaying a specific number of Call Log entries
The Call Log can become very large over time and its size can cause a delay in its display. To reduce this delay, you can view fewer Call Log items at one time and not load the full database.
To set the number of calls displayed in the Call Log
| 1 | From the User/Group Management applet, choose Tools > Options. The Options dialog opens. |
| 2 | In Display __ Call Log entries at a time, enter the number of entries that you want to appear when you open the Call Log view, using the following as a guide: |
| • | A high setting will likely cause a delay while the specified number of entries are copied over the network, but you can navigate within the information easily using the scrolls bars after the entries have been retrieved. |
| • | A low setting minimizes the delay before information is displayed, but you must retrieve entries more often in order to view the entire Call Log. |
| 3 | Click OK. |
Note: This option controls how many entries are transferred in one request, but does not limit the entries available for view. All Call Log entries are always available by choosing Call Log > Next 50 Calls or Previous 50 Calls, or using the buttons on the toolbar.
By default, only external calls are logged. For information about logging internal calls, see Setting Call Log options . For information about archiving the Call Log, see Archiving the Call Log.
Entering an account code for a call via the Call Monitor
To enter an account code for a call or change the one already entered, select the call and choose Call Log > Enter Account Code.
Account codes are a means of marking calls for tracking or billing purposes. For more information, see Using account codes.
Over time, Call Log information will begin to fill up your Wave database. To recover database space, you can archive old Call Log information that is no longer needed to a location outside the database.
Caution! Archived information is permanently removed from the Wave database. You cannot run Contact Center reports on the time period that has been archived.
Call Log information is written to a comma-separated value (CSV) text file that can be read by most spreadsheet and database applications. The default path is:
C:\Program Files\Wave Server\Archive\Calllog.csv
You can archive Call Log data in the following ways:
| • | Set up automatic archiving, which takes place at 1:00 a.m. every day. |
| • | Automatically overwrite the Call Log after a number of days that you specify. |
| • | Perform a manual archive on an as-needed basis, in addition to daily automatic archiving. You can do a manual archive whether or not automatic archiving is turned on. |
You do not need to stop the Wave Server or any other Wave components to perform an archive. However, because archiving is database-intensive, you may want to perform it during off-peak hours so that it does not affect normal system operation.
To archive Call Log information
| 1 | If necessary, click the Administration tab of the Management Console. |
| 2 | Click User/Group Management, located in the PBX Administration section of the Management Console. |
| 3 | Choose Tools > System Settings. The System Settings dialog opens. |
| 4 | Choose the Call Log \ Archive tab. |
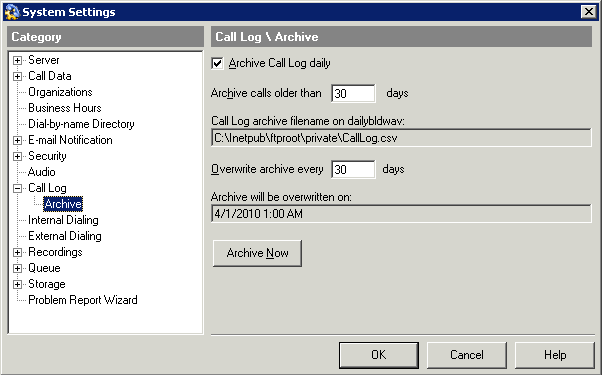
| 5 | Use the following fields to specify how you want to perform archiving: |
| • | Archive Call Log daily. Select this checkbox to automatically archive the Call Log at 1:00 a.m. every day according to the other settings you specify in this dialog. If not selected, the Call Log is written to continually and will increase in size until you manually archive it using the Archive Now button described below. |
| • | Archive calls older than ___ days. Number of days a call remains in the Call Log until it is archived. |
| • | Call Log archive file name on <Wave Server name>. Location and filename of the Call Log archive file on the Wave Server. Call Log archives are written to commas-separated value (CSV) text files that can be viewed with most spreadsheet and database applications. |
| • | Overwrite archive every ___ days. Number of days that archived information will be appended to the Call Log archive file. After that number of days, archived information in the file will be deleted and the file will be reused. |
| • | Archive will be overwritten on. Date and time that the Call Log archive file will next be overwritten and the data in it deleted. To preserve the archived data, back up the file just before it will be overwritten. |
| 6 | Click Archive Now to manually archive the Call Log according to the settings specified above. The archive begins immediately and may take several minutes to complete. You can perform a manual archive at any time whether or not automatic archiving is turned on. |
Note: You cannot perform any other Global Administrator functions until the archive completes.
| 7 | Click OK to save your archiving settings. |
Note: Use the Import and Export Wizard (see Exporting the Call Log) to create a file containing Call Log information without removing the information from the database.
You can export the Call Log to a comma-separated value (CSV) file that can be read by most spreadsheet and database applications. Exported Call Log entries are not deleted from the Wave database, and the size of the Wave database does not change after an export.
| 1 | Choose File > Import and Export. The Import and Export Wizard opens. |
| 2 | Under Select an import or export action, select Export Call Log and click Next. |
| 3 | In Save exported file as, enter the path and file name for the exported file or click Browse to specify a destination. |
| 4 | Under Options, enter the Start date and End date. |
| 5 | Click Finish to export the file. Depending on the size of your Call Log, an export may take several minutes to complete. |
Result codes when exporting the Call Log
When the Call Log is exported, the Result field appears as a code. Use the following table to interpret the result codes:
|
Code |
Result |
|
0, 3 |
Abandoned |
|
1, 2 |
Connected |
|
4 |
Left message |
|
5 |
Blind transfer |
|
6 |
Supervised transfer |
|
8 |
Login to phone commands |
|
12 |
Login failed max number of times |
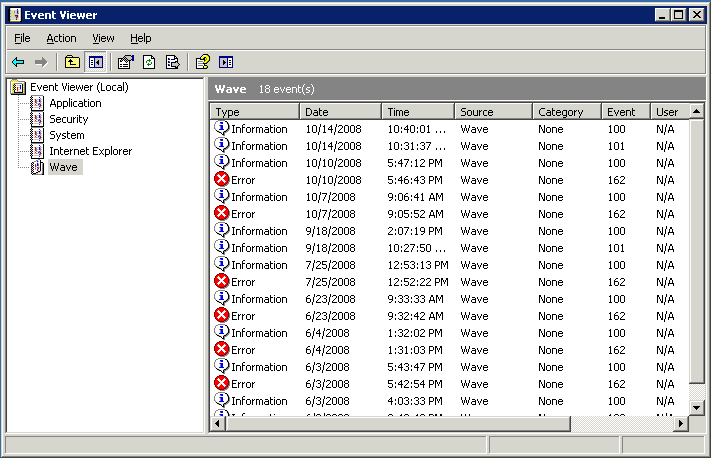
The Wave Event Log contains a record of all Wave-related system events, including start and stop times of the Wave Server and other Wave applications, and error messages.
Errors indicate that a failure has occurred. Warnings indicate that a critical resource is getting low, though no failures have occurred yet.
You can set up Wave to send e-mail notifications when events are logged to the Wave Event Log. For more information, see Setting up Wave Event Log notifications.
| 1 | If necessary, click the Diagnostics tab of the Management Console. |
| 2 | Click Event Viewer. |
The Microsoft Management Console - Event Viewer opens:
Setting up Wave Event Log notifications
You can configure Wave to send e-mail notification of each event logged in the Server’s Wave Event Log. By setting up notifications, you can stay informed of critical problems, like low disk space, no matter where you are.
To receive e-mail notification of Wave Event Log events
| 1 | If necessary, click the Administration tab of the Management Console. |
| 2 | Click User/Group Management, located in the PBX Administration section of the Management Console. |
| 3 | Choose Tools > System Settings. The System Settings dialog opens. |
| 4 | Choose the E-mail Notification \ Event Log tab. |
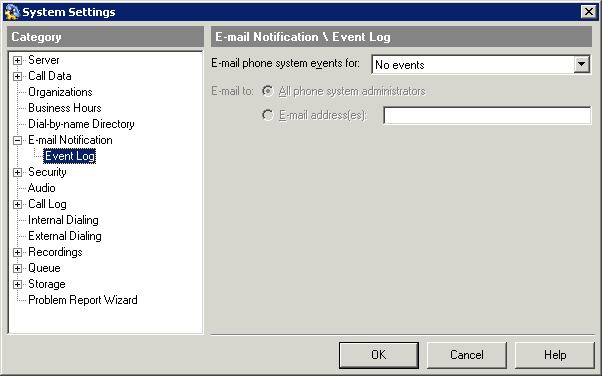
| 5 | Under E-mail phone system events for, select one of the following event levels from the drop-down list: |
| • | All events |
| • | Errors and warnings |
| • | Errors only |
| • | No events. No notifications are sent. (This is the default.) |
| 6 | Under E-mail to, identify to whom the e-mail notifications are sent. (These fields are disabled if you selected No events.) |
| • | All phone system administrators. Notifications go to all Wave users with Global Administrator permissions who have e-mail notification turned on. The users you identify here must also have e-mail notification set to receive Windows Event Log notifications. (This is the default setting.) |
| • | E-mail address(es). Enter the e-mail addresses of users whom you want to receive notifications, separated by semicolons. |
| 7 | Click OK. |
The following messages may be posted to the Wave Event Log. Messages are identified in the Wave Event Log by application and message number. Double-click a message in the Event Log to see its text.
This SQL Server has been optimized for 8 concurrent queries. This limit has been exceeded by # queries and performance may be adversely affected.
This event means that occasionally the Wave Server and ViewPoint are concurrently accessing the Wave database in excess of the 8 simultaneous database transactions allowed by Microsoft's MSDE database. You can ignore this message if you only receive 100 or so of these events per day. If you're getting this event hundred of times per day, you should upgrade to the full version of Microsoft SQL Server which doesn't have a limit on the number of simultaneous queries. See Chapter 3 of the Wave Server Installation Guide for more information.
100 - Informational
Server Started -- Version ##
An informational message indicating when the Wave Server started.
101 - Informational
Server Stopped
An informational message indicating when the Wave Server was shut down. This message indicates an orderly shutdown, not a shutdown caused by a problem.
105 - Error
No Voice Resource Available
This message indicates that Server was unable to provide a voice resource for a requested operation. This error should not be encountered in normal operation and may indicate that you need additional voice resources for your current load.
106 - Informational
Device ## Restarted
This message indicates a trunk or station was restarted to recover from an error condition. The restart may have been initiated automatically by the Wave Server or manually by the system administrator. If this message is seen only infrequently, it can be ignored. If it is seen often, contact your Wave provider.
111 - Error
Unable to start Mail Server. Voicemail notifications via Email will be disabled.
On startup, the Wave Server was unable to start the e-mail notification process. For example, it could not establish a MAPI connection with your mail post office. Mail notification will be disabled until the problem is resolved. Contact your Wave provider.
112 - Informational
Started Mail Server.
An informational message indicating that the Wave Mail Server started successfully when the Server started.
116 - Error
Server cannot record any more voice messages or calls. Disk space is low.
Wave cannot perform call recording on voice messages or calls, because the disk space on the voice files disk is low.
117 - Informational
Server can now record voice messages and calls. Disk space is available.
Call recording can resume, after having been disabled due to low disk space. Sufficient disk space on the voice files computer is now available.
145 - Informational
When user account is locked out Server provides user name and phone extension.
This message indicates that Server was unable to provide access to a user account. This error may indicate that the user exceeded the number of allowable attempts to access a user account. Reporting the user name and phone extension provides useful information to manage a lockout.
The following two T-1 alarms are written to the Windows Event Log:
| • | Red Alarm. Signals that the Robbed Bit T-1 line has lost synchronization with the switch to which it is connected. Wave disables all channels on the affected digital span so that spurious signals are not processed as incoming calls. |
| • | Red OK. Signals that synchronization has been restored. All channels on the affected digital span are re-enabled. |
All T-1 alarms are written to the Wave Server logs.
128 - Error
Notification via pager failed; Unable to allocate trunk; user ‘<username>’, number ‘##’, access code ##
An attempt to send a pager notification of a new voice message failed. The error message shows the user’s name and the full dial string of the pager number that was dialed unsuccessfully. Alert the user that the pager number might be incorrect or that pause characters should be added to the dial string.
133 - Error
Device ## is not responding, restarting...
Wave was unable to open the device and is automatically restarting it.
137 - Error
Device ## is not responding.
The trunk or station has stopped responding to events. Try restarting it.
138 - Error
Email notification thread is not responding.
E-mail notifications will be disabled until the problem is resolved.
139 - Error
Device ## Disabled.
This station or trunk was disabled by a user through the Global Administrator.
140 - Informational
Device ## Enabled.
This station or trunk was re-enabled by a user through the Global Administrator.
148 - Error
Removing Failed Sink: <name>
149 - Warning
Database size is nearing critical limit. Archive call log or upgrade to full version of SQL Server.
Your Wave database is nearing the 2GB limit of MSDE. Archive the Call Log to make more room (see Archiving the Call Log), or upgrade to the full version of SQL Server if you have not done so already. See the database server requirements in the Wave Server Installation Guide
150 - Error
Database size has passed the critical limit and call logging has been stopped. Archive call log or upgrade to full version of SQL Server.
New calls are not being written to the Call Log because the Wave database has passed the critical MSDE size limit (about 2 GB). Archive the Call Log to make more room (see Archiving the Call Log), or upgrade to the full version of SQL Server if you have not done so already. See the database server requirements in the Wave Server Installation Guide.
155 - Error
Infinite Loop:
Wave detected a Contact Center which may be sending callers back and forth to an extension in an infinite loop. This can happen if the queue redirects callers to an extension whose routing list automatically sends calls to the queue.
157 - Error
Failed to resolve the following email addresses:
An email notification was sent where at least one of the email addresses could not be resolved from a name to an address, for example, an address of “John Smith” could not be resolved as an e-mail address. Possible causes include a mistyped name (for example, “Jhon Smith”), an ambiguous name (for example, “John S”), or a problem with the address book associated with the default MAPI profile on the Wave Server.
158 - Error
Failed to send email. subject:
Wave failed to send the specified email notification. This can happen for numerous reasons, such as a network failure. The specific error is included if available.
164 - Warning
Server cannot communicate with Workstation applications because you have Internet Connection Firewall (ICF) enabled.
For the Wave Server to operate properly with a firewall, you must upgrade your PC to Windows XP SP2 or higher. Alternatively you can disable ICF.
165 - Warning
Server cannot communicate with Workstation applications because Windows Firewall exceptions are not allowed.
Please enable Windows Firewall exceptions by selecting Start > Control Panel >Windows Firewall and deselect the Don't allow exceptions checkbox.
166 - Warning
ISM cannot communicate with Workstation applications due to a problem creating a Windows Firewall exception.
Please disable the Windows Firewall by selecting Start > Control Panel > Windows Firewall and uncheck “On”.
167 - Warning
Server cannot communicate with Workstation applications due to a problem with system DCOM settings.
168 - Warning
Cannot communicate with your <name> Server because you have Internet Connection Firewall (ICF) enabled.
To use this application with a firewall, you must upgrade your PC to Windows XP SP2 or higher. Alternatively you can disable ICF.
169 - Warning
Cannot communicate with your <name> Server because Windows Firewall exceptions are not enabled.
170 - Warning
Cannot communicate with your <name> Server due to a problem creating a Windows Firewall exception.
To use this application please disable the Windows Firewall by selecting Start > Control Panel > Windows Firewall and deselect On.
171 - Warning
Cannot communicate with your <name> Server due to a problem with system DCOM settings.
172 - Warning
Windows networking settings have been updated so the <named> workstation applications can operate properly. You must restart your computer before the new settings will take effect.
176 - Error
Wave is unable process email because it cannot connect to the database.
Wave could not connect to the database after 10 attempts. Possible reason is that email notification may not be working properly.
190 - Warning
The custom N network capture filter is invalid and the default capture filter will be used instead. Ensure that the custom N capture filter was entered properly or contact your N Provider to obtain a valid capture filter.
For more information, see the capture filter syntax in the documentation section of http://www.winpcap.org.
192 - Error
MP3 Conversion Error: <name> in function N.
198 - Warning
Server cannot capture network traffic due to low disk space.
Please make sure N MB of disk space is free for network traffic to be captured.
199 - Informational
Server is now capturing network traffic. Disk space is available.
201 - Error
New voicemail call notification failed for user <name>; Unable to reach <name>.
202 - Warning
Network capture was unable to start because it was unable to discover a valid NIC.
203 - Warning
Network capture was unable to start because no valid WinPCap library.
206 - Error
Server logging has been disabled due to a disk operation error. Failed to open log file ##.
Please check the drive for errors.
207 - Warning
A hard drive partitioned as FAT32 has been detected on the Server.
Please convert the drive to NTFS to ensure mission critical reliability for the Wave Server.
7000 - Error
The dlgcmpd service failed to start due to the following error: The system cannot find the device specified.
7001 - Error
The dlgcmcd service depends on the dlgcmpd service which failed to start because of the following error: The system cannot find the device specified.
Archiving call recordings and voicemail
If you record all calls or even a significant portion of calls, or if you have users with thousands of saved voice messages and large maximum mailbox sizes, disk space on the Wave Server can quickly fill up with voice messages and call recordings. In addition, ViewPoint performance will suffer when managing thousands of recordings, or when recordings are being delivered to the user in quick succession.
To handle thousands or even millions of recordings effectively, Wave lets you archive mailbox recordings (voicemail and call recordings) to a network directory of your choice, called the archive folder. Archiving moves the mailbox recording as well as all information about the recording from the Wave Server to the archive folder, so archived voice messages and call recordings are no longer displayed in ViewPoint. If you are archiving queue mailbox recordings, each queue’s recordings are archived to a separate subfolder.
Users can then search for and manage archived recordings using the Wave Archived Recording Browser without burdening the Wave Server, Wave database, or ViewPoint.
You can restore archived recordings to the mailbox of origin or export them to another location. (When an archived recording is restored or exported, it remains in the archive folder until purged.) For more about managing and listening to archived recordings using the Wave Archived Recordings Browser, see Appendix A in the Wave ViewPoint User Guide.
This section describes the following:
| • | Setting up the Wave Recording Archive Service. |
| • | Starting and stopping the Wave Recording Archive Service. |
| • | Archiving mailbox recordings. |
| • | Configuring users who can manage archived mailbox recordings. |
See the following related topics in other Wave manuals:
| • | Installing the Recording Archive Service. See Chapter 10 in the Wave Server Installation Guide. |
| • | Using the Archived Recording Browser to search for and act on mailbox recordings. See Appendix A in the Wave ViewPoint User Guide. |
About the Wave Recording Archive Service
The Wave Recording Archive Service, which manages the archive process, runs on the archive server, a separate PC from the Wave Server. By off-loading archive processing, the Recording Archive Service can handle the resource-intensive archiving process without impacting Wave performance, and can also archive mailbox recordings from multiple Wave Servers.
About mailbox recording file formats
You can archive mailbox recordings in any of the following formats. You can specify which format to use on a user-by-user basis (see Archiving mailbox recordings.)
| • | WAV format is commonly used by Windows applications such as Windows Media Player. (WAV size = 64 Kbps, 469 Kb/minute.) |
| • | MP3 is a popular format that consumes less disk space because of its very high compression rate. The format’s compression ratio makes the MP3 format consume a significant amount of CPU and time when converting files to MP3. (MP3 size = 20 Kbps, 146 Kb/minute.) |
Note: Archiving a mailbox recording in MP3 format results in the smallest file size, about one-third the size of archiving the same recording in WAV format.
Searching for and acting on archived mailbox recordings
You use the Wave Archived Recording Browser to search and manage archived recordings. To use the Archived Recording Browser, you log on using an archive browser user name and password. For more about archive browser user accounts, see Configuring users who can manage archived mailbox recordings.
For details on how to use the Archived Recording Browser to search for and act on mailbox recordings (or to import a recording archive from Wave ISM 1.0), see Appendix A in the Wave ViewPoint User Guide.
Setting up the Wave Recording Archive Service
Important! Before you can configure the Recording Archive Service, install it as described Chapter 10, “Installing the Wave Recording Archive Service” in the Wave Server Installation Guide. Be sure to review the “Requirements” section in that chapter, which details requirements for the archive server PC and archive folder.
This topic covers:
| • | Adding a Windows Firewall exception for SQL Server to allow access from the Archived Recording Browser |
| • | Configuring the Wave Recording Archive Service |
Adding a Windows Firewall exception for SQL Server to allow access from the Archived Recording Browser
In order to prevent users being prevented from connecting to the database in order to browse archived recordings, you must add a Windows firewall exception for SQL Server to allow access from the Archived Recording Browser.
Configuring the Wave Recording Archive Service
To configure the Wave Recording Archive Service
| 1 | On the archive server, choose Start > Programs > Vertical Wave > Wave Recording Archive Service Manager. |
The Wave Recording Archive Service Manager requires administrative rights to run.
| • | If the current user has administrative rights, a Windows User Account Control (UAC) dialog opens asking the user to confirm that the application should be launched. |
Click OK to continue.
| • | If the user does not have administrative rights, a Windows UAC dialog opens asking the user to enter the username and password of a user with administrative rights. |
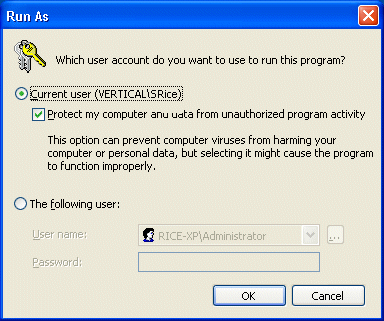
Enter that information and click OK to continue.
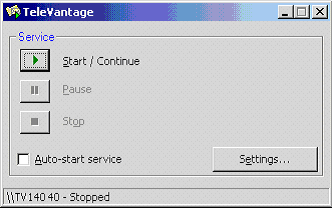
| 2 | The Wave Recording Archive Manager opens: |
| 3 | Click Settings. The Wave Recording Archive Service Manager Settings dialog opens: |
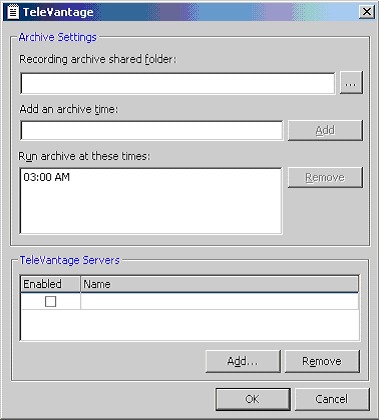
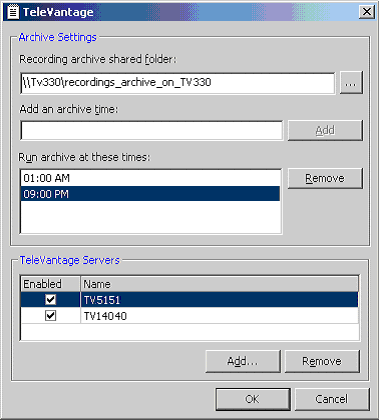
| 4 | To specify the Recording archive shared folder, Click  and browse to the archive folder you created (according to the instructions in Chapter 9 in the Wave Server Installation Guide). The archive folder is a network folder where mailbox recordings are archived, that must be shared with full read/write permissions to any user who wants to access the recordings. If you are archiving mailbox recordings from multiple Wave Servers, each one archives to an individual subfolder within the archive folder. and browse to the archive folder you created (according to the instructions in Chapter 9 in the Wave Server Installation Guide). The archive folder is a network folder where mailbox recordings are archived, that must be shared with full read/write permissions to any user who wants to access the recordings. If you are archiving mailbox recordings from multiple Wave Servers, each one archives to an individual subfolder within the archive folder. |
| 5 | Specify the time when mailbox recordings will be archived automatically. (The default archive time is 3:00 AM.) You can specify additional archive times if you need to archive more frequently. |
Under Add an archive time, enter the time using the format hh:mm AM or PM and then click Add to add it to the Run archive at these times list.
To remove an archive time from the list, select it, and then click Remove.
| 6 | To add a Wave Server to the list of Servers from which mailbox recordings will be archived, click Add, and then browse to the Wave Server that you want to add. |
When you specify multiple Wave Servers for archiving, archiving occurs on one Wave Server at a time, in the order that the Wave Servers are specified here. Once archiving completes on one Wave Server, it starts on the next Wave Server in the list. Mailbox recordings from all of the Wave Servers are archived to the same archive folder.
Note: Each Wave Server name that you specify here is used to populate the Archiving server field on that Server’s Recording \ Archive tab (Tools > System Settings in the User/Group Management applet.) For details, see Section “Message ‘Wave Recording Archive Service has not been configured to archive this server’ when starting the Global Administrator on the Wave Server” in Appendix B in the Wave Server Installation Guide.
To permanently remove a Wave Server from the list, select it and then click Remove. Once removed from the list, you cannot automatically or manually archive mailbox recordings from that Wave Server. To temporarily prevent mailbox recordings on a specific Wave Server from being archived, see the next step.
| 7 | Select the Enabled checkbox for each Wave Server that you want to archive automatically. |
Note: If Enabled is not checked, mailbox recordings will not be archived automatically on the Wave Server, but you can still perform manual archives according to the instructions in Archiving mailbox recordings manually.
| 8 | Click OK to save your changes. |
Starting and stopping the Wave Recording Archive Service
Caution! The Recording Archive Service must be running on the archive server in order for an automatic or manual archive to occur. It is recommended that you set the Recording Archive Service to auto-start according to the following instructions.
| 1 | On the archive server, choose Start > Programs > Vertical Wave > Wave Recording Archive Service Manager. |
The Wave Recording Archive Service Manager requires administrative rights to run.
| • | If the current user has administrative rights, a Windows User Account Control (UAC) dialog opens asking the user to confirm that the application should be launched. |

Click OK to continue.
| • | If the user does not have administrative rights, a Windows UAC dialog opens asking the user to enter the username and password of a user with administrative rights. |
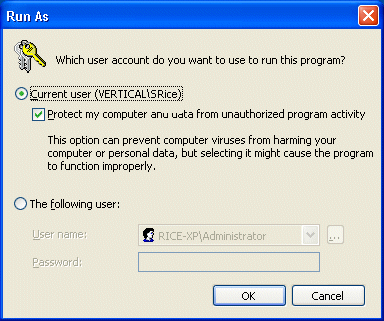
Enter that information and click OK to continue.
| 2 | The Wave Recording Archive Service Manager opens: |
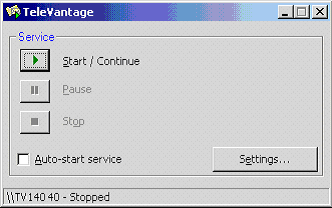
| 3 | Use the buttons to Start/Continue, Pause, or Stop the Recording Archive Service manually. |
Note: If you pause the Archive Recording Service, scheduled or manual archives will not start until you click Start/Continue and the Service is running again. If you click Pause while a scheduled or manual archive is in process, the Service will show a status of Pause Pending until the archive has completed. The status of the Service will then automatically be set to Paused.
| 4 | Select the Auto-start service checkbox to start the Recording Archive Service automatically whenever the Wave Server starts. |
You can archive mailbox recordings automatically according to the settings in the Recording Archive Service Manager, or archive manually at any time. You can modify the mailbox archive settings for an individual user when you set up the archiving event.
Archiving mailbox recordings automatically
Use the User/Group Management applet to configure automatic archiving for various mailboxes according to the following steps.
To archive mailbox recordings automatically
| 1 | If necessary, click the Administration tab of the Management Console. |
| 2 | Click User/Group Management, located in the PBX Administration section of the Management Console. |
| 3 | Choose Tools > System Settings. When the System Settings dialog opens, choose the Recordings \ Archive tab. |
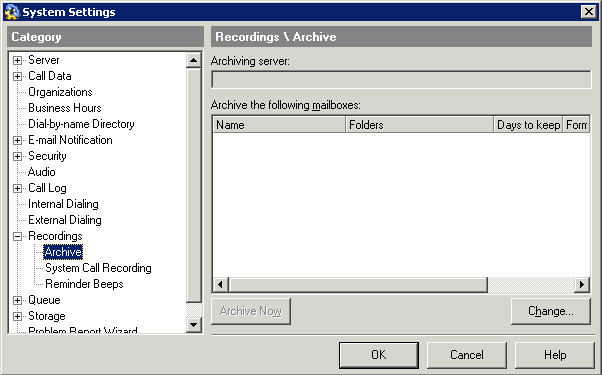
The Archiving server field is blank until you configure the Recording Archive Service to include the list of Servers from which mailbox recordings will be archived, according to the instructions in Setting up the Wave Recording Archive Service.
If you have configured the Wave Recording Archive Service and the field is still blank, try exiting User/Group Management and logging back on to refresh the field. The configured Archive Server should now appear.
Note: If you set up automatic archiving according to the following steps, archiving will not occur if Archiving server is blank, and a message will be displayed to that effect each time you start the User/Group Management applet.
| 4 | The Archive the following mailboxes list shows the voice mailboxes that will be automatically archived. To add to or change the list, click Change. The Select Mailboxes To Archive dialog opens. |
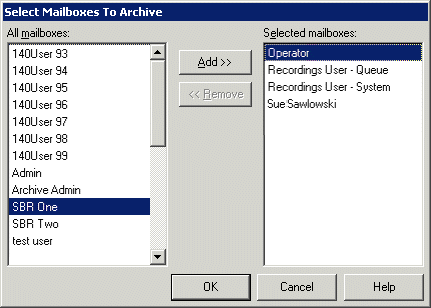
| 5 | Users in the Selected mailboxes list will have their mailbox recordings automatically archived. Use the Add and Remove buttons to modify the list. Click OK to return to the Recordings \ Archive tab. |
| 6 | To modify the mailbox archive settings for an individual user, click the following column headings for the user in the Archive the following mailboxes list: |
| • | Folders. Select which of a user’s folders to archive from the drop-down list: |
| • | Inbox only. Only mailbox recordings in the user’s Inbox folder are archived. |
| • | All folders except Deleted. All of the user’s mailbox recordings are archived. (Mailbox recordings in the user’s Deleted folder are never archived.) |
| • | Days to keep. Enter the number of days that the user’s recordings remain in the database before being archived. Click the column heading to enter a new number of days. |
| • | Format. Click the column heading to select whether to archive the user’s audio files as MP3 or WAV files. |
| 7 | Click OK. |
Archiving mailbox recordings manually
At any time, you can manually archive all mailbox recordings selected for automatic archiving, or a single user’s or queue’s mailbox recordings. (You can archive a single user’s recordings even if the user is not already included in the selected mailbox list used for automatic archiving.)
Use the User/Group Management applet to archive mailbox recordings manually according to the following steps.
To manually archive all selected mailbox recordings
| 1 | If necessary, click the Administration tab of the Management Console. |
| 2 | Click User/Group Management, located in the PBX Administration section of the Management Console. |
| 3 | Choose Tools > System Settings. The System Settings dialog opens. |
| 4 | Choose the Recordings \ Archive tab. |
| 5 | Click Archive Now. Wave archives all selected mailbox recordings already specified on the System Settings dialog, Recordings \ Archive tab. |
To manually archive a single user’s or queue’s mailbox recordings
| 1 | In the Users view, select the user and choose Users > Archive Mailbox Recordings. For a queue, select it in the Queues view and choose Queues > Archive Mailbox Recordings. The Archive Voice Mail dialog opens. |
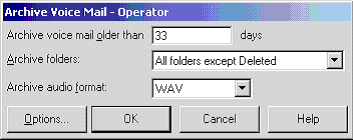
| 2 | Modify any of the following settings: |
| • | Archive voicemail older than ___ days. Enter in days which mailbox recordings you want to archive now. |
| • | Archive folders. Select which of a user’s folders to archive from the drop-down list: |
| • | Inbox only. Only mailbox recordings in the user’s Inbox are archived. |
| • | All folders except Deleted. All the user’s mailbox recordings are archived, including those in custom folders. Mailbox recordings in the user’s Deleted folder are not archived. |
| • | Archive audio format. Select whether to archive the user’s audio files as MP3 or WAV files. |
| 3 | Click OK to start archiving the user’s mailbox recordings. |
Configuring users who can manage archived mailbox recordings
Before users can search and act on archived recordings, you must configure one or more archive browser user accounts.
Archive browser user accounts do not necessarily correspond to Wave user accounts, and you do not have to create an archive browser user account for each Wave user who needs to search for and manage archived recordings—multiple Wave users can log on to the Archived Recording Browser simultaneously using the same archive browser user name and password.
Typically, you create several archive browser user accounts, each with different privileges to manage recordings, and then provide the appropriate archive browser user name and password to those Wave users who need to use the Archived Recording Browser. Each account can be shared by multiple Wave users.
Note: You use the Archived Recording Browser to configure user accounts according to the instructions in this section. The first time you run the Archived Recording Browser to configure user accounts, you use a default account with Archive Admin privileges.
To install the Archived Recording Browser
If you have not already done so, install the Archived Recording Browser according to the instructions in Chapter 9 in the Wave Server Installation Guide. For administrative purposes, you can install the Archived Recording Browser on the archive server or on another PC.
| • | The PC requirements for the Archived Recording Browser are the same as for ViewPoint, as described in “ViewPoint requirements” in Chapter 9 in the Wave Server Installation Guide. |
| • | The Archived Recording Browser is a Wave workstation application, installed via the Wave Workstation Applications Setup. In the In the Setup Type dialog, click Custom to choose the Archived Recording Browser. |
Follow the same instructions to install the Archived Recording Browser on the PCs of users who need to search for and act on archived recordings.
To add new archive browser users
| 1 | Start the Archived Recording Browser by choosing Start > Programs > Vertical Wave > Wave Archived Recording Browser. The Wave Archived Recording Browser dialog opens: |
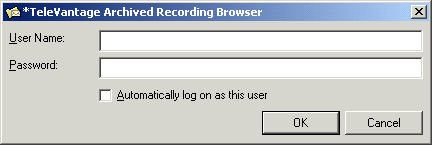
| 2 | If you are running the Archived Recording Browser for the first time, enter a User Name of Archive Admin, leave the Password field blank, and then click OK. Otherwise, log in as any archive browser user with Archive Admin privileges. |
Close the Search Archived Recordings dialog when it opens.
Note: If you are running the Archived Recording Browser for the first time, be sure to enter a password for the Archive Admin user for improved security.
| 3 | In the Archived Recording Browser, choose Tools > Manage Archive Users. The Manage Archive User dialog opens: |
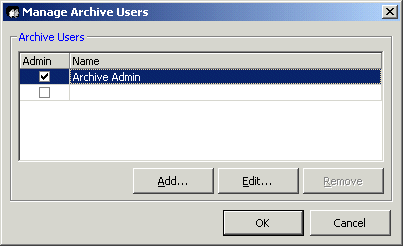
| 4 | Password-protect the default Archive Admin user. To do so, select the Archive Admin user, and then click Edit. In the Edit Archive User dialog, enter a Password and then click OK twice to save the new password. |
| 5 | To add another archive browser user, in the Archived Recording Browser, choose Tools > Manage Archive Users, and then click Add. The New Archive User dialog opens: |
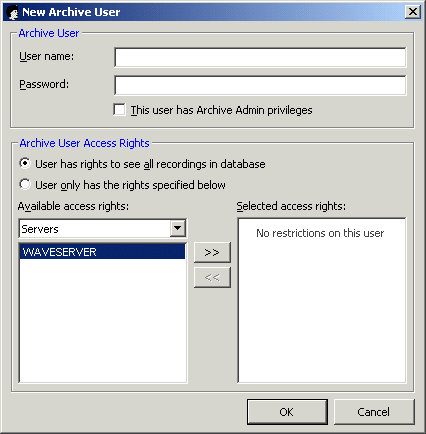
| 6 | Enter the User Name and Password for the archive browser user. These do not have to be the user’s Wave user name and password (see Searching for and acting on archived mailbox recordings for more about archive browser users.) |
| 7 | Optionally, check This user has Archive Admin privileges if you want the user to be able to add, edit, or delete archive users, or create other Archive Admin users. |
| 8 | Click one of the following to specify the user’s access rights. |
| • | User has rights to see all recordings in database. Select this option if you want the new user to be able to view and act on all archived mailbox recordings. Click OK and then go to step 10. |
| • | User only has the rights specified below. Select this option to limit the new user’s access rights to only the options you specify in the next step. |
| 9 | Select one of the following from the drop-down list: |
| • | Servers. If given access to a Wave Server, the user can search and manage only the mailbox recordings that were archived from the specified Wave Server. |
| • | Archived Mailboxes. If given access to an Archived Mailbox, the user can search and manage only the mailbox recordings that were archived from the specified Mailbox. |
| • | Users and Contacts. If given access to a user or contact, the user can search and manage all archived voice messages and call recordings involving the specified user or contact. |
To give the user an access right, select it in the Available access rights list, and then click  to add it to the Selected access rights list. Repeat this step to give the user all of the access rights required. To remove an access right, select it in the Selected access rights list and then click
  .
.
| 10 | When you are done setting the user’s access rights, click OK. |
| 11 | Add any additional archive browser users by repeating steps 5-10. |
Using the Wave Archive Recording Browser
In order to use the Archive Recording Browser to search for and act on archived recordings, you must provide each user with the following information:
| • | Network location of the archive and have network access to that location. |
| • | User name and password of one or more Archive Recording Browser user accounts. |
For instructions on how to use the Archive Recording Browser, see Appendix A of the Wave ViewPoint User Guide.
Monitoring database and disk usage
The Wave database stores your system configuration settings (information about trunks, users, auto attendants, and so forth), the Call Log, and an index to voice prompts, greetings, voice titles, and voice message files. The actual voice files themselves are stored separately on disk.
Tasks associated with monitoring database and disk space include:
| • | Allocating database space |
| • | Allocating disk space |
See the Wave Server Installation Guide for information on the limits of MSDE and SQL Server databases.
The Wave database is configured by default to use up to 50% of the available system memory, which Wave automatically allocates to itself at system startup. Memory size is set when the Wave Server starts. If you add more memory to the system (for example, to support more extensions or trunks), memory size is reset the next time you start the Wave Server.
Memory usage by the database server is dynamic. Some types of database activity (for example, nightly Call Log archiving on busy systems) may require more memory. If more memory is required to support database operations, the database server requests it from Windows. However, this memory is not released automatically when it is no longer needed. For this reason, memory usage by the Wave database typically ramps up to the maximum available, and then levels off. This is normal behavior—not a memory leak—and is not an indication that memory used by the database server is about to reach the maximum or that the system may fail.
If Windows needs the memory back at a later time for its own use or for another application, it will ask the database server to release some. Also, when you stop the Wave Server, all the memory allocated for use by the database server is released.
To view how much of the available space your system is currently consuming, do the following:
| 1 | If necessary, click the Administration tab of the Management Console. |
| 2 | Click User/Group Management, located in the PBX Administration section of the Management Console. |
| 3 | Choose Tools > System Settings. The System Settings dialog opens. |
| 4 | Choose the Storage tab. |
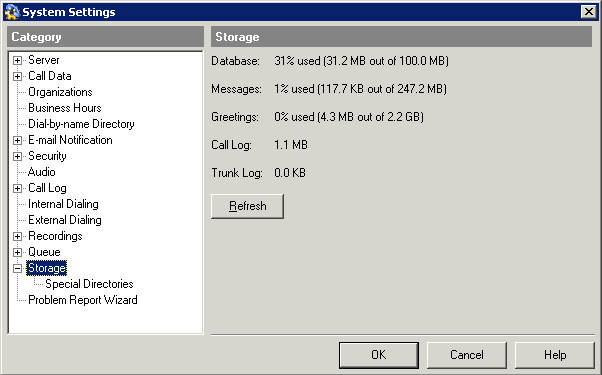
The tab displays the following information:
Note: When you start the User/Group Management applet, Wave displays a warning message if the Wave database is 80% or more full. You should check the database usage periodically to make sure that you are not running out of space. You will also automatically receive e-mail notifications of low space if you have set up Windows Event Log notifications (see Setting up Wave Event Log notifications).
| • | Messages. Percentage of disk space currently used for all users’ voicemail messages as well as any call recordings users have made, out of the total amount of space allocated. |
| • | Greetings. Percentage of disk space currently used for all users’ greetings and voice titles, out of the total amount of space allocated. |
| • | Call Log. Amount of space currently used in the Wave database for Call Log records. Some or all of this space can be recovered by archiving Call Log information if total database usage is high (see Archiving the Call Log). |
| • | Trunk Log. This feature is not supported in this version. |
| 5 | Click Refresh to refresh the information displayed on the tab. |
Changing special Wave directories
You can change the location where Wave stores the following important components on disk:
| • | Wave Database |
| • | Database transaction log |
| • | Database backup |
| • | Voice files |
Note: You must shut down the Wave Server before changing the location of special directories.
To change special Wave directories
| 1 | If necessary, click the Administration tab of the Management Console. |
| 2 | Click User/Group Management, located in the PBX Administration section of the Management Console. |
| 3 | Choose Tools > System Settings. The System Settings dialog opens. |
| 4 | Choose The Storage \ Special Directories tab. |
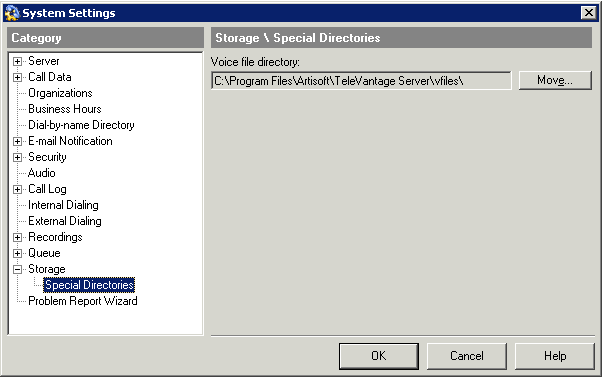
| 5 | Click Move next to a component to specify a new location for that component. |
| 6 | When you are done changing special directory locations, click OK. |
Identifying password security risks
You can analyze the passwords in use on your system for potential security risks. If you have implemented the security options described in Protecting Your Phone System Against Toll Fraud, few users should appear in the list.
For more about system security, see Protecting Your Phone System Against Toll Fraud
To analyze password security risks
| 1 | If necessary, click the Administration tab of the Management Console. |
| 2 | Click User/Group Management, located in the PBX Administration section of the Management Console. |
| 3 | Choose Tools > Analyze Security. |
The Security Analysis dialog lists any users whose passwords may may your system vulnerable, for example a password containing the associated account’s extension, a blank password, and so forth.
In addition, each user’s logon permissions are displayed (Logon via trunk, Logon via station, and so forth). Use the scroll bar at the bottom of the dialog to view these columns.
| • | To change a user’s password or other security settings immediately, select the user and then click Edit to open the User dialog. |
| • | Click Copy to Clipboard to print or save the contents of the dialog. |
Reporting problems to your Wave provider
When reporting problems, you may need to supply a variety of Wave log files and other information to facilitate the troubleshooting process. The following topics describe how to assemble and submit this information to your Wave provider.
| • | Using the Problem Report Wizard to report a ViewPoint problem. |
| • | Gathering logs to report a Wave problem. |
| • | Capturing network troubleshooting logs. These logs can be useful when troubleshooting client/server or voice-over-IP communications issues. |
Using the Problem Report Wizard
You use the Problem Report Wizard to report any ViewPoint problems to your Wave provider.
Important! The Problem Report Wizard is used for ViewPoint-related problems only. To collect logs for troubleshooting other Wave or Wave Server problems, see Gathering logs to report a Wave problem.
The Problem Report Wizard asks you to describe the frequency, patterns, and circumstances of the problem you are reporting. Based on the information you supply, the Problem Report Wizard isolates exactly when and where the problem occurred and automatically collects the appropriate Wave log files and other information from your computer. By assembling all the relevant information, the Wizard helps your provider quickly identify the problem and begin to solve it.
Helping end users to report ViewPoint problems when they occur
Instruct end users to run the Problem Report Wizard in the following ways when they experience a ViewPoint problem:
| • | For an issue with a specific call, right-click on the ViewPoint Call Log entry and choose Report a Problem. |
| • | For a general issue in ViewPoint, choose Help > Report a Problem. |
| • | If ViewPoint cannot be launched, choose Start > All Programs > Vertical Wave ViewPoint > Wave Problem Report Wizard. |
Setting Problem Report Wizard defaults
You can set values for the Problem Report Wizard that will be automatically supplied as defaults whenever it is run. The user running the Problem Report Wizard can always override the defaults.
To set Problem Report Wizard defaults
| 1 | If necessary, click the Administration tab of the Management Console. |
| 2 | Click User/Group Management, located in the PBX Administration section of the Management Console. |
| 3 | Choose Tools > System Settings. The System Settings dialog opens. |
| 4 | Choose the Problem Report Wizard tab. |
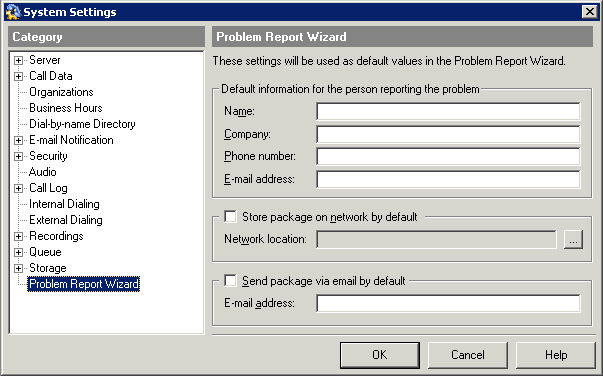
| 5 | Fill in Default information for the person reporting the problem. |
| 6 | Select one or both of the following checkboxes to specify a default action or actions when a problem report package is created: |
| • | Store package on network by default. Specify the default Network location where the package will be saved. Click the ... button to browse to a network location. |
| • | Send package via e-mail by default. Specify the default E-mail address to which the package will be sent. |
Important! Before you can send a problem report package via e-mail, you must first set up e-mail notification via the User/Group Management applet. See Setting up e-mail notification.
| 7 | Click OK. |
For problems with ViewPoint, run the Problem Report Wizard on the computer that is experiencing the problem.
Examples of ViewPoint problems include:
| • | ViewPoint behaves unexpectedly. |
| • | User cannot connect to the network. |
| • | User cannot connect to the Wave database. |
| • | ViewPoint does not start. |
| • | ViewPoint closes unexpectedly. |
| • | Data or commands executed in ViewPoint don’t look or behave properly. |
Note: For information on how to report a problem with a specific call or voice message, see Reporting problems with specific calls or voice messages.
To report a ViewPoint problem by running the Problem Report Wizard
| 1 | On the computer that is experiencing the problem, do one of the following to run the Problem Report Wizard: |
| • | From the Start menu, choose Problems > Vertical Wave ViewPoint > Wave Problem Report Wizard. |
| • | If you cannot find this shortcut, choose Start > Run. Enter the following path and then click OK. (The path on your system may be different.) |
C:\Program Files\Common Files\Vertical\
Wave\TVPRwizard.exe
| • | In ViewPoint, choose Actions > Report A Problem. |
Note: Running the Problem Report Wizard from ViewPoint only gathers logs from the current ViewPoint session. Running the Problem Report Wizard from the Start menu will pick up the appropriate logs from multiple ViewPoint sessions.
| 2 | Follow the onscreen instructions and answer the questions presented in each Wizard window. |
Reporting problems with specific calls or voice messages
Problems with specific calls or voice messages typically involve both ViewPoint running on a user’s computer and the Wave Server. To report these problems, you need to do two things:
| • | Run the Problem Report Wizard on the user’s computer. |
| • | Collect Wave Server logs as described in Downloading Wave files. |
Examples of these types of problems include:
| • | Problems with specific calls in ViewPoint. |
| • | Problems with specific voice messages in a ViewPoint Voice Messages folder. |
| • | Call-handling problems that involve ViewPoint or the Wave Server, for example, calls cannot be conferenced. |
| • | User cannot make outbound calls from ViewPoint. |
While you can run the Problem Report Wizard as described on page Reporting ViewPoint problems to report any problem, there are several easy ways to report call and voice message problems directly from ViewPoint:
| • | In the ViewPoint Call Log view, select the problem call (or the call that left the problem voice message), and then choose Actions > Report a Problem. The Problem Report Wizard starts with information about the call already entered. |
| • | To report a problem with an active call, select the problem call in the Call Monitor View and then choose Actions > Report a Problem. The Problem Report Wizard starts with information about the call already entered. |
| • | If you are very busy, you can alternatively select the problem call in the ViewPoint Call Monitor and click Flag a Problem (described below) to automatically gather information about that call, and then run the Problem Report Wizard at a later time. |
The Flag a Problem button in the ViewPoint Call Monitor lets users click once to flag a problem call, for example, a call that is not displayed correctly in the Call Monitor, or a call in ViewPoint that doesn’t match the call on the user’s phone.
Flagging a problem call can streamline the problem reporting process, for example if a company operator has too many calls coming in and cannot afford the time away from handling customers to run the Wave Problem Report Wizard for each individual problem call. You can then run the Problem Report Wizard once, at a less busy time, to gather the logs for all of the flagged calls.
To flag a problem call
| 1 | In the ViewPoint Call Monitor, select the problem call. |
| 2 |
 Click the Flag a Problem button on the ViewPoint toolbar. (The Flag a Problem button is located to the left of the Help button at the top of the screen.) Click the Flag a Problem button on the ViewPoint toolbar. (The Flag a Problem button is located to the left of the Help button at the top of the screen.) |
| 3 | If prompted in the Problem Notes dialog, enter notes about the problem, and then click OK. (By default, you will not be prompted to enter notes. To configure this behavior, contact your Vertical support representative.) |
To gather logs for all flagged calls
| 1 | At a less busy time, run the Wave Problem Report Wizard from the Start menu. |
Note: Running the Problem Report Wizard from the Start menu picks up the appropriate logs for any flagged calls across multiple ViewPoint sessions. You can also run the Wizard from within ViewPoint by choosing Actions > Report a Problem, but this will only gather the logs for calls flagged during the current ViewPoint session.
| 2 | Follow the onscreen instructions. On the second Wizard screen, deselect the This problem involved a specific call or message checkbox. |
The problem report package is a single ZIP file. It contains all the information gathered about the problem by the Problem Report Wizard. The Wizard saves the problem report package to the location you specify.
The Wizard summarizes the information reported, including the date and time the report was created, in a ProblemInfo.txt file within the ZIP file. You can open a ZIP file with any zip utility (for example, WinZip).
To prevent problem report packages from being overwritten, the Wizard gives each one a unique name based on your company name and a sequence number.

E-mailing the problem report package
Optionally, you check Send Problem Report Package via e-mail in the final window to e-mail the problem report package to a destination of your choice. Because a problem report package can be large, after you send you should delete it from your system to regain disk space.
Running the Problem Report Wizard from the command line
You can run the Problem Report Wizard without having a Wave application open by running it from the command line. This can be useful for automatically creating scheduled Problem Report Wizard captures using the Windows scheduling service. Run the file TVPRWizard.exe, located in C:\Program Files\Common Files\Vertical\Wave. You can run the file in the following ways:
| • | To run the PRWizard normally, specify \createcab:Yes. The PRWizard runs with whatever parameters you specify. |
| • | To run the PRWizard automatically, do not include the \createcab parameter. The PRWizard runs in the background, with a progress bar showing. |
When running the Problem Report Wizard from the command line, you can use any of the following parameters. All are optional.
|
Parameter |
Description |
|
/calllogentry: |
Specified Call Log entry from the User/Group Management applet or ViewPoint |
|
/stations: |
List of stations involved |
|
/clientpackage: |
Full path and filename of a client package to include |
|
/includedatabase: |
If Yes, includes a database backup |
|
/estimateddate: |
Estimated date of occurrence |
|
/estimatedtime: |
Estimated time of occurrence |
|
/exactdate: |
Exact date of occurrence |
|
/exacttime: |
Exact time of occurrence |
|
/rangestartdate: |
Start date of log range |
|
/rangestarttime: |
Start time of log range |
|
/rangeenddate: |
End date of log range |
|
/rangeendtime: |
End time of log range |
|
/summary: |
Text summary of the problem |
|
/reproducible: |
Whether the problem is reproducible. Enter Yes, No, or Unknown. |
|
/details: |
Text describing details of the problem |
|
/contactname: |
Name of contact at your company |
|
/contactcompany: |
Your company |
|
/contactphone: |
Your contact phone number |
|
/contactemail: |
Your contact email address |
|
/supportname: |
Name of your support contact |
|
/supportissue: |
Support issue number |
|
/packagepath: |
Directory in which to place the ZIP file |
|
/packagefile: |
Filename of the ZIP file |
|
/mailpackage: |
Whether the package should be e-mailed (not applicable if /createcab is set to Yes) |
|
/createcab: |
If Yes then the ZIP file creation will begin automatically |
|
/maxevents: |
Maximum number of Event Log events per Event Log type |
|
/cabpriority: |
Process priority for cabarc. Enter Normal, Idle, High, Realtime, Below_normal, or Above_normal. |
Gathering logs to report a Wave problem
You use the Download applet to download files from the Wave Server to your computer where you can examine them using your Web browser.
These logs are not included in the problem report package created by the Problem Report Wizard. You must manually gather them according to the following instructions, and then submit them as directed by your Wave provider.
Depending on your problem, Technical Support may require other logs than the ones describes here. Also, when reporting a ViewPoint problem, be sure to use the Problem Report Wizard, or have the user run it and save the problem report package or e-mail it to you. See Reporting ViewPoint problems.
Identifying when a problem occurred
You should narrow the scope of the log file contents down as much as possible to focus on the time period when the problem occurred, because the more extraneous information that you include in a log file, the longer it will take for Tech Support to identify the problem.
Here are two ways to be as specific as possible when identifying the exact time when the problem occurred:
| • | For a time-specific problem (such as a problem with a specific phone call or other error event), ask the user who is experiencing the problem to hang up when the problem occurs, then pick up the phone again and press ** at dial tone. |
Pressing ** does the following:
| • | Logs an incident in the Error Log. Examine the Error Log (C:\Program Files\InstantOffice\Logs\error.txt) to identify the exact time that the incident occurred. |
| • | Starts a new Trace Log. Examine the previous Trace Log to verify that the problem was captured. |
| • | If the problem involves a specific call, have the user copy and paste the Call Log entry for the call into an e-mail and send it to you. The information in the Call Log entry will help you gather logs that cover the time period when the problem occurred. |
Always gather the following logs when reporting a Wave problem—all of these logs can be gathered via the Download applet. The Category and File to download columns indicate the options to select for each log file when you run Download.
|
Log file name |
Category |
File to download |
|
IOmanifest.txt |
Log Bundles |
Current |
|
Error.log |
Log Bundles |
Current |
|
Error.txt |
Log Bundles |
Current |
|
Trace.fmt |
Log Bundles |
Current |
|
Trace.xxxx.log.Cab |
System Logs |
File covering the date/time range (“xxxx”) during which the problem occurred |
|
TVLOGxxx.txt |
System Logs - Auxiliary |
File covering the date/time range (“xxxx”) during which the problem occurred |
Important!
| • | New error.log, error.txt, and trace.fmt files are started each time the Wave Server restarts. If you restarted the Wave Server since the problem occurred, be sure to specify the Log Bundle that covers the time period in question. If you have not restarted the Wave Server, select Current. |
| • | Some filenames contain the date/time range covered by the file. For example, Trace.2011-05-19-12-24-27__2011-05-21-04-07-41.log file contains the traces starting on May 19th at 12:24 and continuing to May 21st at 4:07. |
| • | Other filenames contain a sequential number such as TVLog012.txt or TV_Cap_MACADDRESS_007.cap. Look at the date/time stamp in the Modified column to determine which file covers the period you are interested in. |
Problem-specific log set. Gather the following logs when reporting the indicated specific type of problem:
|
Log file name |
Problem type |
Category |
File to download |
|
TvQueuexxx.txt |
Contact Center Queue problem |
System Logs - Auxiliary |
File covering the timeframe during which the problem occurred. Look at the date/time stamp in the Modified column to determine which file covers the period you are interested in. |
|
TV_Cap_MACADDRESS_XXXX.cap |
VOIP problem |
System Logs - Auxiliary |
|
|
fmlog.xxx.txt |
Unexpected Wave Server restart |
System Logs |
|
|
WCAPISVRxxx.log |
Viewpoint Mobile App connectivity issues |
System Logs |
|
|
Connectionsxxx.log |
|||
|
Problem Report Wizard |
ViewPoint problems |
||
Other logs. Your technical support representative may request other logs specific to the problem you are experiencing. These can generally be downloaded according to the following instructions as well.
| 1 | If necessary, click the Administration tab of the Management Console. |
| 2 | Click Download, located in the General Administration section. |
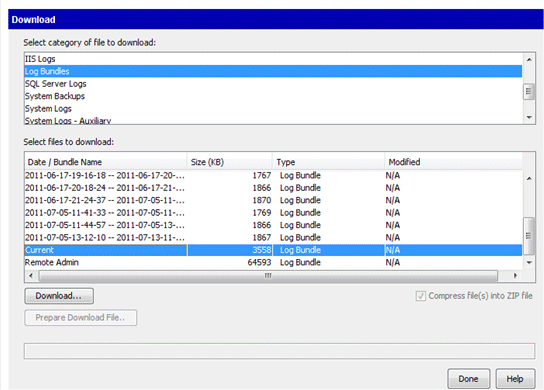
| 3 | Select a category from the list at the top of the screen. |
| 4 | Select a file or group of files from the file list. (See Which logs to gather for more about how to select different types of log files.) |
| 5 | Select the Compress file(s) into ZIP file check box to compress the files using WinZIP. (If you select more than one file, this option is selected automatically.) |
| 6 | Click Download. |
| 7 | Save the file to your local hard drive. |
| 8 | Click Done. |
Capturing network troubleshooting logs
By default, Wave continually captures network traffic information and write it to logs that can help simplify the troubleshooting of client/server or voice-over-IP communications issues.
Network capture logs capture the following protocols:
| • | Session Initiation Protocol (SIP). |
| • | Realtime Transport Protocol (RTP). (RTP logging is turned off by default.) |
| • | Trivial File Transfer Protocol (TFTP) |
| • | Address Resolution Protocol (ARP) |
| • | Internet Control Message Protocol (ICMP) |
| • | Transmission Control Protocol (TCP) (H.225, H.245) |
| • | Microsoft Distributed Component Object Module (DCOM) |
| • | Dynamic Host Configuration Protocol (DHCP) |
| • | Bootstrap Protocol (BootP) |
| • | Domain Naming System (DNS) |
When network capture is enabled, a separate series of log files is written for each network interface card (NIC) in the Wave Server PC. Optionally, a specific server location can be selected to save the network capture log files. By default, each series consists of 20 files of 32 MB each, and the files are continually overwritten starting with the oldest file. The filenames of the captured traces are in the format Tv_cap_nnnnnnnnnnnn_00xx.cap, where nnnnnnnnnnnn represents the last 12 digits of the WinpCap NIC ID, and 00xx represents the capture number (for example, 0001, 0002 ...0020). An example of a log file name is:
Tv_cap_1E2F3B4A5C85_0010.cap
Note: Network capture logs are not included in the problem report package created by the Problem Report Wizard. You must manually gather and submit network capture logs as directed by your Wave provider.
Adjusting or turning off network capture
In the User/Group Management applet, you can adjust the number and size of the log files or files or turn off network capture completely.
To adjust or turn off network capture
| 1 | If necessary, click the Administration tab of the Management Console. |
| 2 | Click User/Group Management, located in the PBX Administration section of the Management Console. |
| 3 | Choose Tools > System Settings. |
| 4 | Click the Server \ Network Capture tab. |
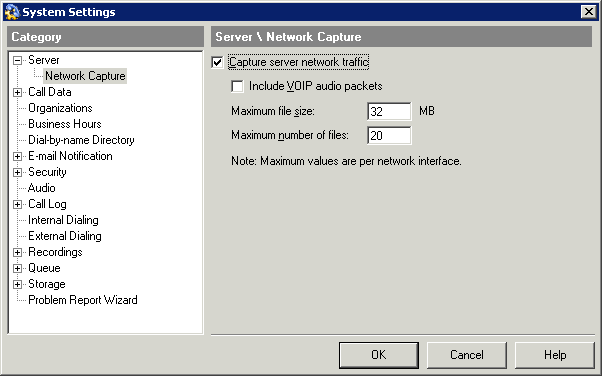
| 5 | When the Capture server network traffic checkbox is selected, you can modify any of the following settings: |
| • | Include VOIP audio packets. Select this checkbox to have the logs capture the audio portion of Voice-over-IP calls (RTP protocol.) This option is turned off by default because it can cause network capture files to fill up quickly. Select this option only if you are experiencing problems with voice quality issues on VoIP calls. |
Note: Only RTP traffic on the Wave Server’s VAM is captured. RTP traffic handled by any Media Resource Modules (MRMs) installed on the Wave Server is not captured.
| • | Maximum file size. Specify the maximum size on megabytes of each log file before Wave increments the file number and begins writing to a new log file. |
| • | Maximum number of files. Specify the total number of log files to be maintained on the system at any one time. When that number is reached, Wave begins overwriting the existing log files starting with the oldest. |
| 6 | To disable network capture, deselect the Capture server network traffic checkbox. |
| 7 | Click OK. |