1. Continuing System Administration
The following topics provide background and step-by-step procedures for performing general administrative tasks and monitoring system performance.
| • | Restoring your system configuration |
| • | Upgrading or downgrading the Wave Server |
| • | Viewing the Fault Monitor Error Logs |
| • | Downloading Wave files |
| • | Setting the minimum free hard drive space notification limit |
| • | Configuring and using SNMP |
| • | Using Disk Management and configuring RAID 1 |
Restoring your system configuration
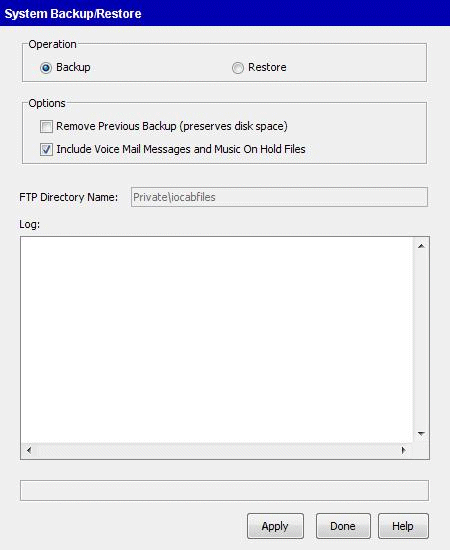
Use System Backup/Restore to restore Wave to the configuration it had when you last did a backup if a power loss has corrupted the database. The restore operation restores from the last backup cabinet (CAB) file located in C:\inetpub\ftproot\private\iocabfiles.
Note: You can only restore a system configuration at the same version as your current system—the version number, Service Pack number, and Hot Fix level must all match.
To restore Wave
| 1 | Manually restore the following items: |
| • | Network adapters and settings (including host name/machine name, setting the TCP/IP domain, and IP Address/Subnet Mask/Gateway per adapter. Adapters include: Integrated Services Card) |
| • | Wave account user names and passwords in the Password Administration applet. |
| • | The system date, time, and time zone in the Date and Time applet. |
| • | RAID-1 Configuration (disk mirroring). |
| • | Windows Workgroup or Network Domain |
| 2 | If you are restoring from a backup CAB file that was saved in a location external to the Wave Server, make sure that the backup CAB file (Iobackup.cab) is located in the C:\inetpub\ftproot\private\iocabfiles directory on your Wave Server. |
If this folder does not exist, create it and copy or FTP the CAB file into the directory. Or, just run the backup and the folder will be created automatically.
| 3 | If necessary, click the Administration tab of the Management Console. |
| 4 | Click the System Backup/Restore icon, located in the General Administration section of the Management Console. |

| 5 | Select Restore. |
| 6 | Check Include Voice Mail Messages and Music on Hold Files to restore the voicemail messages and Music on Hold WAV files from the backup file. |
| 7 | Check Include Call Navigator Prompts to restore Call Navigator prompt files from the backup file. |
| 8 | Click Apply. |
| 9 | Click Yes to confirm the Restore operation. |
Detailed results of the operation will appear in the Log.
| 10 | Click OK at the end of the restore process to reboot the Wave Server. |
Restoring network settings after using the System Recovery Disk
In the event that you need to use the Vertical Wave System Recovery Disk that came with your system, you will need to restore your customized settings using the System Backup/Restore applet with a previously created backup file. In some cases, you may need to manually reconfigure your network settings and adapter information.
After you have restored your settings using the System Backup/Restore applet (see Restoring your system configuration), a log is displayed in the applet that provides information about the Restore action. If Wave could not restore your network adapter information successfully, the log will include the following error message:
Error: Cannot Restore Network Adapters
If the error message does not appear in the log, then Wave successfully completed the restore operation and you do not need to manually reconfigure your network settings.
To restore your network settings
| 1 | Print or write down the network settings information in the log file. |
The information in the log that you will need looks like this, but has values specific to your Wave Server.
Hostname=EastCoastIO
Domain=domain.com
NameServer=192.168.1.2 192.168.1.3
SearchList=domain.com
[(Slot 6 + 5) 10/100 Base-T Ethernet Integrated Services Card 3]
IPAddress=192.168.75.4
DefaultGateway=192.168.75.1
SubnetMask=255.255.255.0
Primary WINS=192.168.1.2
Secondary WINS=192.168.1.3
[[Unknown, DLCI 16] Untitled]
IPAddress=192.168.74.1
DefaultGateway=
SubnetMask=255.255.255.0
Primary WINS=
Secondary WINS=
| 2 | Reconfigure your system name and IP addresses for each of your network adapters with the information in the log. |
Upgrading or downgrading the Wave Server
You use the Software Upgrade applet to:
| • | Upgrade the Wave Server with a new release of Wave ISM, Service Pack, or HotFix. See Upgrading the Wave Server. |
| • | Downgrade the Wave Server to rollback to a previous version of Wave ISM. See Downgrading the Wave Server. |
| • | View a history of all upgrades that have been performed. See Viewing upgrade history. |
| • | Delete one or more of the system backup files that are created automatically whenever an upgrade is performed. See Deleting system backups created during an upgrade. |
When you start the Software Upgrade applet, the Upgrade Status dialog displays the total disk space taken up by old upgrade backup files. (Backup files are created automatically whenever you perform an upgrade.)

Click Ignore backup warning and then click Done to continue. Click Delete Backup to delete some or all of the old upgrade backup files.
Wave software upgrades are distributed in a cabinet (CAB) file, a compressed archive that includes all of the files required for the upgrade.
Obtaining a CAB file
You can obtain an upgrade CAB file in either of the following ways:
| • | Via an Upgrade CD that you obtain from your Wave provider. |
| • | By downloading the upgrade CAB file from the Vertical Web site. |
For information about a specific upgrade, see the Release Notes included with that base release, HotFix, or Service Pack.
Upgrading the Wave Server consists of the following:
| • | Uploading the CAB file to the Wave Server. See Uploading a CAB file . |
| • | Performing the upgrade. See Performing an upgrade. |
Scheduling an upgrade
You can choose to perform the upgrade immediately after the upload, or you can upload at one time (for example, during your lunch hour), and then upgrade later when the system is not in use.
| • | Uploading does not interrupt phone or data services running on the Wave Server. |
| • | The upgrade process includes multiple system restarts, so you should schedule your upgrade so that normal phone service will not be interrupted. |
Before you can perform an upgrade, you must upload the CAB file to the Wave Server and add it to the Upgrade List (the list of upgrades that will be performed).
There are three ways to upload the CAB file:
| • | Upload from a file. When you choose this method, the CAB file you specify is first transferred from the source location to the PC you are using to run the Global Administrator Management Console, and then to the Wave Server. The file to upload can be a local file or a file from another network. This is the slowest upgrade method. |
| • | Network share. When you choose this method, the CAB file is transferred directly from the source location to the Wave Server. You need to provide network credentials (user name and password) to access the network location. This method is faster than a client upload, but slower than using a removable drive. |
| • | Removable drive. This option is only available if a removable flash drive or CD/DVD drive containing the CAB file has been inserted into the USB port on the Wave Server. When you choose this method, the CAB file on the drive is copied directly to the Wave Server. This is the fastest upgrade method. |
A USB flash drive or CD/DVD drive may contain a “packing list”, a builder-generated list of upgrades contained on the drive. If a packing list is detected on the drive, the CAB files are automatically uploaded to the Upgrade List in the order specified, so you don’t have to add the CAB files to the Upgrade List individually.
How long does an upgrade take?
Upload time is based on file size and the transfer method used.
| • | Uploading from a removable drive is the fastest method. |
| • | Uploading from a network share is slower than using a removable drive. |
| • | Uploading from a file is the slowest method. |
Upgrade time is the same regardless of which method you used to upload.
Note the following:
| • | Uploading a large CAB file using your browser over the LAN can take an hour or more. Upgrading from a remote source (such as over the Internet) generally takes about three times as long as upgrading from a USB flash drive or CD/DVD that is directly inserted into or attached to the Wave Server. |
| • | When you upload the file using a Web browser, a spinning icon is your only status indicator. Unless your Web browser reports an error, the file upload is probably working fine, so do not interrupt the upload. |
| • | If you are planning to upgrade over a modem connection, be sure to check the size of the upgrade CAB file. Uploads will take the longest over a modem. For example, if the upgrade CAB file is 20 MB, expect a two-hour upload over a modem. For this reason, only small HotFixes should be uploaded using a modem. |
For instructions on how to upload a CAB file, see
The automated upgrade procedure unpacks files, starts the SNMP Alarms applet (which runs throughout the process so you can monitor the upgrade status), restarts the Wave Server, copies files, restarts again, and verifies the upgrade. In addition, Wave may exercise an option to automatically break and restore the disk mirror with the redundant hard drive for subsequent upgrades, so that if the upgrade fails you can boot with your previous software version from the second drive.
Note: When you start an upgrade, the SNMP Alarm panel pops up and you can monitor the progress of your upgrade. If you have a browser pop-up blocker on your system, the SNMP Alarm panel is blocked and doesn't come up. You can usually configure these blockers to allow pop-ups from specific domains and IP addresses.
The upgrade checks the Wave software versions only. It does not check individual file versions. The registry, Call Detail Report database, and files are backed up as they are replaced. If the upgrade is successful and Wave is fully functional, the setup files are removed.
If you have mirrored disks, use the Disk Management to verify the health of your disks before proceeding with an upgrade. For information about checking your disks using Disk Management, refer to
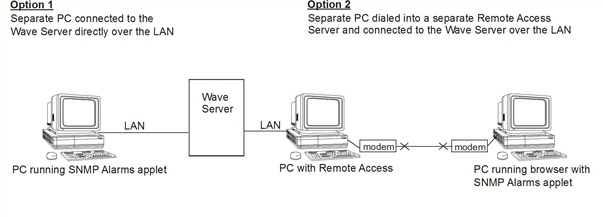
Caution! You cannot see any SNMP alarms during an upgrade unless trap destinations are configured in the SNMP Configuration applet. For instructions, see “Configuring SNMP agents” on page 1-1. In addition, be sure to run the Software Upgrade applet over the LAN or modem, as shown in the next diagram, if you want to view SNMP status.
The following diagram shows the options for viewing SNMP status:
For instructions on how to perform an upgrade, see
| • |
|
| • |
|
| • |
|
| • |
|
Upgrading from a removable drive
This option transfers the CAB file or files on the USB device directly to the Wave Server. After uploading, you can perform the upgrade immediately, or at a later time. For more about upload and upgrade options, see
To upgrade from a removable drive
| 1 | Obtain a flash drive or CD/DVD with the latest version of the upgrade CAB file from your Wave provider. |
| 2 | Insert the flash drive or CD/DVD drive into the USB port on the Wave Server. |
Note: If you connect a bootable drive via the USB port,

| 3 | Log on to the Global Administrator Management Console. |
Note: To upgrade Wave ISM software, you must have the Wave permission to run the Software Upgrade applet.
| 4 | If necessary, click the Administration tab of the Management Console. |
| 5 | Click Software Upgrade, located in the General Administration section. |
| 6 | Select the Upgrade button if necessary. |
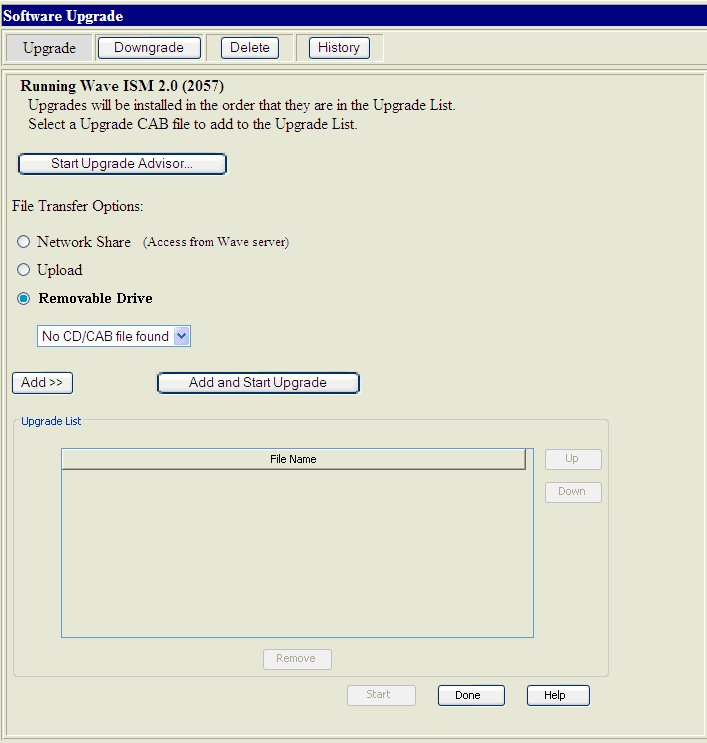
| 7 | In the File Transfer Options section, click Removable Drive. This option is only available if a removable device is inserted in the USB port on the Wave Server. |
| 8 | Do one of the following: |
| • | Click Add>> to add the CAB files on the USB device to the Upgrade List. To run the upgrade later, see |
| • | Click Add and Start Upgrade to add the CAB files on the USB device to the Upgrade List and start the upgrade immediately. |
| 9 | After the upgrade is complete, close all browser windows, and then run the Global Administrator Management Console again to review the upgrade history (see |
Upgrading from a network share
This option transfers the CAB file or files that you specify directly from the network location to the Wave Server. After uploading, you can perform the upgrade immediately, or at a later time. For more about upload and upgrade options, see
To upgrade from a network share
| 1 | Log on to the Global Administrator Management Console. |
Note: To upgrade Wave ISM software, your user account must have permissions to run the Software Upgrade applet.
| 2 | If necessary, click the Administration tab of the Management Console. |
| 3 | Click Software Upgrade, located in the General Administration section. |
| 4 | Select the Upgrade button if necessary. |
| 5 | In the File Transfer Options section, click Network Share. |
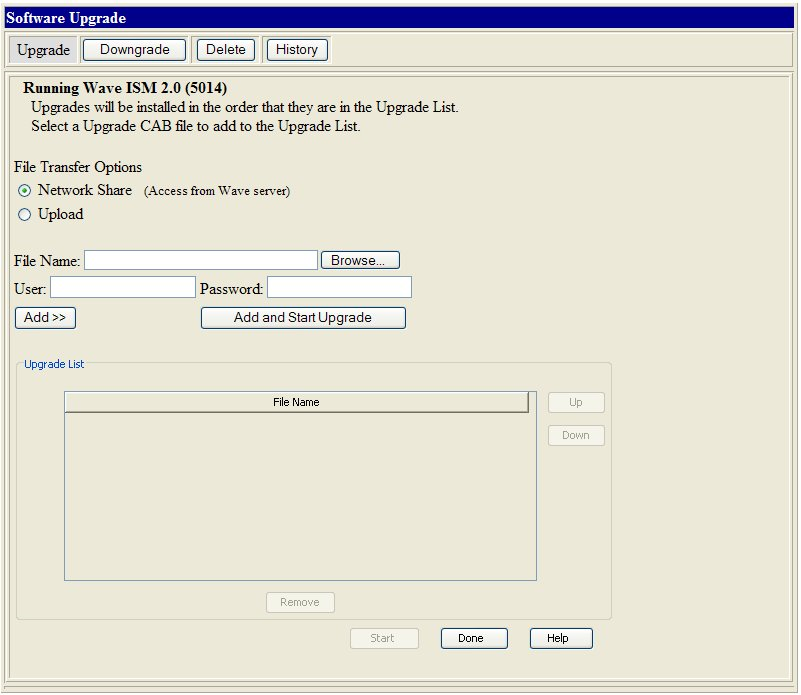
| 6 | The Network Share option does not work with mapped drives because of network mapping and credential restrictions. You must do one of the following to specify the CAB file: |
| • | Enter the path to the upgrade CAB file in the File Name field. |
| • | Click Browse to identify it. |
If you use the Browse button you must do the following:
| a | Enter the network drive name (for example, \\netdriv1). |
| b | Press Enter. |
| c | Click Browse and then select path and file of the CAB file to upload. |
| 7 | Enter your logon credentials (User and Password) required to access the network share. If the file is located on the Wave Server itself, no network credential are required. |
| 8 | Do one of the following: |
| • | Click Add>> to add the CAB file to the Upgrade List. To run the upgrade later, see |
| • | Click Add and Start Upgrade to add the CAB files on the USB device to the Upgrade List and start the upgrade immediately. |
| 9 | After the upgrade is complete, close all browser windows, and then run the Global Administrator Management Console again to review the upgrade history (see |
| 10 | After your Wave Server is back online, click Done in the Software Upgrade dialog to close the Software Upgrade applet. |
This option transfers the CAB file or files you specify from the source location to the PC you are using to run the Global Administrator Management Console, and then to the Wave Server. After uploading, you can perform the upgrade immediately, or at a later time. For more about upload and upgrade options, see
To upgrade from a file
| 1 | Log on to the Global Administrator Management Console. |
Note: To upgrade Wave ISM software, your user account must have permissions to run the Software Upgrade applet.
| 2 | If necessary, click the Administration tab of the Management Console. |
| 3 | Click Software Upgrade, located in the General Administration section. |
| 4 | Select the Upgrade button if necessary. |
| 5 | In the File Transfer Options section, click Upload. |
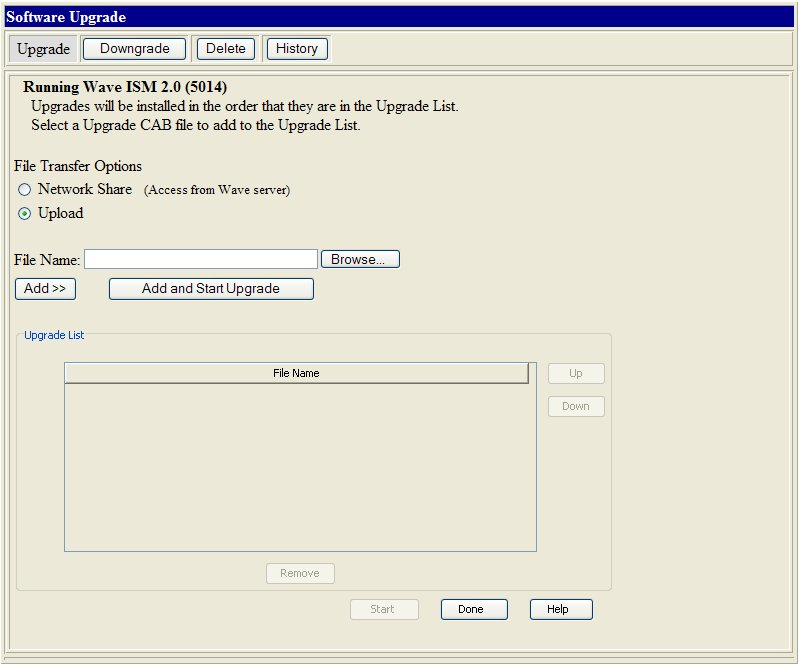
| 6 | Enter the path to the upgrade CAB file in the File Name field, or click Browse to identify it. |
| 7 | Do one of the following: |
| • | Click Add>> to add the CAB file to the Upgrade List. To run the upgrade later, see |
| • | Click Add and Start Upgrade to add the CAB files on the USB device to the Upgrade List and start the upgrade immediately. |
| 8 | After the upgrade is complete, close all browser windows, and then run the Global Administrator Management Console again to review the upgrade history (see |
| 9 | After your Wave Server is back online, click Done in the Software Upgrade dialog to close the Software Upgrade applet. |
Upgrading the Wave Server at a later time
Perform the following steps to upgrade the Wave Server using a CAB file that you previously uploaded and added to the Upgrade List.
To upgrade the Wave Server a later time
| 1 | If necessary, click the Administration tab of the Management Console. |
| 2 | Click Software Upgrade, located in the General Administration section. |
| 3 | Click Start. The upgrade begins immediately. |
| 4 | After the upgrade is complete, close all browser windows, and then run the Global Administrator Management Console again to review the upgrade history (see |
| 5 | After your Wave Server is back online, click Done in the Software Upgrade dialog to close the Software Upgrade applet. |
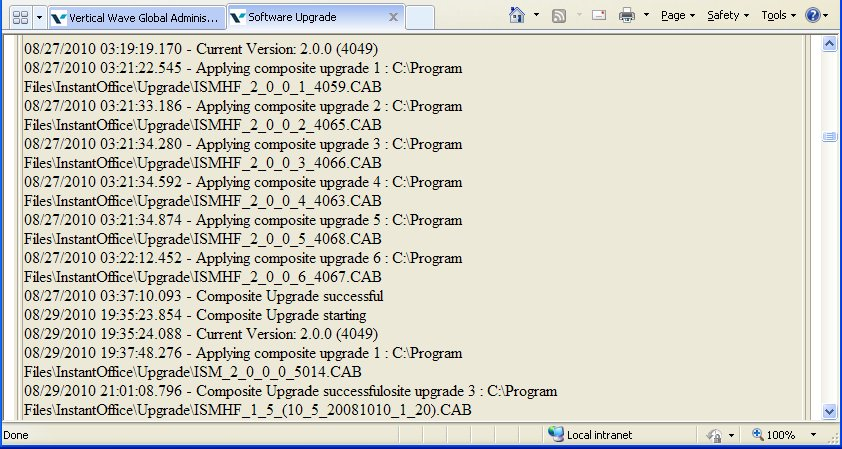
The History pane of the Software Upgrade applet displays a history of all upgrades that have been performed. It shows the date and time of current versions as well as when upgrades were started and when they completed successfully.
To view upgrade history
| 1 | If necessary, click the Administration tab of the Management Console. |
| 2 | Click Software Upgrade, located in the General Administration section of the Management Console. |
| 3 | Click History. |
Deleting system backups created during an upgrade
Backup files are created automatically whenever you perform an upgrade. You can delete all of the backup files associated with a specific upgrade to regain disk space.
Important! All backup files older than the one you select to delete will be deleted as well.
To delete upgrade backup files
| 1 | If necessary, click the Administration tab of the Management Console. |
| 2 | Click Software Upgrade, located in the General Administration section. |
| 3 | Click Delete. |

| 4 | From the Delete Upgrade Backup drop-down list, select the backup that you want to delete. |
| 5 | Click Start. Repeat these steps to delete backup files from other upgrades. |
Downgrading the Wave Server to a previous version of Wave ISM is not recommended. All backups used for a downgrade are removed during the downgrade to prevent you from attempting a subsequent downgrade which could render your Wave system inoperable.
During the downgrade process, the SNMP Alarms applet provides status. As in the upgrade process, the Wave Server is restarted twice while a downgrade is performed.
Caution! When you downgrade to the software version that was originally shipped with your Wave Server, you also replace your registry with the registry that was shipped with your Wave Server, and you will lose your configuration information.
To downgrade the Wave ISM software
| 1 | If necessary, click the Administration tab of the Management Console. |
| 2 | Click Software Upgrade, located in the General Administration section. |
Note: To downgrade the Wave ISM software, you must log on with an Wave user account that has permission to access the Software Upgrade applet.
The Software Upgrade applet starts.
| 3 | Click Downgrade. |
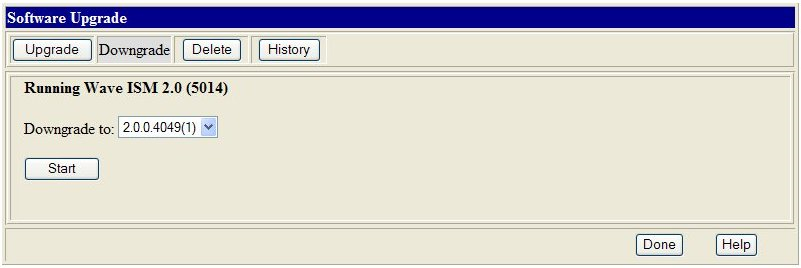
| 4 | Select the Wave ISM version to downgrade to from the drop-down list. If it is not possible to downgrade, no version will be listed. |
| 5 | Click Start. |
A Downgrade Status message is displayed, and immediately afterwards, the SNMP applet starts so you can monitor the process of the downgrade.
Note: The downgrade procedure reboots the Wave Server twice.
| 6 | After your Wave Server is back online, click Done in the Software Upgrade dialog to close the Software Upgrade applet. |
You will typically access the Software Versions applet when you are troubleshooting an issue, to poll for a list of installed software, or to determine the need to download patches or software upgrades. The Software Versions applet lists the contents of the iomanifest.txt file, which details the product version number, as well as the software (the latest CAB file) installed in Wave.
To check software versions
| 1 | If necessary, click the Administration tab of the Management Console. |
| 2 | Click Software Versions, located in the General Administration section. |
| 3 | Scroll through the file until you find the software you want to check. |
| 4 | Click Done to the Management Console. |
Viewing the Fault Monitor Error Logs
The Fault Monitor is an embedded processor that provides independent watchdog services for the overall system, collecting system error messages that help you determine why a fault has occurred. The fault monitor module stores a copy of a subset of the system traces that are stored by the system trace manager, specifically those that are flagged as severe or fatal errors.
The Fault Monitor module must be connected to an analog trunk in order to use dial-in access and pager notification. For information on connecting the Fault Monitor module to a trunk, refer to the Wave Server Installation Guide. For a full discussion of using the Fault Monitor, refer to the Wave Server Hardware Reference Guide.
The fault monitor module stores copies of a subset of the system traces that are stored by the system trace manager, specifically those that are flagged as severe or fatal errors. The Fault Monitor main buffer is implemented as a circular buffer so that it always contains the most current traces. The buffer is 28 K bytes, and can contain around 250 traces, depending on the size of each trace. On each reboot, the entire contents of this buffer is saved to the file fmlog.*.txt, where the * represents the date and time the traces were saved. You can find the fmlog.*.txt files on the Wave Server hard drive in the C:/Program Files/InstantOffice/Logs directory.
If a bluescreen event occurs, the operating system bluescreen data generated by the event is saved in a memory dump in c:\windows\memory.dmp.
The contents of these buffers are lost if the Wave Server is powered off. In any situation where the Wave is non-responsive and you wish to preserve the contents of these buffers for later access, you should use the black reset button located on the Integrated Services Card. The Wave Server should not be powered off so as to preserve the traces in the fault monitor buffers.
To view the Fault Monitor Error Logs
| 1 | If necessary, click the Administration tab of the Management Console. |
| 2 | Click General Settings, located in the General Administration section. |
| 3 | Select the Fault Monitor tab. |

| 4 | Click View Fault Monitor Error Logs. |
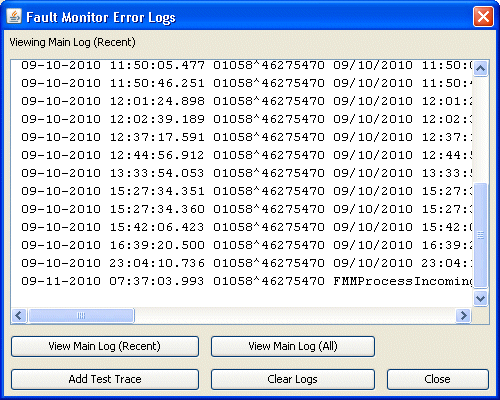
| 5 | Click one of the following buttons: |
| • | View Main Log (Recent). Displays the contents of the last 4K of the Main Log (default view) |
| • | View Main Log (All). Displays the entire contents of the 32K Main Log |
| • | . displays the contents of the Alternate Log |
| • | Add Test Trace. Adds a test trace with an appropriate time stamp and the text Management Console ==> Test trace to the end of the Main Log. To view the test trace, click either View Main Log (Recent) or View Main Log (All). |
| • | Clear Logs. Clears the contents of the Main Log and Alternate Log. To verify that the logs have been cleared, click View Main Log (Recent), View Main Log (All), or View Alternate Log. |
| 6 | Click Close to close the dialog and return to the General Settings applet. |
| 7 | Click Apply to save your changes. |
| 8 | Click Done to return to the Management Console. |
The Download applet is a diagnostic tool that allows you to download files from the Wave Server to your workstation for inspection. Files are downloaded by sending them through FTP to the web browser on your workstation. The browser will prompt you to choose a location to save the files.
Hint: One way to use the Download applet is to gather logs to submit a problem report to your Wave provider. For details, see
You can download files from any of the following categories:
| • | CMS Reports. Reports and log files for Vertical Wave Fax Manager and Vertical Wave Service Response products. |
| • | CRQ Reports. Reports and log files for Vertical Wave Fax Manager and Vertical Wave Service Response products. |
| • | Client Components. Executables for distribution to client workstations. |
| • | Call Navigator Reports. Reports and log files for Call Navigator. |
| • | Database. |
| • | Global Administrator History. History file for Management Console access. |
| • | Global Administrator Logs. Log file for Management Console access. |
| • | IIS Logs. |
| • | Log Bundles. Log files in this category are used when troubleshooting Wave problems. See |
| • | SQL Server Logs. |
| • | System Backups. Configuration backup CAB files and backup logs. |
| • | System Logs. Wave Server logs. |
| • | System Logs - Auxiliary. Wave Server auxiliary logs. Log files in this category are used when troubleshooting Wave problems. See |
| • | System Reports. Daily archives from the Call Detail Report and Trunk Statistics Report. |
| • | ViewPoint Data Provider Configuration and Components. Configuration settings for the ViewPoint Data Provider. |
| • | ViewPoint Data Provider Logs. Activity history for all ViewPoint database requests. |
To download Wave files
| 1 | If necessary, click the Administration tab of the Management Console. |
| 2 | Click Download, located in the General Administration section. |
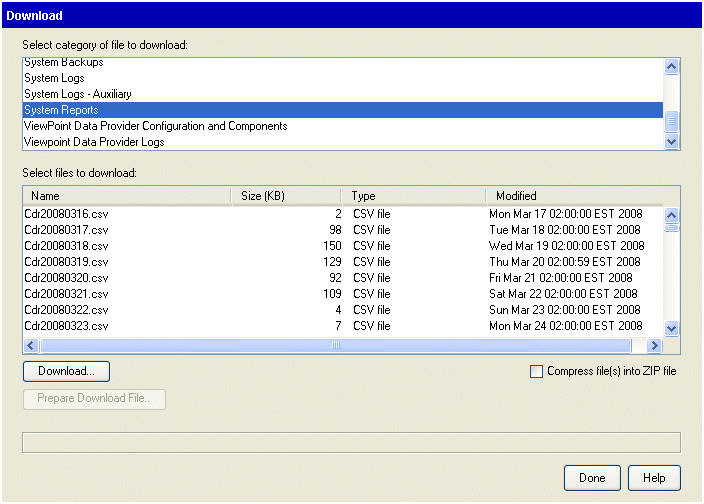
| 3 | Select a category from the list at the top of the screen. |
| 4 | Select a file or group of files from the file list. |
| 5 | Select the Compress file(s) into ZIP file check box to compress the files using WinZIP. (If you select more than one file, this option is selected automatically.) |
| 6 | Click Download. |
| 7 | Save the file to your local hard drive. |
| 8 | Click Done to return to the Management Console. |
Setting the minimum free hard drive space notification limit
This option allows you to set a notification to warn you when there is between 50-400 megabytes of primary hard drive space left on your Wave Server.
Note: You must be monitoring your Wave Server with SNMP to benefit from this feature.
To set a minimum free hard drive space notification limit
| 1 | If necessary, click the Administration tab of the Management Console. |
| 2 | Click General Settings, located in the General Administration section. |
| 3 | Select the System tab. |
| 4 | Select a number from the Notify when less than __ megabytes free drop-down list. |

When your hard drive reaches the limit you set, an SNMP trap will be sent with the following message:
Min Free Space=n. Current Avail Free Space=y.
where n is the amount of minimum memory in megabytes you set, and y is the actual current available free space.
| 5 | Click Apply to save your changes. |
| 6 | Click Done to return to the Management Console. |
Simple Network Management Protocol (SNMP) can be used to monitor and diagnose a Wave Server, notifying you about any alarms and traps.
Using the SNMP Configuration applet, you can configure traps to notify specified clients about any unsolicited events and you can set up several levels of security. Using the SNMP Alarms applet, you can monitor current and review previous alarms.
All Management Information Bases (MIBs) reside on the Wave Server in the C:\Program Files\SNMP\MIBs directory.
For complete information about Wave SNMP agents and a list of other supported agents, see:
| • | SNMP terminology |
| • | Configuring SNMP agents |
| • | Configuring an SNMP trap filter |
| • | Configuring SNMP security |
| • | Configuring a contact |
| • | Using SNMP alarms |
SNMP terminology used in the configuration applet is explained in the following table.
|
Term |
Meaning |
|
Community Name |
Both the SNMP management system and SNMP agent must be members of a group so that SNMP messages can be passed between them. The logical name assigned to such a group can be any combination of alphanumeric characters, and is referred to as a community name. SNMP operations require a valid community name; up to seven community names can be specified. Community names, known only to registered users or administrators, provide the security required by SNMP SET operations. The globally known “public” can be used as a community name, but does not provide security. If no community is specified, all SNMP requests will be honored. The SNMP agent residing on the managed node accepts or rejects an SNMP request based on the community name contained in the request. For example, an agent configured with the community name “vertical” rejects all requests containing any other community name. |
|
Host |
The management system requesting SNMP information from this Wave Server. |
|
Trap |
An unsolicited asynchronous message sent from an SNMP agent to a management system. Traps are typically sent by the agent when a predefined condition or event occurs. For details on such conditions and events, see |
|
Trap Community |
The string encoded in a trap message (packet) by the agent; placeholder for trap destinations. Like community name, the trap community name can be any combination of alphanumeric characters; unlike community name, trap community names have nothing to do with security. “Public” is fine to use as a default. |
|
Trap Destination |
A specific network address (IP or DNS host name) to which a trap message is sent. Up to five trap destinations can be added for each trap community. |
You will typically access the SNMP Configuration applet to configure community names, trap destinations, and specific management (host) destinations. Once SNMP agents are configured:
| • | Users can view SNMP traps from the Wave Server through the SNMP Alarms applet. |
| • | Specified clients will be notified when SNMP traps occur. |
| 1 | If necessary, click the Administration tab of the Management Console. |
| 2 | Click SNMP Configuration, located in the General Administration section. |
| 3 | On the Agent Panel tab, enter the following information: |
| • | Contact. Contact person for this Wave Server. |
| • | Location. Physical location of this Wave Server. |
Both fields can contain a maximum of 255 characters.
| 4 | Click the Traps tab. |
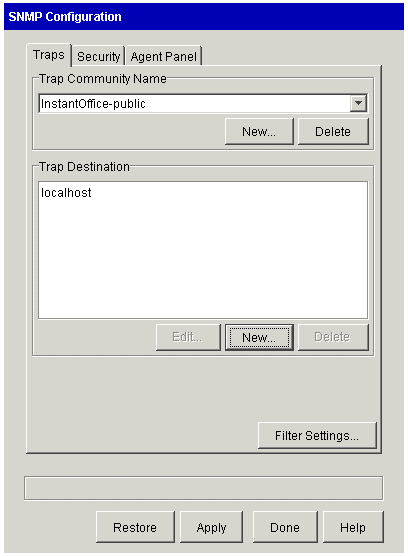
| 5 | Click New to add a trap community name. |
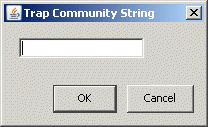
| 6 | Type InstantOffice-public, and click OK. |
You must have a valid trap community name in order to see SNMP alarms. Public is the default community string, but it can be changed.
| 7 | Repeat steps 5 and 6 to add more trap community names. |
To add a trap destination
| 1 | Choose a trap community name from the list. |
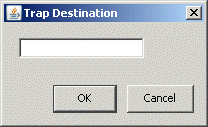
| 2 | Click New under Trap Destination. The Trap Destination dialog opens. |
| 3 | Type the DNS host name of the Wave Server, and IP address of the trap destination, then click OK. |
By default, the trap destination list includes localhost, which means that SNMP alarms will be returned to the Wave Server you are configuring, and can be monitored via the SNMP Alarms applet in the Management Console.
| 4 | Repeat to add more trap destinations. |
Client machines listed as trap destinations receive SNMP traps, which can be viewed from the SNMP Alarms applet. All client destinations listed as trap destinations receive SNMP traps from this Wave Server. The community name encoded in the trap message depends on which community the trap destination belongs.
Configuring an SNMP trap filter
Using SNMP Filters, you can enable and disable specific groups (trap groups) of SNMP traps to filter the traps for network monitoring tools.
To filter SNMP traps
| 1 | If necessary, click the Administration tab of the Management Console. |
| 2 | Click SNMP Configuration, located in the General Administration section. |
| 3 | Click the Filter Settings button on the Traps tab. |
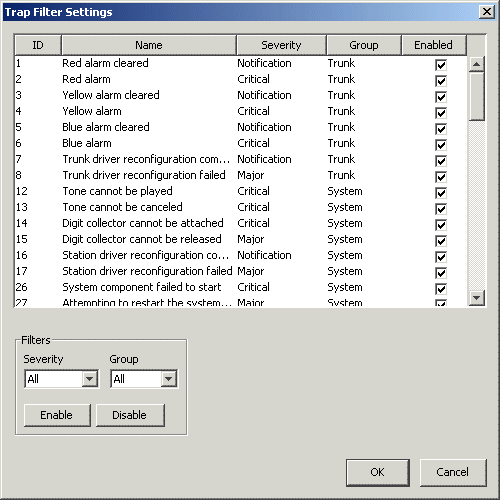
| 4 | You can enable or disable traps by severity or by group using the Severity and Group drop-down lists and then clicking Enable or Disable after each selection. |
| • | Severity. Select All, Critical, Major, or Notification. |
| • | Group. Select All, System, Trunk, System, Upgrade, Hardware, OS, Data, or MSM. |
For those traps that are selected for filtering, the Enabled check box is checked.
| 5 | Click OK. |
| 6 | Click Done to save your changes return to the Management Console. |
| 1 | If necessary, click the Administration tab of the Management Console. |
| 2 | Click SNMP Configuration, located in the General Administration section. |
| 3 | Click the Security tab. |
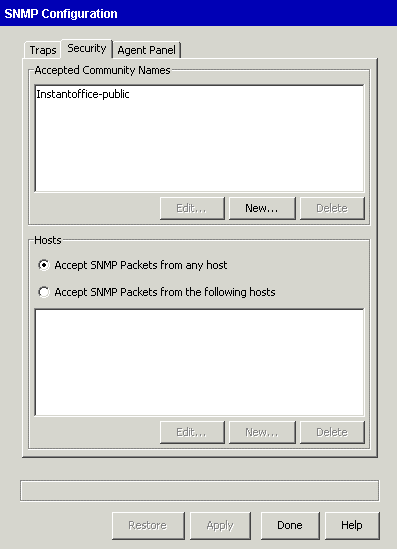
| 4 | Click New to add an SNMP community name. |
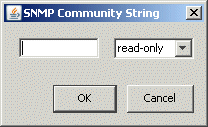
| 5 | Type a valid SNMP community name. |
If no community name is specified, SNMP requests containing any community name are accepted. A certain level of security can be effected by setting the agent to allow another private community string. Up to seven such community names can be specified on the agent. SNMP requests will only be accepted if they contain one of the configured community names.
| 6 | Specify if the community string is read-only or read-write using the drop-down list. |
| 7 | Click OK. |
| 8 | Repeat steps 4 through 7 to add more community names. |
| 9 | If you wish to specify that SNMP messages be accepted only from particular hosts: |
| a | Click the Accept SNMP packets only from the followings hosts option. |
| b | Click New. |
The SNMP Hosts dialog opens.
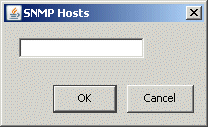
| c | Type the host name or IP address, and click OK. |
| d | Repeat to add more hosts. |
Naming particular hosts adds another level of security to SNMP monitoring. By default, SNMP packets are accepted from any host.
| 10 | Click Apply to save your changes. |
| 11 | Click Done to return to the Management Console. |
If you want to specify a person or organization to contact in the case of an SNMP alarm that requires immediate attention, you can enter that information in the Agent Panel tab in the SNMP Configuration applet.
To configure a contact
| 1 | If necessary, click the Administration tab of the Management Console. |
| 2 | Click SNMP Configuration, located in the General Administration section. |
| 3 | Click the Agent Panel tab. |
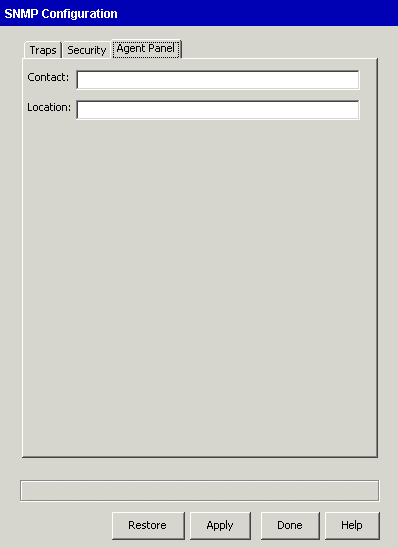
| 4 | Type the name of the person or organization to contact in the Contact field. |
| 5 | Type the location, or a phone number, of the person or organization to contact in the Location field. |
| 6 | Click Done to save your changes and return to the Management Console. |
You will access the SNMP Alarms applet frequently as you monitor the Wave Server. Once the SNMP Configuration applet has been configured, the SNMP Alarms applet reports all SNMP traps sent by SNMP agents residing on the Wave Server. You can view alarms to help determine why, for example, your T-1 link or the Wave Server is down.
SNMP alarms can also be sent to third-party monitors by specifying their IP address and setting appropriate community names. Consult your SNMP monitor documentation for further details.
Caution! You cannot see any SNMP alarms unless trap destinations are configured in the SNMP Configuration applet. You must configure a valid trap community name, and the host name or IP address of the Wave Server as the trap destination.
The SNMP Alarms applet provides two views:
| • | Current alarms: Real-time traps occurring in the Wave Server. Once you have noted the trap, you can remove it from this view. |
| • | Previous alarms: Traps that have occurred when the client was not monitoring alarms in real time. All alarms are retained in a permanent record which you can view at any time by using the Previous Alarms button. |
Types and severity of alarms are detailed in Critical Alarms.
Note: The alarms, Connection to the system is lost and Connection to the system is restored are not SNMP alarms and the time stamps associated with them are approximate.
To use the SNMP Alarms applet
| 1 | If necessary, click the Administration tab of the Management Console. |
| 2 | Click SNMP Alarms, located in the General Administration section. |
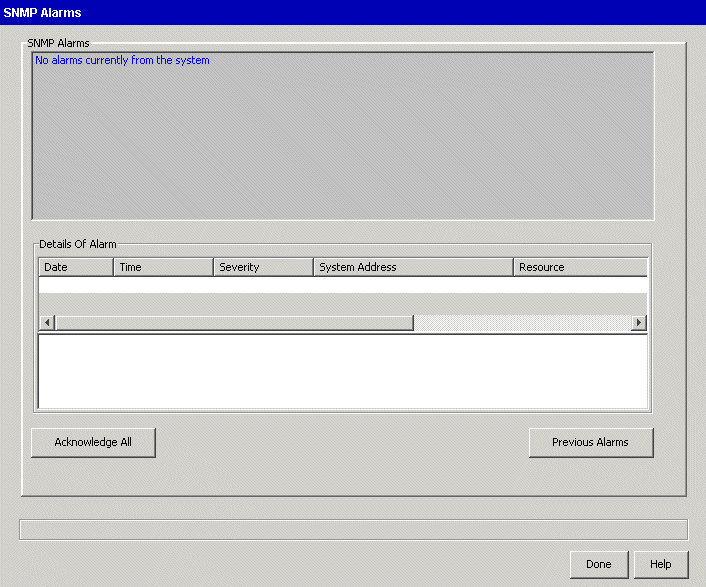
The most recent alarms are displayed in the upper list box.
To monitor alarms in real time, leave the applet open. Alarms are reported continuously, since a permanent connection with the Wave Server is maintained.
The SNMP Alarms applet displays the most recent alarm at the top of the list.
| 3 | Select an alarm to view details in the lower text area. |
| 4 | Click Acknowledge All to remove the list of current alarms and place them in the Previous Alarms log. |
| 5 | To see a list of all previous alarms, click Previous Alarms. |
The SNMP Alarms applet displays all the previous Wave alarm messages.
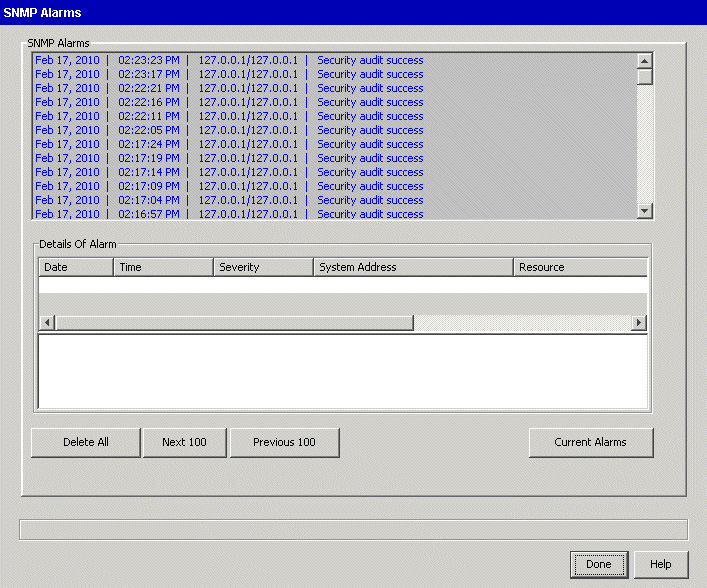
| 6 | Click Next 100 or Previous 100 to traverse through the alarms. |
| 7 | Double-click an alarm to display the details for that alarm. |
| 8 | Click Delete All to remove all the alarms from the Previous Alarms log. This also deletes the history file from the file system. |
| 9 | Click Current Alarms to return to the applet that lists only the current SNMP alarms. |
| 10 | Click Apply to save your changes. |
| 11 | Click Done to return to the Management Console. |
Most critical (red) alarms are initiated by the Wave Server, although in some cases a service provider’s equipment signal will be displayed as a red alarm. Critical alarms indicate a significant problem with the T-1 link or the Wave Server. Some of the causes for a critical alarm follow.
| • | Cable is not connected |
| • | Not receiving a T-1 stream because of a short in the RCV wires |
| • | Receiving an incompatible DS1 frame structure |
| • | Receiving signal (voltage) is too weak because the trunk cable is too long |
Most major (yellow) alarms are initiated by your service provider because their equipment is not able to process the T-1 stream. Some of the causes for a major alarm follow:
| • | Service provider is receiving incompatible DS1 frame structure |
| • | Transmitting signal is too weak because the trunk cable is too long |
Notification (green) alarms indicate a system modification. For example, a T-1 module or analog station module has been reconfigured.
Using Disk Management and configuring RAID 1
You will typically access the Disk Management application using the RAID 1 Configuration icon to determine the status of your Wave Server hard drives, mirror a new hard drive, or use a mirrored hard drive to recover Wave after a failure. You can also mirror a hard drive as a method of backing up your Wave configuration.
| 1 | Shut down the Wave Server. |
| 2 | Insert the old hard drive in slot B. |
| 3 | Restart the Wave Server. |
| 4 | If necessary, click the Administration tab of the Management Console. |
| 5 | Click RAID 1 Configuration, located in the General Administration section. |
| 6 | Select a partition on Disk 1. |
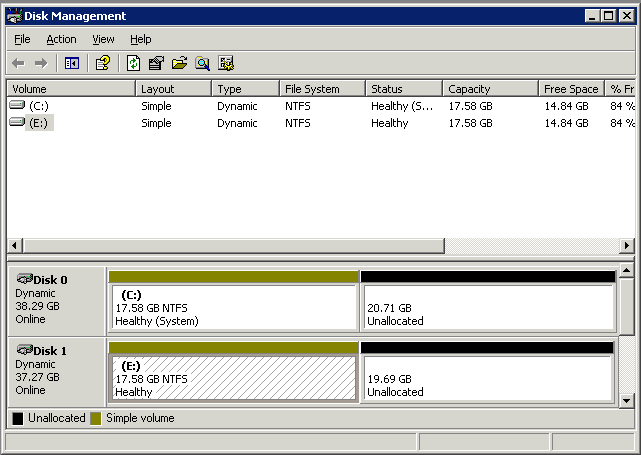
| 7 | Choose Action > All Tasks > Delete Volume. |
| 8 | Click Yes. |
The drive letter will be removed, the partition will be cleared, and a new color will indicate free space (the default is striped).
| 9 | Repeat steps 6 to 8 for each partition. |
A hard drive should be free and clear of partitions before it is used for mirroring.
Cloning a hard drive using RAID
Cloning a hard drive, using RAID, is an effective way to create a duplicate of Wave.
To clone a hard drive
| 1 | Create a mirror of the hard drive using the instructions in |
| 2 | Shut down the Wave Server. |
| 3 | Remove the hard drive from Slot B. |
| 4 | Restart the Wave Server. |
| 5 | If necessary, click the Administration tab of the Management Console. |
| 6 | Click RAID 1 Configuration, located in the General Administration section. |
| 7 | Select Action > All Tasks > Remove Mirror. |
| 8 | Select Disk 1, then click Remove Mirror. |
| 9 | Shut down the Wave Server. |
| 10 | Insert a new hard drive and restart the Wave Server. |
| 11 | Establish the mirror between the two hard drives, using the instructions in Mirroring your hard drive and RAID. |
| 12 | Install the hard drive you removed in another Wave Server. |
You will need to assign new IP addresses and a new host name to the Wave Server housing the cloned hard drive you removed from the original Wave Server.
To determine the condition of a mirror set, periodically check the status bar in the Disk Management application. Disk Management displays information about the mirror in the Status column in the Volume List. The following table describes each status type that could be displayed in the Disk Management Status column. If a partition in the set is damaged or loses synchronization with the other partition, FAILED or FAILED REDUNDANCY is displayed.
|
Status |
Description |
|
FAILED |
Displayed when a volume cannot be started automatically or the disk is damaged. |
|
FAILED REDUNDANCY |
Displayed when one of the mirrored disks is not online. |
|
HEALTHY |
Status if the mirror set is healthy. |
|
REGENERATING |
Displayed while Wave is generating the mirror set. |
|
RESYNCHING |
Displayed while Wave is establishing the mirror. |
To check the status of a RAID disk
| 1 | If necessary, click the Administration tab of the Management Console. |
| 2 | Click RAID 1 Configuration, located in the General Administration section. |
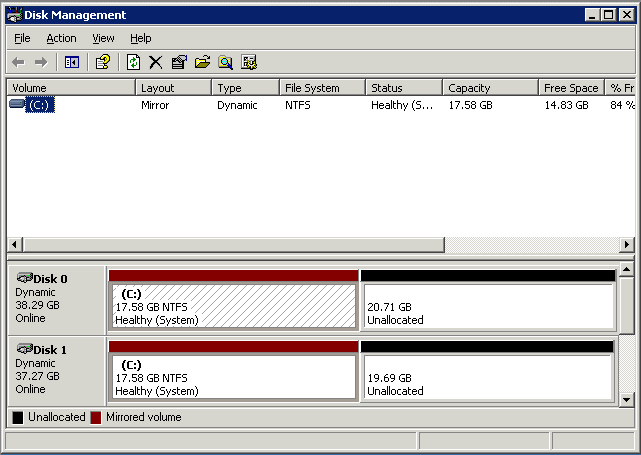
Mirrored and HEALTHY disks appear like this in the Disk Management applet:
Recovering with RAID-1 Configuration
If the disk in the Wave Server’s slot A is damaged, use the disk in slot B to restart the Wave Server.
Hint: The Windows Event Viewer may help you determine hardware status and what happened to cause the damage.
To recover Wave from a mirrored disk
| 1 | Shut down the Wave Server. |
| 2 | Remove the hard drive from slot A. |
| 3 | Move the mirrored hard drive from slot B to slot A. |
| 4 | Restart the Wave Server. |
| 5 | If necessary, click the Administration tab of the Management Console. |
| 6 | Click RAID 1 Configuration, located in the General Administration section. |
| 7 | Select Action > All Tasks > Remove Mirror. |
| 8 | Select Disk 1, then click Remove Mirror. |
Note: No fault tolerance is available until a new mirror is established.
| 9 | Re-establish fault tolerance (RAID-1). To do so: |
| a | Shut down the Wave Server. |
| b | Insert a new hard drive in slot B. |
| c | Follow the instructions in |
Import/Export provides Wave dealers and administrators with a powerful tool to reduce system administration effort and cost via offline editing of Wave component settings and batch updates, as well as speed up the system staging, installation, deployment, and migration process.
In this version, you can import and export the following ViewPoint components:
| • | Personal call rules |
| • | Personal routing lists |
| • | Personal routing list actions |
The following are NOT supported in this version:
| • | Importing and exporting a call rule that contains a schedule condition of During custom hours. |
| • | Importing and exporting the Standard routing list (the default routing list that is built into Wave). |
In future versions, Import/Export will be expanded to support other Wave and ViewPoint components.
Import and export are two distinct features that work hand in hand:
| • | Export allows you to select one or more components of an existing Wave system and create a set of human-readable and editable files (in CSV, XML or text format) containing data and settings associated with those components. The files follow a published format that is forward-compatible. |
You can use desktop tools (such as Microsoft Excel) to rapidly process the files and change attributes via find/replace, copy/paste, and other data manipulation methods without having to edit specific components and update component settings individually via the Global Administrator Management Console.
| • | Import uses the data and settings in properly-prepared CSV, XML or text files to update the Wave system configuration in batch mode. |
Some ways to use Import/Export include:
| • | Simplifying the system staging process. Configure a Wave system based on the organization’s standard conventions and practices and then export the configuration bundle as a customized “base configuration”. Importing the base configuration quickly stages a new system before any further site-specific customization is performed. |
| • | Reducing overall labor costs for system updates. Create template import files and directly delegate site-specific data entry of component information to customers or lower-cost data entry resources. |
| • | Speeding up new system deployment. Speed up new system installations or ongoing bulk configuration changes by first exporting the relevant data and then using desktop tools to modify it as needed. The modified file can then be imported to either configure a new system, or update an existing system in a fast, bulk-change mode. |
| • | Simplifying migration to Wave from other PBXs. Use data extracted from other PBXs to create import files to bulk provision component information on the new Wave system. (The level of potential automation will depend on the ability of the other PBX to generate the raw data.) |
| • | Importing Wave components from a file. |
| • | Exporting Wave components to a CSV file. |
Exporting Wave components to a CSV file
Each exported component is saved as an individual CSV file placed in a ZIP file called WaveExportData.zip. Exported CSV files have the following names:
| • | ViewPoint settings: |
| • | PersonalCallRules.csv |
| • | PersonalRoutingList.csv |
| • | PersonalRoutingListActions.csv |
See
To export Wave components to a CSV file
| 1 | If necessary, click the Administration tab of the Management Console. |
| 2 | Click Import/Export, located in the General Administration section. |
| 3 | Click the Export tab. |

| 4 | Select the ViewPoint Settings checkbox to export personal call rules, personal routing lists, and personal routing list actions. |
| 5 | Click Export to continue. (Click Reset to deselect all options to re-specify the items to export—the Reset button will be disabled once the export starts.) |

A progress indicator is displayed next to each item that you selected to export. Click Cancel at any time to stop the export.
| 6 | When the export completes, click Download to create the individual CSV files and the output ZIP file. |

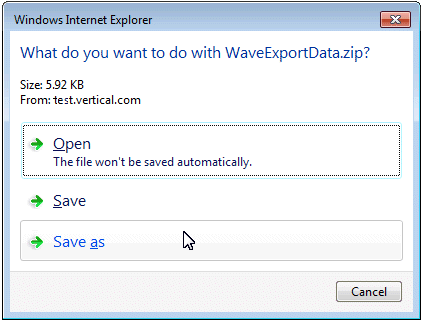
| 7 | At the prompt, open or save the ZIP file. |
Importing Wave components from a file
You can import Wave components from a previously exported file or a file that you have prepared using Microsoft Excel or a text editor like Notepad. You can import all of the files in a ZIP file exported previously, or an individual file or files in the ZIP file. You can also selectively import one or more rows from a file, or make changes to the data in a file before importing.
When you select a file to import as described below, the file is copied to the Wave Server. This copy is deleted when the import completes, or after a predetermined session timeout.
To import Wave components from a file
| 1 | If necessary, click the Administration tab of the Management Console. |
| 2 | Click Import/Export, located in the General Administration section. |
| 3 | On the Import tab, browse to the ZIP or individual file that you want to import, and then click Upload. |

| 4 | Select the components to import. |

| • | Select All. Selecting this checkbox selects all of the following checkboxes. |
| • | Personal Routing Lists. |
| • | Personal Routing List Actions. |
| • | Personal Call Rules. |
Click Next to continue.
| 5 | The contents of the file (or the first file in a ZIP file) are displayed. |
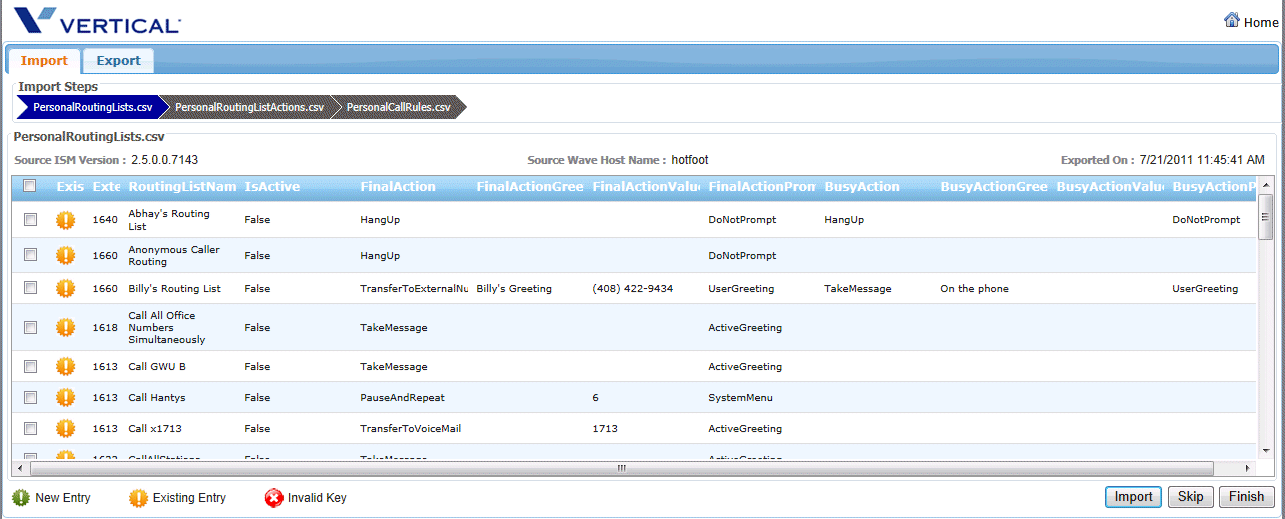
When you select a ZIP file, the individual files are listed under Import Steps at the top of the screen:

The filename’s color indicates its status:
| • | Blue. Current file—the contents of each row in this file are listed on the Import tab. |
| • | Green. File has been processed, and is ready to be imported. |
| • | Red. File has been skipped. Its contents will not be imported. |
| 6 | Click on a row to make changes. Note that not all columns can be edited. If you enter invalid data in a column, that error is flagged in yellow. Scroll down to view error message details. |
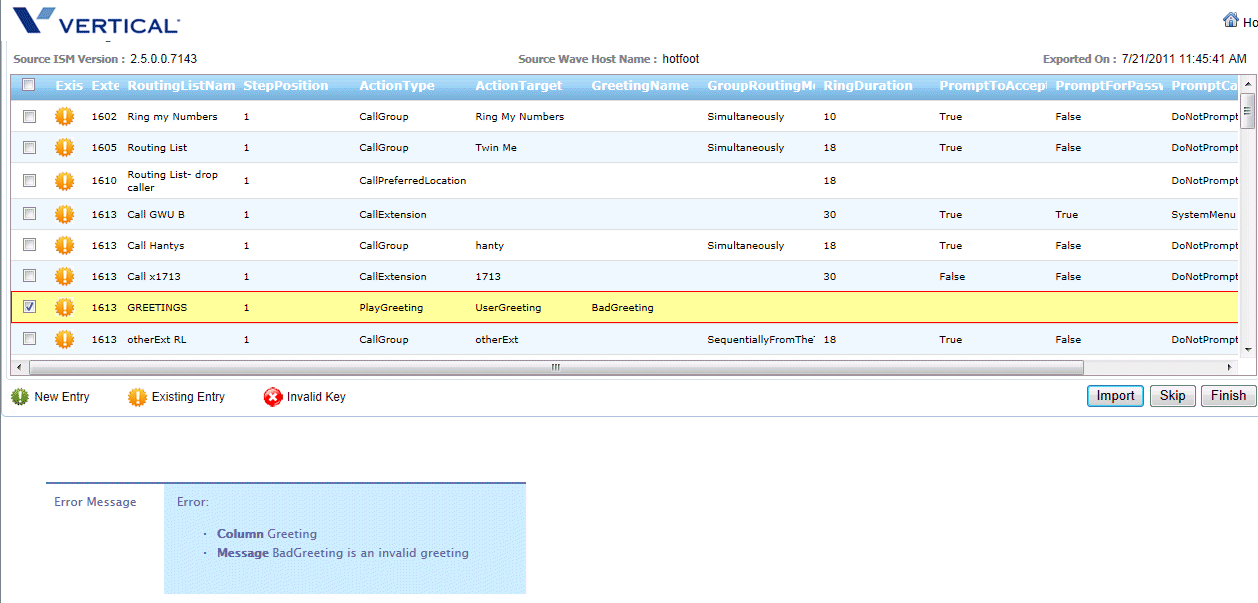
| 7 | When you are done editing a file, click Import to go to the next file. Click Skip to skip any errors in the current file, which will not be included in the import. |
| 8 | When you are ready to import, click Finish. The results of the import are displayed in the Import Summary. |

File formats for importing and exporting
Export file formats
Each exported CSV file contains data specific to the exported item, but all CSV files have a header record in the following format. This example shows the file header for a PersonalCallRules.csv file as viewed in Microsoft Excel.

Preparing a file for import
In an exported file, the <Help> section at the end of the file header lists and describes each column in that file’s rows, including all valid entries for each column. This example shows the start of the <Help> section for a PersonalCallRules.csv file as viewed in Microsoft Excel.
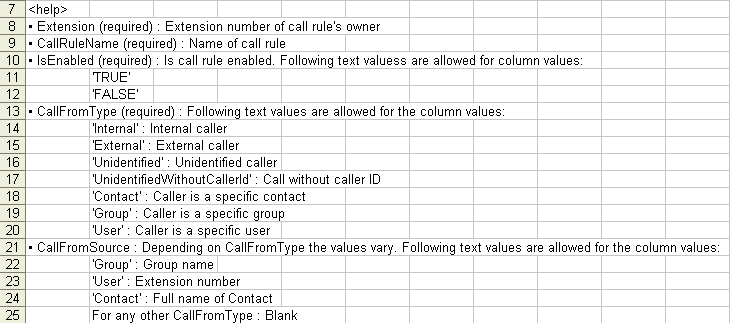
You can use the <Help> section in an exported file as a guide when creating your own file for import from scratch as described below, or to modify a previously-exported file using Microsoft Excel or a text editor such as Notepad.
To create a file for importing
| 1. | In Microsoft Excel or a text editor such as Notepad, create a new file. |
| 2. | Add the file header information shown above as the first rows in the file. |
| 3. | Add each item (call rule, routing list, and so forth) to be imported as a separate row, and enter the appropriate information for each column. |
| 4. | Save the file as a CSV, EML, or text file to any location. |
The following sections describe the specific export file format for each supported Wave item. If you want to import your own data into Wave (instead of importing a previously-exported file) prepare a CSV file according to the following format.
Personal Call Rules import file format
|
Column |
Column Heading |
Contains |
Comments |
|
1 |
Extension |
User’s first name. |
Optional. Can be left blank. |
|
2 |
IsEnabled |
User’s last name. |
Required. |
|
3 |
CallRuleName |
User’s extension. |
Required. Must be unique. Numeric field can not be more than 7 digits. |
|
4 |
CallFromType |
Slot number assigned to user’s phone. |
Optional. Numeric. To create virtual extensions, leave Slot and Port blank or set to 0. |
|
5 |
CallFromSource |
Port number assigned to user’s phone. |
Optional. Numeric. To create virtual extensions, leave Slot and Port blank or set to 0. |
|
6 |
ScheduleType |
MAC address of the user’s SIP phone. |
Required for SIP phone users only. 12 digit hexadecimal number unique to each user. If MAC Address is entered, Phone Type should be any SIP phone and Slot and Port fields should be left blank. |
|
7 |
RingOverride |
|
|
|
8 |
RoutingListName |
Name of the phone template to be applied to the user. |
Optional. This template name depends on the telephone type entered and must exist. If this field is left blank, default features will be applied to the phone. |
|
9 |
VoiceMail |
Name of access profile. |
Required. This is the same name visible in the Access Profile drop-down list on the User tab in the User/ Group Management applet. |
|
10 |
ContactFirstName |
User’s title. |
Optional. |
|
11 |
ContactLastName |
User’s password that controls access to the user's voicemail and account options. Also used to log into ViewPoint. |
Optional. Numeric. |
|
12 |
ContactMobile |
Descriptive comments about this user. |
Optional. |
|
13 |
ContactWork |
User’s home phone number. |
Optional. |
|
14 |
ContactAltrnate |
User’s alternate home phone number. |
Optional. |
|
15 |
ContactHome |
User’s mobile phone number. |
Optional. |
|
16 |
ContactAlternateHomeNumber |
User’s call forwarding number. |
Optional. |
|
17 |
ContactEmail |
User’s e-mail address. |
Optional. Text field. |
|
18 |
ContactAlternateEmail |
User’s alternate e-mail address. |
Optional. Text field. |
|
19 |
ContactInstant |
User’s instant messaging address. |
Optional. Text field. |
|
20 |
ContactType |
E-mail address to which voice message notifications for this user are sent. |
Optional. Text field. |
|
21 |
ContactCompany |
Pager number to which voice message notifications for this user are sent. |
Optional. Text field. |
|
22 |
Contact |
Phone number to which call notifications for this user are sent. |
Optional. Text field. |
|
23 |
Contact |
|
|
|
24 |
ContactJobTitle |
|
|
|
25 |
ContactPin |
|
|
Personal Routing List Actions import file format
|
Column |
Column Heading |
Contains |
Comments |
|
1 |
Extension |
User’s first name. |
Optional. Can be left blank. |
|
2 |
RoutingListName |
User’s last name. |
Required. |
|
3 |
StepPosition |
User’s extension. |
Required. Must be unique. Numeric field can not be more than 7 digits. |
|
4 |
ActionType |
Slot number assigned to user’s phone. |
Optional. Numeric. To create virtual extensions, leave Slot and Port blank or set to 0. |
|
5 |
ActionTarget |
Port number assigned to user’s phone. |
Optional. Numeric. To create virtual extensions, leave Slot and Port blank or set to 0. |
|
6 |
GreetingName |
MAC address of the user’s SIP phone. |
Required for SIP phone users only. 12 digit hexadecimal number unique to each user. If MAC Address is entered, Phone Type should be any SIP phone and Slot and Port fields should be left blank. |
|
7 |
GroupRouting |
|
|
|
8 |
RingDuration |
Name of the phone template to be applied to the user. |
Optional. This template name depends on the telephone type entered and must exist. If this field is left blank, default features will be applied to the phone. |
|
9 |
PromptToAccept |
Name of access profile. |
Required. This is the same name visible in the Access Profile drop-down list on the User tab in the User/ Group Management applet. |
|
10 |
PromptFor |
User’s title. |
Optional. |
|
11 |
PromptCaller |
User’s password that controls access to the user's voicemail and account options. Also used to log into ViewPoint. |
Optional. Numeric. |
|
12 |
CallBusyGroup |
Descriptive comments about this user. |
Optional. |
Personal Routing Lists import file format
|
Column |
Column Heading |
Contains |
Comments |
|
1 |
Extension |
User’s first name. |
Optional. Can be left blank. |
|
2 |
RoutingListName |
User’s last name. |
Required. |
|
3 |
IsActive |
User’s extension. |
Required. Must be unique. Numeric field can not be more than 7 digits. |
|
4 |
IsDefault |
Slot number assigned to user’s phone. |
Optional. Numeric. To create virtual extensions, leave Slot and Port blank or set to 0. |
|
5 |
FinalAction |
Port number assigned to user’s phone. |
Optional. Numeric. To create virtual extensions, leave Slot and Port blank or set to 0. |
|
6 |
FinalAction |
MAC address of the user’s SIP phone. |
Required for SIP phone users only. 12 digit hexadecimal number unique to each user. If MAC Address is entered, Phone Type should be any SIP phone and Slot and Port fields should be left blank. |
|
7 |
FinalActionValue |
|
|
|
8 |
FinalAction |
Name of the phone template to be applied to the user. |
Optional. This template name depends on the telephone type entered and must exist. If this field is left blank, default features will be applied to the phone. |
|
9 |
BusyAction |
Name of access profile. |
Required. This is the same name visible in the Access Profile drop-down list on the User tab in the User/ Group Management applet. |
|
10 |
BusyAction |
User’s title. |
Optional. |
|
11 |
BusyActionValue |
User’s password that controls access to the user's voicemail and account options. Also used to log into ViewPoint. |
Optional. Numeric. |
|
12 |
BusyAction |
Descriptive comments about this user. |
Optional. |