Open topic with navigation
1. Initial System Administration
Review the following topics to complete the final tasks of initial system configuration:
Backing up your Wave system configuration
You should back up your system:
|
•
|
After you complete your initial configuration. |
|
•
|
Every time you make a configuration change. |
|
•
|
Whenever you perform a software upgrade or install third-party software. |
There are two ways to back up and restore your system:
|
•
|
Using Backup/Restore. Backup/Restore backs up your Wave system configuration and other items, but does not back up your entire system. |
|
•
|
Using the Wave Live Image Add-on. Live Image creates a disk image backup of your entire Wave system. You use the Recovery Disk Creation utility to create a bootable USB device tat you can use to rebuild your Wave system from scratch or to return to a previous working version. |
The following topics describe how to use Backup/Restore to backup your system configuration. See Imaging and restoring your system using Live Image for information about using the Live Image Add-on.
Using System Backup/Restore
Special Backup/Restore considerations on a WaveNet node
Backing up your system configuration using Backup/Restore
Mirroring your hard drive and RAID
Restarting the Wave Server
Running Microsoft Systems Management Server
Imaging and restoring your system using Live Image
Using System Backup/Restore
System Backup/Restore backs up the following items.
|
•
|
Wave configuration, including database file and registry keys. |
|
•
|
WaveNet databases, if the Wave Server is a node in a WaveNet network. See Special Backup/Restore considerations on a WaveNet node for more information. |
|
•
|
Voicemail Greetings, Names, and Mailboxes directories.
|
|
•
|
System prompts. The default language set of system-wide prompts is automatically backed up. You specify the default language to use via the User/Group Management applet (System Settings dialog > Audio tab > Default system prompts.) |
Additional language versions of the system prompts will also be backed up automatically if you specify any of the following. (All of these language settings are specified via the User/Group Management applet.)
|
•
|
If you specify another language for a user or user template. |
|
•
|
If you specify another language for an Auto Attendant’s menu choices. See Adding a menu choice. |
|
•
|
If you specify another language for a Contact Center queue’s prompts. See “Choosing the language for a queue’s phone prompts” in Chapter 2 in the Wave Contact Center Administrator Guide. |
Note that if you have other languages installed but not specified in any of the ways listed above, additional versions of the system prompts in those languages are not backed up automatically.
|
•
|
Wave licensing information. |
|
•
|
Voicemail messages and Music On Hold WAV files (optional). |
|
•
|
Call Navigator prompts (optional). |
Caution! The IP Address, Subnet Mask, and Gateway settings are also backed up, and will be applied if you restore to a different Wave Server. If you restore to a different Wave Server, you must set the appropriate IP Address, Subnet Mask, and Gateway on the new Server.
The System Backup/Restore applet does not back up the following items:
|
•
|
Network Adapters and Settings, including host name/machine name and TCP/IP domain. |
|
•
|
Password Administration settings (Wave account user names and passwords). |
|
•
|
RAID settings (Windows Disk Management) |
|
•
|
Windows Workgroup or Network Domain settings |
Note the following:
|
•
|
Depending upon the number and size of your voicemail messages, the backup and restore procedure could each take up to 2 hours. For that reason, schedule backups during off-peak hours. |
|
•
|
Compression takes place only after a temporary full backup of the raw files has been created, so be sure that your Wave Server’s hard drive has enough space (up to 2 GB) to accommodate the temporary backup files. |
|
•
|
You can only restore from a backup of a system of the same version number as your current system. |
|
•
|
Since the backup and restore procedure uses FTP, the client PC doing the backup must have an FTP program installed. |
About very large backups
If your Wave database is very large, or you are recording calls but do not call recordings regularly, the backup file can grow beyond two GB. In this case, backups will take longer than 2 hours to complete and multiple 2 GB backup files will be generated as described below. To avoid this and keep your backup times reasonable, best practice is to archive off call recordings on a regular basis.
A system backup is written to a CAB file. When the backup CAB file size exceeds 2GB, a new CAB file is created. These sequential backup files will be named iobackup.cab, ioback2.cab, iobackup3.CAB and so on. The restore process will extract all the related CAB files in sequence.
Note: To restore your system from multiple CAB files, all the CAB files must be present in the same Windows folder.
Special Backup/Restore considerations on a WaveNet node
Backing up your system configuration using Backup/Restore
Backing up your Wave system configuration
Special Backup/Restore considerations on a WaveNet node
If you are backing up or restoring a system configuration on a Wave Server that is a node in a WaveNet network, note the important information in this topic.
Warning! Never restore a system configuration from one WaveNet node to another WaveNet node on the same network. Doing so will introduce inconsistencies in the network configuration, and the restored node will take the place of the backed-up node in the WaveNet network. Extensive manual re-configuration will be required to correct the network configuration.
If a Wave Server was physically connected as a node in a WaveNet network when you backed up that Server’s system configuration, make sure that the Server is still physically connected before you perform the restore so that the restored node is automatically re-synchronized with the other nodes in the network.
After the restore completes, the restored node sends a message to each other node and re-synchronizes based on the responses received. If the restored node is not connected to the network or cannot establish connectivity with one or more other nodes, those nodes will be removed from the WaveNet configuration on the restored node. If this occurs, the WaveNet configuration must be manually re-created.
Important! Be sure to verify connectivity before you perform the restore—there is a 10 minute window during which automatic re-synchronization is attempted. After 10 minutes, all of the other nodes are removed from the WaveNet configuration on the restored node. At that point, the WaveNet configuration must be manually re-created.
To verify that a Wave Server is physically connected to the WaveNet network
|
1
|
Make sure that the Wave Server to be restored is physically connected to the network via a network cable. |
|
2
|
From the node to be restored, verify that you can successfully Ping at least one other node in the network. |
Note the following:
|
•
|
If a WaveNet node was not currently added to the WaveNet network at any time before or after performing a backup, restoring the system configuration on that node does not physically re-add the restored node to the WaveNet network. |
|
•
|
If a WaveNet node was not currently added to the WaveNet network when the backup was performed, but was added before the restore is performed, the restored node will not be re-added to the WaveNet network after the restore. To re-add the restored node to the network, from any node in the network perform the steps in Adding a Wave Server to the WaveNet network. |
In this case, publications from the other nodes to the restored node will be re-established, but publications from the restored node will have to be re-built manually, because they were not included in the backup.
Using System Backup/Restore
Backing up your system configuration using Backup/Restore
Backing up your Wave system configuration
Backing up your system configuration using Backup/Restore
To back up your system configuration
|
1
|
If necessary, click the Administration tab of the Management Console. |
|
2
|
Click System Backup/Restore, located in the General Administration section. |
|
3
|
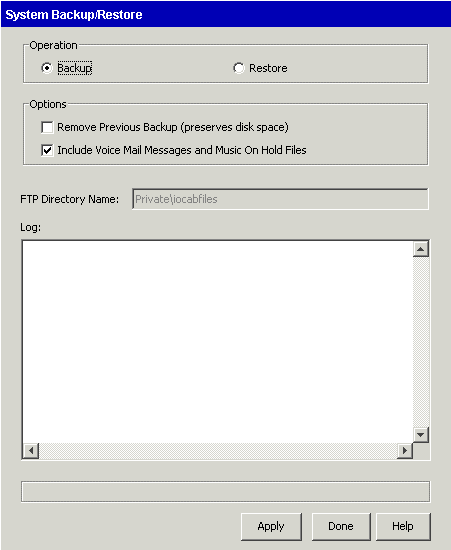
The System Backup/Restore dialog opens. If necessary, select Backup. |
|
4
|
Click Remove Previous Backup to delete the previous backup file from Wave Server hard drive. (This option is disabled if no previous backup file is detected.) |
|
5
|
Click Include Voicemail Messages and Music On Hold Files to back up voicemail messages and Music on Hold WAV files. Note that recorded names and greetings are included in the standard backup operation and are not affected by this option. |
|
6
|
If you use the Call Navigator application and wish to back up its prompt files, select Include Call Navigator Prompts. (If Call Navigator is not installed on the Wave Server, this option does not appear.) |
Detailed results of the backup operation will appear in the Log field. The system configuration cabinet (CAB) file is stored in the following location:
C:\Inetpub\Ftproot\Private\Iocabfiles
Note: It is recommended that you transfer a copy of the CAB file to a different computer via FTP for safe storage.
|
9
|
Click Done to return to the Management Console. |
Using System Backup/Restore
Special Backup/Restore considerations on a WaveNet node
Backing up your Wave system configuration
Mirroring your hard drive and RAID
Important! The information in this section applies only to hard disk drives (HDDs)—NOT to solid state drives (SSDs). Since SSDs have no moving parts and are not susceptible to the types of problems that cause HDDs to fail, mirroring and RAID redundancy are unnecessary for SSDs.
As the last step of the initial configuration you should mirror your redundant hard drive using Windows Disk Management. This procedure creates a backup of your Wave configuration that you can fall back on in case of hard drive failure.
Redundant Array of Independent Disks, or RAID, brings another level of fault tolerance to the Wave Server. RAID is a set of disks (hard drives) that serve collectively as a single, logical storage device, providing data redundancy. The Disk Management application sets up disk mirroring, using one hard drive to mirror another with the same controller, so that an exact copy of the primary hard drive is stored on a secondary, mirrored hard drive.
Whenever you create a mirrored disk, you must use a hard drive of a size equal to or larger than the primary hard drive; the Disk Management application then creates a partition of the correct size automatically. It is best to use a new hard drive, preferably one that is identical to the primary hard drive. For consistency, obtain new hard drives from Vertical Communications.
Depending on the amount of data on the hard drive, it can take up to 30 minutes for Disk Management to mirror the Wave Server’s C: drive.
Three scenarios are possible with Wave hard drives:
|
•
|
A Wave Server purchased with two hard drives is preconfigured for RAID-1. The second hard drive is mirrored for you. |
|
•
|
If you add a second hard drive after you purchase a Wave Server, you need to configure RAID-1 on the second hard drive and mirror it. See the instructions below. |
|
•
|
If you need to recover a Wave system using a mirrored hard drive, you must break the mirror, power off the Wave Server, install the mirrored drive in slot A and insert a new drive in slot B, restart, and then mirror the new hard drive. See Recovering with RAID-1 Configuration. |
Note the following:
|
•
|
The hard drive labelled Disk 1 should be blank, unformatted, and partitionless. If the hard drive has partitions, delete the partitions before mirroring it. See Clearing an old hard drive. |
|
•
|
To view SNMP alarms while you are mirroring the hard drive, open another browser window on your workstation, log onto the Management Console, click the Administration tab if necessary, and click the SNMP Alarms icon. The SNMP Alarms applet reports the SNMP traps as they occur. |
To mirror a new hard drive
|
1
|
Shut down the Wave Server. |
|
2
|
Insert the new hard drive in slot B. |
|
3
|
Restart the Wave Server. |
|
4
|
Log on to the Management Console. |
|
5
|
If necessary, click the Administration tab of the Management Console. |
|
6
|
Click RAID-1 Configuration, located in the General Administration section. |
|
7
|
If the new disk is not completely blank, the Disk Management applet opens. Go to step 10. |
|
8
|
If the new disk is completely blank, the Initialize and Convert Disk Wizard starts automatically. |
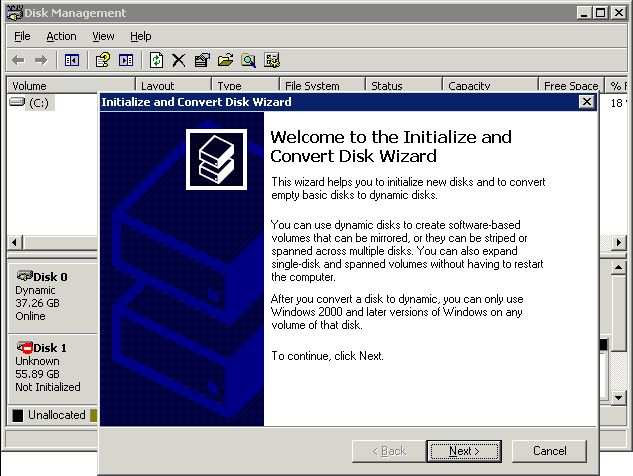
Follow the on-screen instructions. Note the following:
|
•
|
On the Select Disks to Initialize screen, verify that the new disk (“Disk 1”) is selected. |
|
•
|
On the Select Disks to Convert screen, select the checkbox to mark the new disk (“Disk 1”) for conversion to a dynamic disk. |
|
9
|
Click Finish. Go to step 13. |
|
10
|
In order to create a mirror of your hard drive, both disks must be dynamic disks. By default all drives are basic. To determine which format your disks are, look for either “Basic” or Dynamic” below the disk number. |
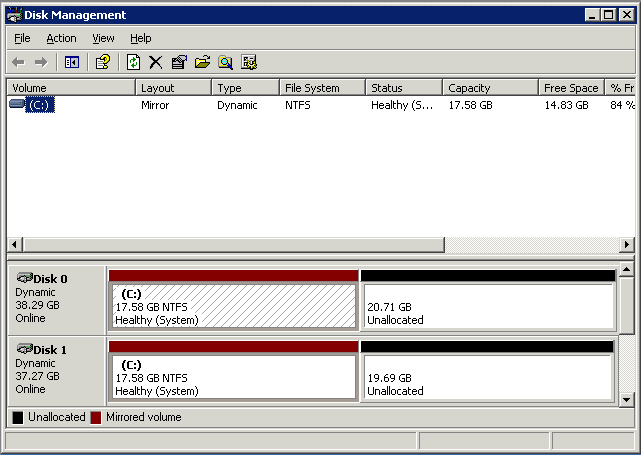
Important! If the secondary hard drive shows that it is "foreign", right-click in the space that says Disk 1 and choose Import foreign disk. Disk 1 should now show "Online". Since Disk 1 must be empty before mirroring takes place, right click in the C: area for Disk 1 and choose Remove volume.
|
11
|
To convert your disks to dynamic disks, select the disk or disks at the bottom of the screen and select Action > All Tasks > Convert to Dynamic Disk. |
|
12
|
Select the disks you want to convert, then click OK. |
If you are converting Disk 0, follow the prompts to reboot your system. Once the system has been rebooted, log into the Management Console and re-enter the RAID-1 applet. You should now see that the disks are dynamic disks.
|
13
|
Click the C: partition on Disk 0. |
|
14
|
Select Action > All Tasks > Add Mirror. |
If the command is dimmed, your new hard drive is not blank. Follow the instructions in Clearing an old hard drive, then return to step 10.
|
15
|
Select Disk 1, then click Add Mirror. |
A new color indicates mirroring (the default color is red).
Note: If the resulting mirrored partitions are of different sizes, then the primary and mirrored hard drives are physically incompatible. This should not happen if you received your hard drive from Vertical Communications. Contact technical support for assistance. While the mirroring will work, the mirrored hard drive will not boot if the primary hard drive fails; however, it will be recoverable from a separate machine.
The disks will now synchronize. Disk Management indicates initializing mirroring status with the following message:
RESYNCHING (percentage complete)
|
16
|
When mirroring is complete, Disk Management indicates healthy status with the following message: |
HEALTHY
|
17
|
Exit Disk Management to return to the Management Console. |
Note: If you remove the mirrored hard drive from the Wave Server and are running Wave with just the primary hard drive installed, be sure to return to the RAID-1 Configuration applet and break the mirror so that the system does not expect to see two hard drives.
RAID cautions
Clearing an old hard drive
Cloning a hard drive using RAID
Identifying RAID disk health
Recovering with RAID-1 Configuration
Backing up your Wave system configuration
Mirroring your hard drive and RAID
Restarting the Wave Server
Running Microsoft Systems Management Server
Imaging and restoring your system using Live Image
RAID cautions
The following cautions apply to all situations using RAID:
|
•
|
Do not change the Wave partition size. This will break the mirror and will cause both recovery and mirroring problems in the future. |
If the partition sizes are different after mirroring, the mirrored drive will not boot.
It is not necessary to use Microsoft Windows formatting and partitioning features before you use the Disk Management application; the application performs all necessary steps for you.
|
•
|
Do not attempt to mirror a Wave primary hard drive in Slot A onto a Wave primary hard drive in slot B. Due to the cloning technique used in manufacturing Wave primary drives, the Disk Management application cannot distinguish between primary drives. |
An alternative is to use Disk Management to remove all partitions on the second Wave primary disk so the disk will be treated as a new drive.
|
•
|
Once you mirror a hard drive, either leave the mirrored hard drive in the slot or take it out and put it somewhere safe until you need it. If you take out the mirrored drive and are running with just one hard drive, break the mirror so that the system does not expect to see two hard drives. |
|
•
|
Do not use the mirrored hard drive as a primary hard drive and then load both hard drives back into the Wave Server. The system cannot distinguish between the two primary hard drives and will not be able to restart. |
|
•
|
You cannot see any SNMP alarms during RAID-1 configuration unless trap destinations are configured in the SNMP Configuration applet; for instructions, see Configuring SNMP agents. |
Mirroring your hard drive and RAID
Clearing an old hard drive
Cloning a hard drive using RAID
Identifying RAID disk health
Restarting the Wave Server
You will typically access the Restart Vertical Wave applet to restart remotely any time you change IP addresses, install new network services, change subnets, upgrade software, or install additional hardware.
A fully loaded Wave system can take up to 10 minutes to restart and come to a state where you can administer it remotely again. The duration of a restart is somewhat dependent on the routing functions you have enabled.
To restart a Wave Server remotely
|
1
|
If necessary, click the Administration tab of the Management Console. |
|
2
|
Click Restart System, located in the General Administration section. |
|
3
|
In the Seconds before restart field, specify how many seconds should elapse before the system restarts. |
|
4
|
Click Restart to restart the Wave Server. |
|
5
|
Click Yes to confirm that you want to restart. |
|
7
|
Close the browser window. |
You cannot access the Wave Server until it is fully operational. If you are logging on remotely, you must wait a full 10 minutes before attempting to log on again. After a restart, use the Chassis View applet to verify that installed components are all working correctly.
Running Microsoft Systems Management Server
If you run Microsoft Systems Management Server (SMS) on your company network, configure the SMS software to exclude all Wave Servers from its control list.
Imaging and restoring your system using Live Image
Important! Live Image is not a replacement for performing normal system backups.
Using the Wave Live Image Add-on, you can back up an image of the entire Wave Server, create a bootable USB drive, and then re-image the system in minutes instead of hours.
The Live Image Add-on is a separately-licensed application that allows you to schedule and perform disk image backups on a periodic (daily, weekly, and so forth) or one-time basis (for example, after initial system installation or after performing a major upgrade). An image backup task can perform a full backup every time it runs, or a full backup followed by a series of incremental backups that only contain changes since the last full backup.
The re-imaging process uses a bootable USB device that you create via the Recovery Disk Creation utility (a Windows stand-alone program included with Live Image). This recovery disk can then be used to boot a Wave Server in recovery mode to restore a previously-created backup image.
Live Image can dramatically reduce the time it takes to return to a fully-operational state after certain events, for example:
|
•
|
After a catastrophic failure, you need to rebuild your system from scratch. |
|
•
|
After applying upgrades to a working system, you want to back out the changes to return to a working version. |
Previously, you may have had to spend hours to recover the system, re-apply Service Packs and HotFixes as needed to bring your system up to the level it was at before the failure, and then restore the latest backup configuration in order to get up and running again. The time spent on this process could cause painful system downtime for end-user sites and lost revenue for dealers.
How Live Image works
When you perform an image backup, you store the backup image (TIB file) on a local hard drive on the Wave Server, on a hard drive in a USB enclosure, or on a network drive.
You then create a bootable USB device (either a USB flash drive or hard drive in a USB enclosure) using the Recovery Disk Creation utility. The Recovery Disk Creation utility does not automatically put the backup image file itself on the USB device. If the USB device is large enough, you can manually create the Vertical\BackupImage folder on the USB device and then copy the TIB file from the location where it was stored to that folder.)
To re-image your system, you insert the bootable USB device into the Wave Server. When you restart the Server, the system automatically searches for a backup image TIB file to use for re-imaging using the following search order.
|
•
|
On the USB device itself in a folder called Vertical\BackupImage. |
|
•
|
On a hard drive connected to the Wave Server in a folder called Vertical\BackupImage. The hard drives are searched in reverse order, for example first the E drive, then D, C, and so forth. |
The TIB file MUST be located in a folder called called Vertical\BackupImage in order to be found by the re-imaging process.
Important! Network drives are not included in the search, so if you store backup images on a network drive, be sure to copy the backup image file to use to a drive connected to the Wave Server (or to the USB device if it is large enough) before initiating the restart.
Note: If more than one backup image TIB file is found in the Vertical\BackupImage folder, if they are part of an incremental backup set, the latest one will be used. If they are separate image backups, whichever file is found first will be used. In order to prevent the wrong TIB file from being used, it is highly recommended that the Vertical\BackupImage folder ONLY contains the specific TIB file or files that are to be used to re-image your system if necessary, rather than using it as an interim storage location for various backups.
See the following:
Live Image requirements
|
•
|
Wave Live Image license. If a valid Wave Live Image license is not installed on the Wave Server, you will not be able to run the Live Image Add-on or the Recovery Disk Creation utility. |
|
•
|
Live Image HotFix, if you are upgrading from Wave ISM 1.5 or 2.0. See Installing Live Image. |
|
•
|
Additional Recovery Disk Creation utility requirements: |
|
•
|
Windows 7 or Windows Vista, base release or higher (32-bit and 64-bit versions) |
|
•
|
USB device of 1 GB or larger. Note that 1 GB is required for the files and software to support the re-imaging. If you plan to copy the backup image file to the USB device as well, you will need a larger-capacity USB device. |
The following devices are supported when you create a bootable USB device:
|
•
|
Hard drive in a USB enclosure |
Note: A list of supported USB devices is available on V-Connect. Choose Products > Wave IP > Technical documents > Compatible USB Storage Devices for Live Image.
Installing Live Image
Installing the Wave Live Image Add-on
|
•
|
On a new system running Wave ISM 2.5 or higher, the Wave Live Image Add-on is installed automatically. |
|
•
|
If you are upgrading to Wave ISM 2.5 from Wave ISM 1.5 or 2.0, you install Wave Live Image via the LiveImage HotFix. |
Live Image will be disabled until a valid Wave Live Image license is installed.
Installing the Recovery Disk Creation utility
Important! You install the Recovery Disk Creation utility on a separate PC that meets the requirements listed in Live Image requirements. You cannot install the Recovery Disk Creation utility on the Wave Server.
To install the utility, run the installer program located by default in the following location on the Wave Server:
\Netsetup\CreateImageMediaSetUp.exe
Running Live Image
|
1
|
If you have not already done so, add and activate a Wave Live Image license. You cannot run Live Image without a valid license. |
|
2
|
If necessary, click the Administration tab of the Management Console. |
|
3
|
Click Live Image, located in the General Administration section. |
|
4
|
The Live Image web interface opens, displaying all image tasks that are currently in the schedule. The following example shows what you will see the first time you run Live Image—only the two sample image tasks included with Live Image are shown. |
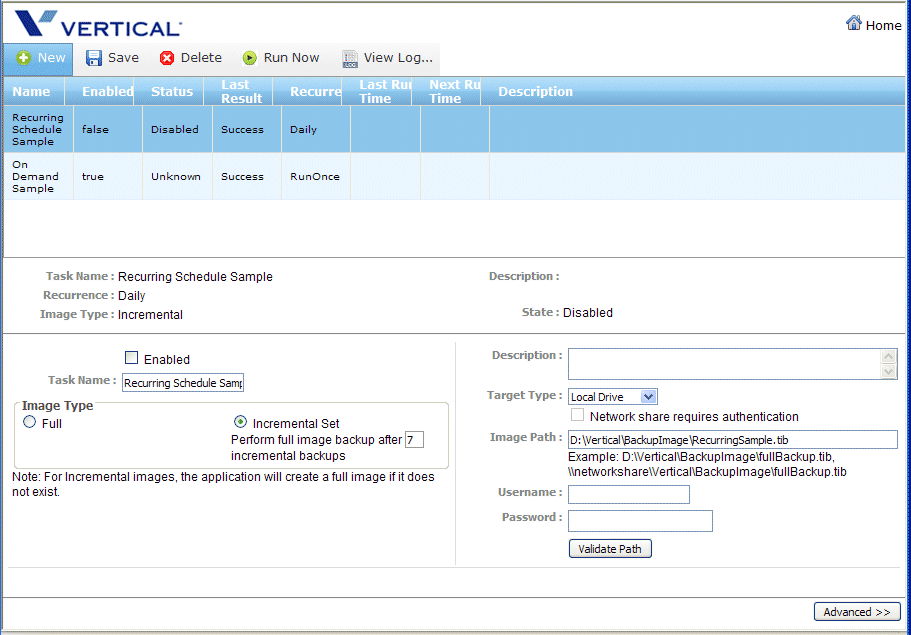
The screen is divided into the following sections:
|
•
|
Toolbar. You use the Live Image toolbar at the top of the screen to perform the following tasks: |

|
•
|
New. Creates a new image task. |
|
•
|
Save. Saves any changes that you have made in the Task Details section. |
|
•
|
Delete. Deletes the selected image task. |
|
•
|
Run Now. Runs the selected image task immediately. Note that when you click Run Now, the status of the image task will not change until you click your browser’s Refresh button. |
|
•
|
View Log. Displays the latest backup log for the selected image task. |
|
•
|
Task Grid. The Task Grid below the toolbar displays the following information for each image task: |
|
•
|
Name. Descriptive name for the image task. |
|
•
|
If true, the task is enabled and will run automatically at the scheduled times, if any have been specified. If the Recurrence for this task is set to None, the task will not run until it is manually executed by clicking Run Now on the Toolbar. |
|
•
|
If false, the task is disabled and will not run. You can run the task at any time by clicking Run Now on the Toolbar. |
|
•
|
Status. Current status of the image task: |
|
•
|
Running. The task is currently executing. |
|
•
|
Ready. The task is ready to be executed, but no instances are queued or running. |
|
•
|
Last Result. The result of the image task the last time it ran—Success or Failure. Possible reasons for failure include: |
|
•
|
Failure. Click View Log on the Toolbar for more information. |
|
•
|
Failure (No License). At the time the task last ran, the Live Image license was either not present, or it had expired. |
|
•
|
Failure (No Database Entry). The database information that corresponds to the Windows Scheduled Task does not exist. This message indicates an internal error or database problems. |
|
•
|
Failure (Invalid Disk Type). You specified a USB flash drive as the Target type the last time the task ran. Currently, only local hard drives, network drives, or hard drives enclosed in a USB enclosure are supported as targets for Live Image backups. |
|
•
|
Failure (Insufficient Disk Space or Access Denied). This error can occur when a target drive does not have sufficient free space to contain the image backup, or when, in the process of checking for available space on a network drive, it isn't possible to access the drive due to an invalid user id or password, insufficient permissions, network error, too many drives mapped, and so forth. |
Sufficient free space means that the target drive has at least the amount of free space available as is in use on the source drive. The same calculation is done for a full or an incremental backup.
|
•
|
Failure (Invalid Command Parameters). This message indicates an internal error. Delete the task and recreate it; if the problem still occurs, contact Technical Support. |
|
•
|
Recurrence. The frequency with which the image task will run, for example “Weekly”. |
|
•
|
Last Run Time. The date and time the image task last ran. This column is blank: |
|
•
|
If the task has never run. |
|
•
|
If the task’s Recurrence is set to Run Once or None. |
|
•
|
Next Run Time. The date and time when the image task is next scheduled to run. This column is blank: |
|
•
|
If the task has never run. |
|
•
|
If the Enabled checkbox is not selected. |
|
•
|
If the task’s Recurrence is set to Run Once or None. |
|
•
|
Description. Text description of the image task. |
|
•
|
Summary section. When you select an image task in the Task Grid, the details for that task are summarized in the Summary section below the grid. If you are creating a new image task, default values are displayed. In addition to some of the same fields described above for the Task Grid, the summary section also displays: |
|
•
|
Image Type. If Full, the image task is a full backup of the Wave system. If Incremental Set, the image task is defined as a full backup followed by a number of incremental backups that you specify. |
|
•
|
Task Details section. When you select an image task in the Task Grid, that task’s details are displayed in the Task Details section at the bottom of the screen. If you are creating a new image task, default values are displayed. Task details are described in Scheduling and performing a Live Image backup. |
Imaging and restoring your system using Live Image
Live Image requirements
Installing Live Image
Scheduling and performing a Live Image backup
Preparing a bootable USB device using the Create Live Image Media utility
Re-imaging your system using a Live Image backup file
Scheduling and performing a Live Image backup
Two sample image tasks are included with Live Image that you can modify or use as starting points for your own custom image tasks:
|
•
|
Recurring Schedule Sample. This image task runs daily and performs an incremental backup. It is disabled by default. |
|
•
|
On Demand Sample. This image task runs on demand and performs a full backup. It is enabled by default. |
Note: The sample tasks are for illustrative purposes only, and should not be expected to run successfully without modification. For example, the Image path in each sample task assumes a specific folder structure on a “D:\” drive on the Wave Server, which is unlikely to be present, even if you have a 2nd drive installed.
To create, schedule, and run a new image task
|
1
|
Click New on the toolbar. |
|
2
|
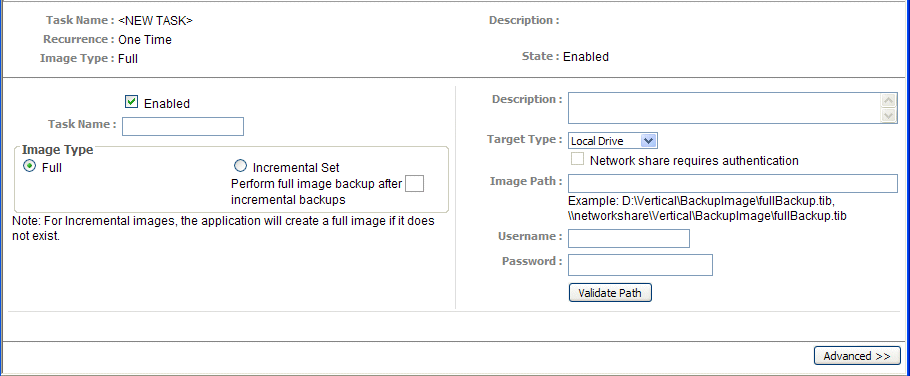
In the Task Details section, enter the following information. |
|
•
|
Enabled. If selected, this image task will run at the next scheduled time. If deselected, it will not run as scheduled. |
|
•
|
Task Name. Enter a unique descriptive name for the image task. |
|
•
|
Image Type. Select one of the following: |
|
•
|
Full. Performs a full backup of the entire Wave system. |
|
•
|
Incremental Set. An incremental set consists of a full backup plus the number of incremental backups that you specify. Select this option to perform a full backup the first time the image task is run, followed by the number of incremental backups you specify below. When that incremental set is complete, the next set will start with a full backup again. |
|
•
|
Perform full backup after ___ incremental backups. Number of incremental backups to perform before the next full backup. You can specify 1-99 incremental backups. |
Note: For incremental backups, Live Image will always create a full image if one does not exist.
|
•
|
Description. Enter descriptive text about the image task. |
|
•
|
Target Type. Select one of the following destinations where the backup image will be saved: |
|
•
|
Local Drive. Select the drive number of a local drive (or a hard drive in a USB enclosure). Do not specify a USB flash drive. |
|
•
|
Network share requires authentication. This option is enabled only if you select a Target Type of Network Path. Select this checkbox if a valid username and password are required to save a backup image to the target location. |
|
•
|
Image Path. Enter the path and filename for the saved backup image. |
Important! You cannot specify a root-level image path. If you do, you will receive the error “Root directory cannot be used as a backup location”.
|
•
|
On a local drive. You cannot specify the image path D:\backup.tib. Use a secondary-level path instead, for example D:\weeklybackup\backup.tib. |
|
•
|
On a network drive. You cannot specify a single-level folder for the image path. For example, you create a network share on computer “sstmaurice-ws” called “LiveImageWeeklyBackup” at C:\LiveImageWeeklyBackup. If you specify the image path “\\sstmaurice-ws\LiveImageWeeklyBackup
\backup.tib”, you will receive the “Root directory cannot be used as a backup location” error. |
Instead, add a secondary folder level so that the image path is “\\sstmaurice-ws\LiveImageWeeklyBackup\weeklybackup\backup.tib.”
|
•
|
Username. Enter the username required for network share access. |
|
•
|
Password. Enter the password required for network share access. |
|
•
|
Validate Path. Click to test that the location you specified to save the backup image is accessible. |
|
3
|
Click Advanced to add scheduling options to the image task. (Click Basic to return to the Task Details section.) |
|
4
|
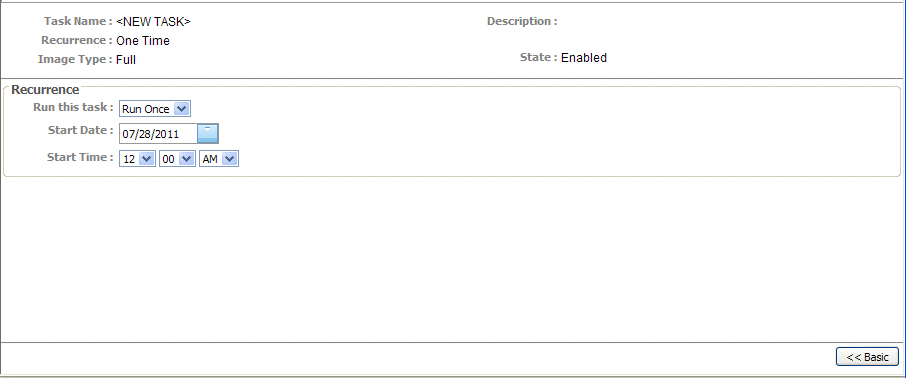
In the Recurrence section, enter the following information: |
|
•
|
Run this Task. Select one of the following from the drop-down list: |
|
•
|
None. This image task is not scheduled and will not run until you click Run Now on the toolbar. |
|
•
|
Run Once. This is an non-recurring scheduled image task that will run ONCE at the scheduled date and time. You can run it at any time by selecting it in the Task Grid and clicking Run Now on the Toolbar. |
|
•
|
Daily. This image task runs automatically at the specified time and day-interval, for example at 10 PM every day, at 12:01 AM every third day, and so forth. |
|
•
|
Weekly. This image task runs automatically at the specified time on the specified day of the week, for example at 5PM on Saturday. |
|
•
|
Monthly. This image task runs automatically at the specified time on the specified day of the month, for example at 12:01 AM on the 15th day of every month. |
|
•
|
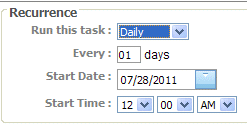
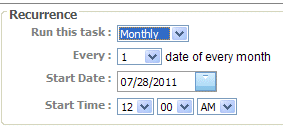
Every ___ . Determines how often the scheduled image task runs. (This field is hidden if you chose None or Run Once above.) |
|
•
|
Daily. To run the image task every day, enter 1. To run the image task every other day, enter 2, and so forth. |
|
•
|
Weekly. To run the image task every week, enter 1. To run the image task every other week, enter 2, and so forth. Then, select the day or days of the week on which the image task will run. |

|
•
|
Monthly. Select the day of the month on which the image task will run from the drop-down list. |
|
•
|
Start Date. Select the date on which to start running the scheduled image task. |
|
•
|
Start Time. Specify the start time to run the scheduled image task. |
|
5
|
When you are done configuring the new image task, click Save. You can then do the following via the toolbar: |
|
•
|
Click Delete to delete the image task. |
|
•
|
Click Run Now to run the image task immediately, otherwise the image task will run automatically at the next scheduled time. |
Preparing a bootable USB device using the Create Live Image Media utility
The Recovery Disk Creation utility creates a bootable USB device that contains the files and software required to re-image your system.
Optionally, after the bootable USB device is created according to the following instructions, you can manually copy the backup image (TIB) file to the USB device as well. The TIB file MUST be located in a folder called called Vertical\BackupImage in order to be found by the re-imaging process.
See How Live Image works for details.
To create a bootable disk image using the Recovery Disk Creation utility
|
1
|
If you have not already done so, install the Recovery Disk Creation utility according to the information in Installing Live Image. |
|
2
|
Launch the Recovery Disk Creation utility using any of the following methods: |
|
•
|
From a command prompt, type CreateImageMedia.exe. Include the path to the folder where you installed the utility, or navigate to that folder before entering the command. |
|
•
|
In Windows Explorer, double-click on CreateImageMedia.exe. |
|
•
|
In Windows Explorer, right-click on CreateImageMedia.exe, and then choose Run as administrator. |
If you are not a member of the local system's Administrators group, a User Account Control (UAC) dialog opens, requesting a userid and password for a user with administrative privileges. If you are a member of the Administrators group, the UAC dialog requests confirmation that the application be allowed to make changes to this computer.
|
3
|
The Create Live Image Media dialog opens: |
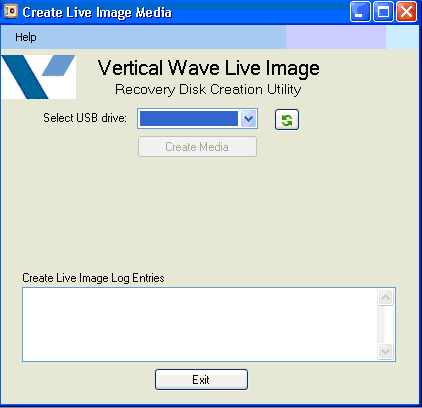
If no USB device is detected, the Select USB drive drop-down list is empty and the Create Media button is disabled.
|
4
|
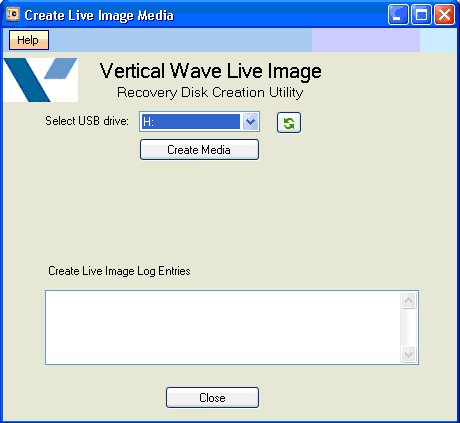
If you have not already done so, insert a USB device (USB flash drive or USB enclosure) into the PC. |
The Select USB drive drop-down list will refresh automatically when a USB device is inserted or removed. (You can also click the Refresh button.) Since the utility relies on the PC’s operating system to detect the device, it may take a few seconds before the drop-down list is refreshed.
Select the USB device to use.
|
5
|
Click Create Media. If the selected device is too small, the following error message is displayed. If you see this error, replace the device with at least a 1GB drive and start over. |

The following message opens, warning you that any data on the selected device will be destroyed. Click Yes to continue.

|
6
|
As the Recovery Disk Creation utility runs, a progress dialog opens, and progress indicators show the status. |
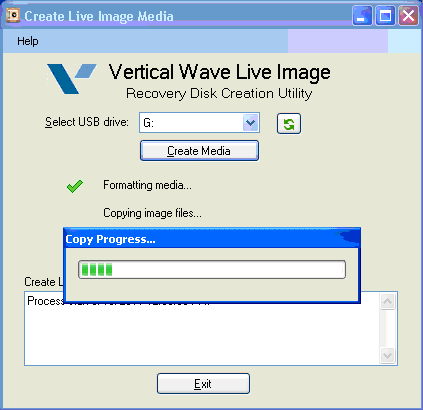
The following example shows a successful completion:
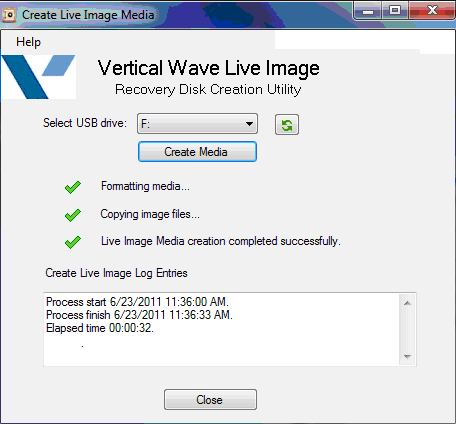
The following example shows an unsuccessful completion:
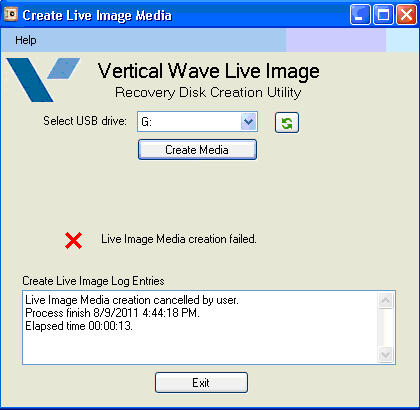
If a processing failure occurs, review the information logged by the failing step in the Create Live Image Log Entries text box at the bottom of the dialog. This and more information will be logged to the application log file, located in the following location (relative to the folder where the utility was installed):
...\Logs\CreateImageMedia.log
|
7
|
Click Close to exit the Recovery Disk Creation utility. |
Re-imaging your system using a Live Image backup file
After creating a bootable USB device using the Create Live Image Media utility as described in Preparing a bootable USB device using the Create Live Image Media utility, make sure that the backup image (TIB file) to use resides in one of the following locations:
|
•
|
On the USB device itself in a folder called Vertical\BackupImage. |
|
•
|
On a local hard drive or hard drive in a USB enclosure connected to the Wave Server, in a folder called Vertical\BackupImage. You cannot re-image your system from a TIB file on a network drive. |
See How Live Image works for important details about backup image files, including how the system searches for the backup image file to use for re-imaging.
Warning! Do not leave any bootable USB device inserted in the Wave Server for extended periods of time, even if the device does not contain a Live Image backup file. Wave is equipped with self-correcting mechanisms, which may force a system reboot when certain thresholds are met. If a bootable USB device is encountered, either of the following may occur:
|
•
|
The boot sequence may stop after booting the USB device, preventing Wave from starting. |
|
•
|
The Wave Server maybe re-imaged, if the USB device contains a system recovery image or a valid Live Image backup file. |
Note: This same behavior will occur if a system upgrade is invoked while a bootable USB device is inserted in the Wave Server.
To re-image your system using a Live Image backup file
|
1
|
Turn the Wave Server off. To do so, press and hold the red button on the front of the Server. |
|
2
|
When you observe the following pattern on the LEDs on the front of the Wave Server, release the red button: |
|
Shutdown button press detected. System shutdown initiated.
|
Green
|
Blinking red / solid green
|
Blinking green / blinking red
|
Blinking green
|
System shutdown begins, and when complete, the Wave Server powers itself off.
|
3
|
Insert the bootable USB device directly into USB 2 port on the front of the Wave Server. Note the following: |
|
•
|
On a Wave IP 2500, the USB 2 port is the bottom USB port. |
|
•
|
On a Wave IP 500, the USB 2 port is the right-most USB port. |
|
4
|
Restart the Wave Server. To do so, press the red button on the Wave Server faceplate. |
|
5
|
After about 10 minutes, check the status LEDs on the front of the Wave Server. If system recovery was successful, the following alternating pattern repeats every 30 seconds: |
|
Normal firmware operation.
|
Green
|
Blinking red / solid green
|
Blinking green
|
Blinking green
|
|
6
|
After about 10 minutes, check the status LEDS on the front of the ISC: |
|
•
|
If system recovery was successful, the following alternating pattern repeats every 30 seconds: |
|
off
|
Green
|
Green
|
Green
|
off
|
off
|
|
off
|
off
|
off
|
off
|
off
|
Green
|
Go to the next step.
|
•
|
If system recovery was not successful, the following alternating pattern repeats every 15 seconds: |
|
off
|
Red
|
Red
|
Red
|
off
|
off
|
|
off
|
off
|
off
|
off
|
Red
|
off
|
If system recovery was not successful, retry starting with step 1. If the problem persists, contact your Wave Technical Support representative.
|
7
|
Remove the bootable USB device. |
|
8
|
Restart the Wave Server. To do so, use either the power switch at the back, or press the black reset button. Your Wave Server is now operational. |


