Open topic with navigation
1. System Settings in User/Group Management
The system settings available through the User/Group Management applet control overall Wave behavior. Before adding Wave users, you should define your system settings.
Opening the System Settings dialog
To access system settings in the User/Group Management applet
|
1
|
If necessary, click the Administration tab of the Management Console. |
|
2
|
Click User/Group Management, located in the PBX Administration section of the Management Console. |
The User/Group Management applet opens. See “Navigating applet tree structures” on page 1-1 for information about navigating in the User/Group Management applet.
|
3
|
Choose Tools > System Settings. The System Settings dialog opens. |
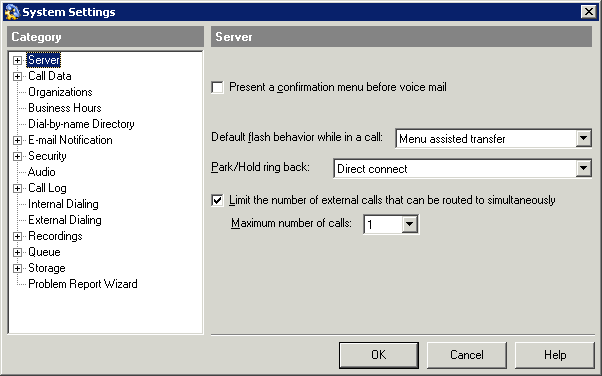
Documentation for the System Settings dialog
The following table describes where to find detailed information for the various tabs of the System Settings dialog:
Setting general options
General Wave options include the following:
Setting general Wave settings
To set general Wave settings, do the following:
|
1
|
If necessary, click the Administration tab of the Management Console. |
|
2
|
Click User/Group Management, located in the PBX Administration section of the Management Console. |
|
3
|
Choose Tools > System Settings. |
|
5
|
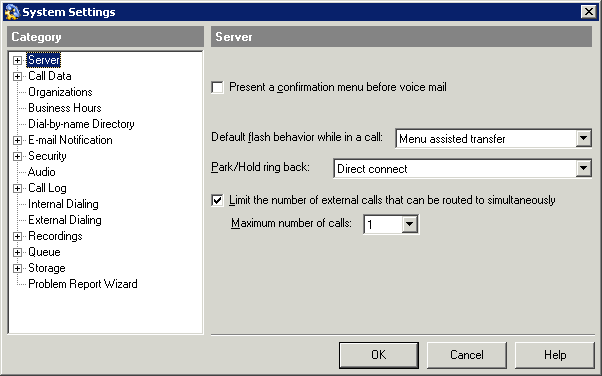
Define the following settings: |
|
•
|
. This feature is not supported in this version. |
|
•
|
Present a confirmation menu before voicemail. Select this checkbox so that callers hear the confirmation prompt, “To leave a message press 1, or press * to return to the menu” after they hear a user’s voicemail greeting. If not selected (the default), callers go directly to the user’s voicemail after hearing the greeting, where they can record a voice message. |
|
•
|
Default flash behavior while in a call. Select the default Flash behavior for analog phones when a user presses Flash (or quickly presses the phone’s hook) while on a call. (The default behavior for digital and SIP phones while on a call is to place an active call on hold and return to internal dialtone.) |
|
•
|
Menu assisted transfer. Pressing Flash takes the user to the Wave call handling menu, where he or she can put the call on hold, transfer, park, create a conference call, and more. If multiple calls are on hold, the user hears a multi-call menu to select the call to handle. |
|
•
|
Direct transfer. Pressing Flash immediately prompts the user for an extension to transfer the call. Use this option to create faster, simplified phone transferring for users who answer and transfer many calls. Note that when Direct transfer is selected, a user cannot access the other call handling commands unless he or she has ViewPoint installed. |
|
•
|
Manage current call. Pressing Flash takes the user directly to the call handling menu for the current call (the call that was active when Flash was pressed.) This option simplifies call handling when multiple calls are on hold. Note that when this option is selected, the user must press Flash # Flash to reach the multi-call menu to select a call other than the current call. |
|
•
|
Park/Hold ring back. Select what happens when a user answers an automatic ringback call when the ringback interval elapses after leaving a call on hold or parked: |
|
•
|
. Wave announces the caller, as with normal call announcing. |
|
•
|
Direct connect. The user is immediately connected with the caller with no announcing. |
|
•
|
Limit the number of external calls that can be routed to simultaneously. When this option is selected, the number of external numbers that can be called simultaneously by a ViewPoint routing list action is limited to the value specified in Maximum number of calls, described below. |
Warning! This checkbox is selected by default—it is HIGHLY RECOMMENDED that you do not change it. If no limit is specified and ViewPoint users create routing list actions that call all members of a ViewPoint Group simultaneously, depending on the number of contacts in the Group all of the trunks on the Wave Server could be tied up making external calls to the contacts.
When this option is selected, when a ViewPoint user creates a routing list action that calls all of the members of a ViewPoint Group simultaneously, ViewPoint checks that the Group does not contain more contacts than the number specified in Maximum number of calls. If that check fails, the user is informed that “A Group that is called simultaneously cannot have more than n contact(s). This setting is determined by your Administrator to conserve phone line usage.”
Note that a user who is a member of the Group is not counted toward the limit, even if the user’s calls are being forwarded to an external number, because call forwarding is ignored when a user is called as a member of a Group—the call rings the user’s phone, and is not forwarded.
|
•
|
Maximum number of calls. Maximum number of external numbers that can be called simultaneously by a ViewPoint routing list action. The default value is 1. |
Configuring the dial-by-name directory
The dial-by-name directory enables callers to dial Wave users by name, which is helpful when the extension is not known.
To configure the dial-by-name directory
|
1
|
If necessary, click the Administration tab of the Management Console. |
|
2
|
Click User/Group Management, located in the PBX Administration section of the Management Console. |
|
3
|
Choose Tools > System Settings. |
|
4
|
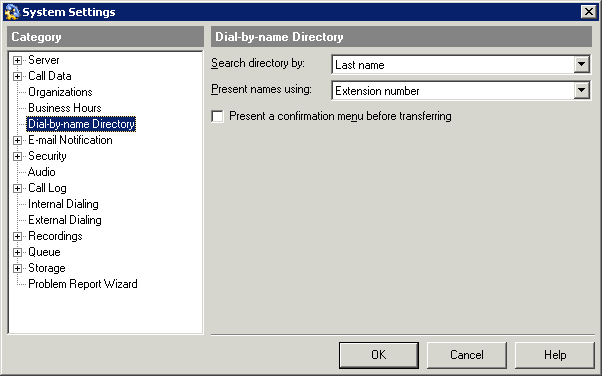
Click the Dial-by-name Directory tab. |
|
5
|
In Search directory by, select one of the following methods by which a caller can search for a user: |
|
•
|
Last name. Caller enters the first few letters of the last name, for example, “sar” for Sargeant. (This is the default method.) |
|
•
|
First name. Caller enters the first few letters of the first name, for example, “joh” for John. |
|
•
|
Last name or First name. Caller enters the first few letters of either the first or last name. |
|
6
|
In Present names using, select one of the following methods for presenting the names of users to a caller: |
|
•
|
Extension number. Caller hears an extension number after each name, for example, “For John Sargent, press 175.” This is the default. |
|
•
|
Numbered list. Caller hears a sequence number after each name, as in “For John Sargeant, press 1; for Mary Sargeant, press 2.” |
Note: If a voice title is not recorded for a user, the system will read off the extension number in place of the voice title. For example on a match to “John Smith” where John's extension is 201, the system will read "For extension 201 press 201" if there is no voice title recorded for that user.
|
7
|
Use the Present a confirmation menu before transferring field to specify what happens when a dial-by-name search results in a single match. |
|
•
|
If this checkbox is selected, Wave asks the caller to confirm his or her choice, for example, “For John Sargent, press 1. To try again, press *.” |
|
•
|
If not selected, the caller is connected immediately. |
Changing the internal dial-by-name extension
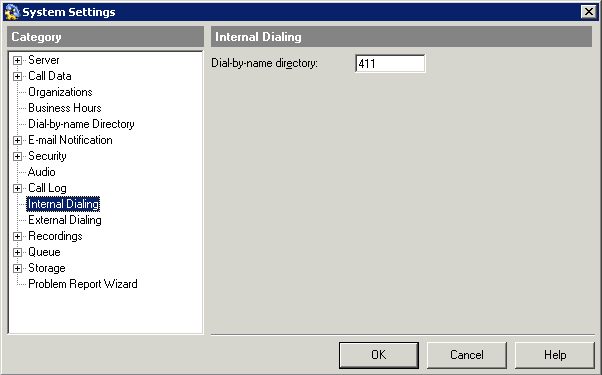
By default, users can dial 411 to access the dial-by-name directory. To change the dial-by-name directory extension, perform the following steps.
Note: When you change the default dial-by-name extension from 411 to another extension, all system prompts that refer to extension 411 automatically update to use the new number. If the new extension requires an alteration to the first digit table, keep in mind that this will cause all of your SIP phones to reboot and download the new dial plan information from Wave when you save your changes.
|
1
|
If necessary, click the Administration tab of the Management Console. |
|
2
|
Click User/Group Management, located in the PBX Administration section of the Management Console. |
|
3
|
Choose Tools > System Settings. The System Settings dialog opens. |
|
4
|
Click the Internal Dialing tab. |
|
5
|
Enter the new extension in Dial-by-name directory. |
Setting business hours
Wave uses your business hours settings in schedules that you create for the following:
|
•
|
Call rules. See the Wave ViewPoint User Guide for information on how to use call rules. |
You can create as many sets of business hours as you need. For example, you can create a set of business hours for the company as a whole (the default), and then create additional sets of business hours for individual Organizations, shifts, and so forth.
Defining business hours
To define your business hours, you define your daily work hours, work days and holidays, as follows:
|
1
|
If necessary, click the Administration tab of the Management Console. |
|
2
|
Click User/Group Management, located in the PBX Administration section of the Management Console. |
|
3
|
Choose Tools > System Settings. The System Settings dialog opens. |
|
4
|
Click the Business Hours tab. |
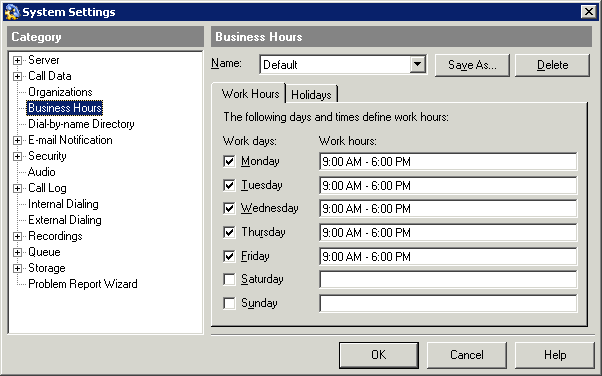
From the Business Hours tab you can do the following:
|
•
|
To create a new set of business hours, fill in the fields as described below, and then click Save As. |
|
•
|
To edit an existing set of business hours, select its Name from the drop-down list. |
|
•
|
To delete a set of business hours, select its Name from the drop-down list, then click Delete. |
|
5
|
On the Work Hours tab, under Work days, select a checkbox to count that day as a work day,. Then, under Work hours, enter the starting and ending times for each work day. |
When you define business hours and holidays, you can type dates and times in most formats. Your entries are converted to a standard format that is based on your Windows regional settings.
Note: You can enter more than one time range for a day, separated by commas, for example, “9:00 AM - 12:00 PM, 3:00 PM - 6:00 PM.” Use this format to express business hour shifts that overlap midnight. For example, to express a shift that runs from 5:00 PM to 2:00 AM the next morning, enter “12:00 AM - 2:00 AM, 5:00 PM - 12:00 AM” for each work day.
|
6
|
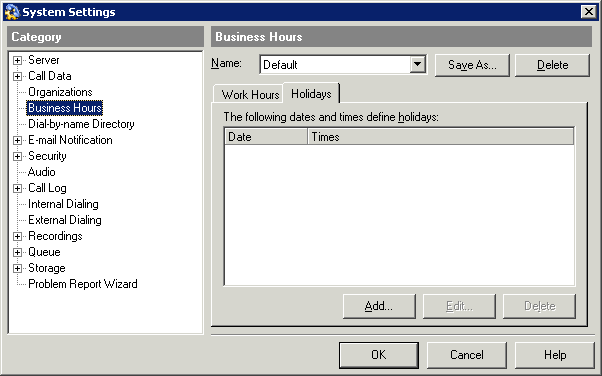
To define holidays or other special dates, click the Holidays tab. |
|
7
|
Click Add to add a new holiday. Click Edit to edit an existing one. |
|
8
|
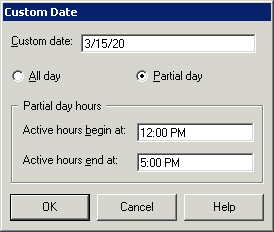
In the Custom Date dialog, enter the Custom date of the holiday. |
|
9
|
Choose if this is an All day or Partial day holiday. For a partial day holiday, enter: |
|
•
|
Active hours begin at. Starting work time on the holiday. |
|
•
|
Active hours end at. Ending work time on the holiday. |
|
11
|
Click OK to close the System Settings dialog. |
Setting up e-mail notification
Wave can automatically send an e-mail to a user whenever he or she receives a new voice message, and send the voice message audio file as an attachment to the e-mail. Once you enable e-mail notification for the system, you must configure each user appropriately.
You can also set up e-mail notification to Wave and other designated recipients whenever an emergency number is dialed. See Enabling e-mail notification for emergency calls.
Secure Sockets Layer (SSL) support
SSL provides standard e-mail notifications when you use a hosted service such as Microsoft Office365 or gmail as your company mail server.
When this option is enabled as described below, Wave automatically sends an e-mail to a user whenever he or she receives a new voice message, and attaches the voice message audio file to the e-mail.
Enabling e-mail notification
To enable e-mail notification for the system, do the following:
|
1
|
If necessary, click the Administration tab of the Management Console. |
|
2
|
Click User/Group Management, located in the PBX Administration section of the Management Console. |
|
3
|
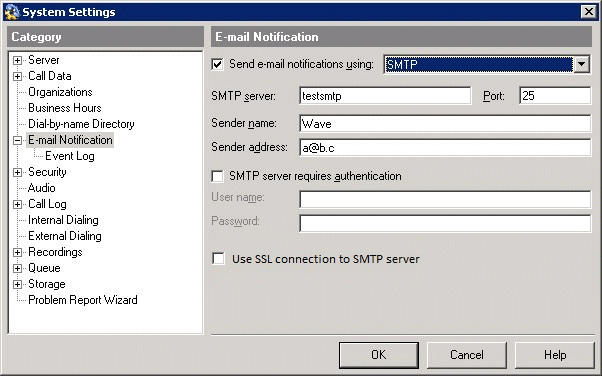
Choose Tools > System Settings, then click the E-mail Notification tab |
|
4
|
To enable e-mail notification, check Send e-mail notifications using. Select SMTP from the drop-down list. |
|
5
|
Fill in the following SMTP settings fields with information provided by your e-mail administrator or Internet Service Provider. |
|
•
|
SMTP server requires authentication. Select this checkbox if valid credentials are required to log on to the SMTP server. |
|
•
|
User name. Username required to log on to the SMTP server. |
|
•
|
Password. Password required to log on to the SMTP server. |
|
•
|
Use SSL connection to SMTP server. Select this checkbox if your mail provider requires a Secure Sockets Layer (SSL) or Transport Layer Security (TLS) connection. See Secure Sockets Layer (SSL) support. |
Configuring users for e-mail notification
For information on setting up e-mail notification for a user via the User dialog, see The Voice Mail \ E-mail, Pager, and Call Notification tabs .
Enabling e-mail notification for emergency calls
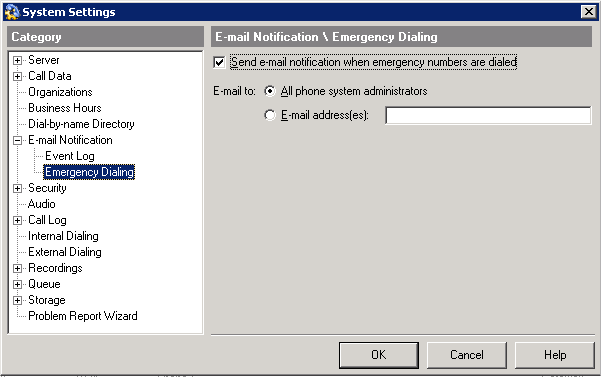
Wave can automatically send an e-mail notification to one or more recipients whenever an emergency number is dialed. You can send notifications to all Wave phone administrators as well as other designated recipients. The notification identifies the time and extension from which the emergency call was placed.
Note: Any digital or supported IP phone user can now be assigned an Emergency Alert key on his or her phone that will light up whenever an emergency number is called from any Wave extension. See Emergency Alert feature for details.
To enable e-mail notification for emergency calls:
|
1
|
If necessary, click the Administration tab of the Management Console. |
|
2
|
Click User/Group Management, located in the PBX Administration section. |
|
3
|
Choose Tools > System Settings. Expand E-mail Notification, and then click the Emergency Dialing tab. |
|
4
|
Check Send e-mail notification when emergency numbers are dialed. |
|
5
|
Identify the recipients: |
|
•
|
All phone system administrators. |
|
•
|
E-mail address(es). Enter one or more e-mail addresses to alert other designated recipients. Separate addresses with commas. |
Enforcing strong password security
Password security is crucial in preventing your company from being victimized by toll fraud. Unauthorized users who gain privileged access to your phone system can place outbound long distance or international calls that get charged to you. In 99.9% of cases, access is gained through insecure (easy-to-guess) passwords. By making your passwords more secure, you can dramatically increase the security of your Wave system against toll fraud. For more information about making your system secure, see Protecting Your Phone System Against Toll Fraud.
Recommended minimum password security settings
Important! The following minimum password security settings are recommended. Starting with Wave ISM 1.5 SP2, these are the default settings for all new installations. On all existing Wave Servers, it is highly recommended that you manually upgrade password security settings to these minimum values.
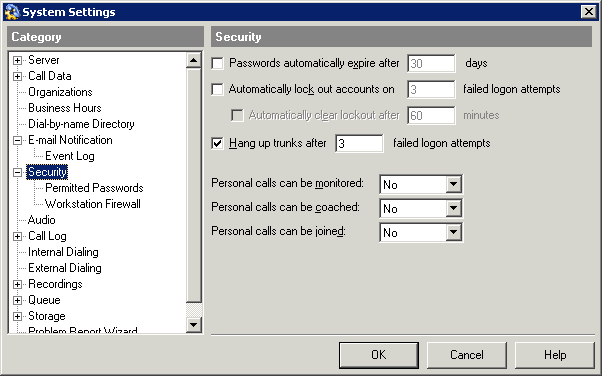
On the Security tab of the System Settings dialog
|
•
|
Enable the following settings: |
|
•
|
Automatically lock out accounts on 3 failed logon attempts
|
|
•
|
Automatically clear lockout after 60 minutes |
On the Security \ Permitted Passwords tab of the System Settings dialog
|
•
|
Set the Minimum password length to 5. |
|
•
|
Enable the following settings: |
|
•
|
Prevent passwords that contain an account's extension |
|
•
|
Prevent passwords that contain entries from the following list |
In addition to the passwords listed by default, add any other easily-guessed passwords for example your company name expressed in phone key presses, and so forth.
To enforce strong password security on your system
|
1
|
If necessary, click the Administration tab of the Management Console. |
|
2
|
Click User/Group Management, located in the PBX Administration section of the Management Console. |
|
3
|
Choose Tools > System Settings. The System Settings dialog opens. |
|
4
|
Click the Security tab. |
|
5
|
Use the following options to safeguard your Wave system against unauthorized access: |
|
•
|
Passwords automatically expire after __ days. Select this checkbox to force users to regularly change their passwords. Enter the number of days that each user may keep a password before Wave requires them to change it. |
You can override this setting for individual users to permit passwords that never expire. You can also manually force a user to change his or her password whenever you want.
|
•
|
Automatically lock out accounts after __ failed logon attempts. If this checkbox is selected, Wave locks out an account after the number of consecutive failed logon attempts that you specify. A locked-out account cannot log on to Wave, even with the correct username and password, until the Wave administrator unlocks it. |
|
•
|
Automatically clear lockout after __ minutes. Select this checkbox to have Wave automatically reopen locked-out accounts after the amount of time (in minutes) that you specify. |
You can also manually reopen a locked-out account in either of the following ways:
|
•
|
User. In the User dialog / Security tab, click the Other tab, deselect the User is locked out checkbox, and then click OK. |
|
•
|
Queue. In the Queue dialog / Security tab, click the Account tab, deselect the Queue is locked out checkbox, and then click OK. |
|
•
|
Hang up trunks after __ failed logon attempts. If this checkbox is selected, the system hangs up on any incoming caller who tries to log on to a Wave account with an invalid password after the number of consecutive attempts that you specify. |
|
6
|
Use the following fields to set system defaults for whether a user’s personal calls can be monitored, coached, or joined using the Call Supervising features. Whenever you create a new user, these defaults are used to define if the user’s personal calls can be supervised, and you can override the defaults for an individual user. Set each of the following Call Supervising features to Yes or No. |
|
•
|
Personal calls can be monitored. Allows the supervisor to listen in on an active call. Neither the user nor the other parties in the call can hear the supervisor. |
|
•
|
Personal calls can be coached. Allows the supervisor to coach a user on an active call. The user can hear the supervisor, but the other parties in the call cannot. |
|
•
|
Personal calls can be joined. Allows the supervisor to join another user’s call as a full participant. All parties can hear the supervisor. |
Note the following:
|
•
|
In order for these features to work as expected, the appropriate permissions must be set for the supervisor (Can coach/monitor/join user calls) and all users involved in the call (Personal calls can be coached/monitored/joined). |
|
•
|
Contact Center queue calls are not personal calls. Monitoring, coaching, and joining queue calls is controlled by Contact Center agent permissions. See the Wave Contact Center Administrator Guide for more information. |
|
7
|
Choose the Security \ Permitted Passwords tab. |
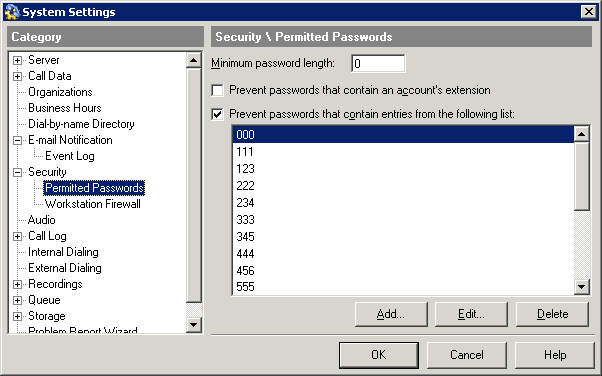
Important! By preventing easy-to-guess passwords, you can make your system much more secure from unauthorized access. Vertical highly recommends checking all the options on this tab to prevent toll fraud. When you change any of the options on this tab, users whose passwords are now prohibited will be prompted to change them the next time they log on, and will show up in the Security Analysis report (see Protecting Your Phone System Against Toll Fraud.)
|
8
|
Use the following options to restrict the passwords that users can choose: |
|
•
|
Minimum password length. Enter the minimum number of digits for a password. For secure passwords, the minimum should be at least 5, and preferably 7 or more digits. |
|
•
|
Prevent passwords that contain an account’s extension. A password that contains a user’s extension number is especially easy to guess. Select this checkbox to prevent the extension from being any part of the password. For example, a user at extension 337 could not have a password of 337, 33755, or 13378080. |
|
•
|
Prevent passwords that contain entries from the following list. Select this checkbox to prevent passwords from containing any of the digit strings in the list. Wave provides a default list of easy-to-guess digit strings, and you can add your own entries to the list. |
|
•
|
To add a new digit string to the list, click Add. To edit the selected digit string, click Edit. The Prevented Password Sequence dialog opens: |

Enter the new sequence of digits that users will be prohibited from using as part of their passwords, and then click OK to return to the Security \ Permitted Passwords tab.
|
•
|
To remove a digit string from the list, select it and click Delete. |
For more information about making your system secure, see Protecting Your Phone System Against Toll Fraud.
Setting up system-wide audio options
You can set the following audio option on a system-wide basis.
|
•
|
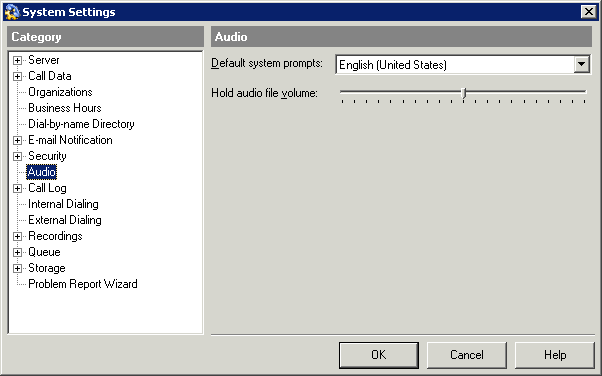
Default language used to present system and auto attendant voice prompts to callers and users. U.S. English is installed by default. French, German, Spanish, and UK English are available in General Hotfix 1005. Note that this HotFix installs system and auto attendant voice prompts, but does not affect the text that appears on a phone’s LED display. To obtain General HotFix 1005, contact your Wave provider. |
Note: The Hold audio file volume slider control that appears on the Audio tab is not supported in this version.
To change system-wide audio settings
|
1
|
If necessary, click the Administration tab of the Management Console. |
|
2
|
Click User/Group Management, located in the PBX Administration section of the Management Console. |
|
3
|
Choose Tools > System Settings. The System Settings dialog opens. |
|
5
|
Select the language to use to present Default system prompts to callers and users from the drop-down list. |
Setting up personal call supervision defaults
You can set system defaults for whether users’ personal calls can be Monitored, Coached, or Joined using the Supervise commands. When you create a new user, these defaults are used to define if users’ personal calls can be supervised, and you can override the defaults for individual users.
Note the following:
|
•
|
When you change a system default, users who have that Supervise permission set to “System Default” change to reflect the new default. |
|
•
|
Whether or not a user can use the Supervise commands is controlled by permissions. |
To change personal call supervision defaults
|
1
|
If necessary, click the Administration tab of the Management Console. |
|
2
|
Click User/Group Management, located in the PBX Administration section of the Management Console. |
|
3
|
Choose Tools > System Settings. The System Settings dialog opens. |
|
4
|
Click the Security tab. |
|
5
|
In each of the following fields choose Yes or No: |
|
•
|
Personal calls can be monitored. Users with the Allow monitoring user calls permission can listen to users’ personal (not queue) calls without the monitored user knowing. |
|
•
|
Personal calls can be coached. Users with the Allow coaching user calls permission can add themselves to users’ personal (not queue) calls and be heard by the coached user, but not by the caller. |
|
•
|
Personal calls can be joined. Users with the Allow joining user calls permission can add themselves to users’ personal (not queue) calls as full participants. |
For instructions on supervising calls using the Monitor, Coach, and Join features, see Chapter 6 of the Wave ViewPoint User Guide. For information on configuring a user for the permissions needed to Coach, Monitor or Join another user's personal calls, see Assigning a user’s permissions. For information on supervising queue calls, see the Wave Contact Center Administrator Guide.


