Open topic with navigation
1. Using the Call Classifier
The Wave Call Classifier add-on allows you to create rules to identify callers, intelligently route calls, and present Contact Center agents with scripts and related caller information before calls are answered. Creating Call Classifier rules is part of auto attendant configuration, and you can create as many rules as you want per auto attendant.
Call Classifier can query any ODBC-compliant database (Microsoft Access, SQL Server, Excel, Oracle database, and so forth) in order to display detailed caller information on agents’ screens. In addition, by verifying caller data, Call Classifier can route callers to the agent best equipped to handle each call.
See the following topics:
How to use Call Classifier to customize inbound call handling
The following examples provide some ideas on how to use Call Classifier:
|
•
|
Set a caller's queue priority based on issue number, customer number, or Caller ID to bump them up in line. |
|
•
|
Get detailed profile information on any business or end user from any ODBC database. |
|
•
|
Prompt callers for any numeric information, and validate it based on any ODBC database, then send the resulting profile information to the agent. |
|
•
|
Prevent non-validated callers from reaching an agent. |
|
•
|
Based on the area code that the customer is calling from, route callers to the agents most appropriate for that region. |
|
•
|
Based on your own custom or company database, attach issue numbers, customer profiles, addresses, and other information to the call when customers call. |
|
•
|
Add agent call scripts (with optional embedded customer name) to the Call Notes based on Caller ID and a custom database query (for example, “Is Mr. Jones available? This is Fred Holmes from XYZ Corp…”). |
|
•
|
Add Caller ID name where none exists by looking up the Caller ID number in a white pages database or database of area codes and regions. |
|
•
|
Add meaning to DID numbers. For example, ABC corp has a different support phone number (using DID) for each of their products. As Call Classifier receives calls, it can add the appropriate product name to the Notes field based on DID, then route the call to the support queue. Agents using the Call Monitor can see the product name before answering the call, resulting in a shorter call and a more informed agent. |
|
•
|
In conjunction with Wave Fax Manager, allow a single DID number to be used for both faxes and calls. Use Wave auto attendants for fax detection, and then use Call Classifier to route calls to users if no fax is detected. |
|
•
|
Create a global “black list” so that all calls from a set of particular numbers are sent directly to voice mail or are disconnected. |
|
•
|
Hide certain or all Caller IDs from users by setting Caller ID to nothing. |
|
•
|
Add address information to calls based on Caller ID. If Caller ID isn't present, you can have Call Classifier prompt the caller for their phone number. |
How Call Classifier works
Call Classifier requirements
How Call Classifier works
Call Classifier can recognize incoming calls based on any of the following:
|
•
|
DID (the phone number dialed by the caller) |
|
•
|
Caller ID name or number |
Call recognition can be based on a match on:
|
•
|
Any number or text that you enter in a Call Classifier rule |
|
•
|
A record in your company's ODBC database |
Once a call is recognized, you can perform the following actions:
|
•
|
Route the call to an extension or voice mailbox. |
|
•
|
Populate the Call Notes field with custom information. |
|
•
|
Replace the DID number, Caller ID number, Caller code with text of your choice. |
|
•
|
Set or reset Custom Data variables attached to the call. |
|
•
|
Process additional Call Classifier rules. |
How to use Call Classifier to customize inbound call handling
Call Classifier requirements
Call Classifier requirements
Once your Wave Server meets the requirements listed below, Call Classifier functionality for Wave auto attendants will be operational—no additional installation steps are required.
Make sure that each Wave Server where you plan to run Call Classifier meets the following requirements:
|
•
|
Install or upgrade the Wave Server to the required versions. For the latest information, contact your Vertical provider. |
|
•
|
Purchase, enter, and activate required one Call Classifier license per Wave Server. For more about Wave licenses, see About Wave licenses. |
Viewing Call Classifier rules
Adding a Call Classifier rule to an auto attendant
Prompting the caller to enter an identifying number
Using custom database queries in Call Classifier rules
Viewing Call Classifier information in the Call Monitor
Viewing Call Classifier rules
Perform the following steps to view Call Classifier rules already associated with an auto attendant.
|
1
|
In the Auto Attendants view, double-click an existing auto attendant to edit it. The Auto Attendant dialog opens. |
|
2
|
Click the Advanced tab. Call Classifier rules that have been defined so far are displayed in the Process the following rules on auto attendant entry section at the bottom of the dialog. In the following example, 2 rules have been defined for the default auto attendant: |
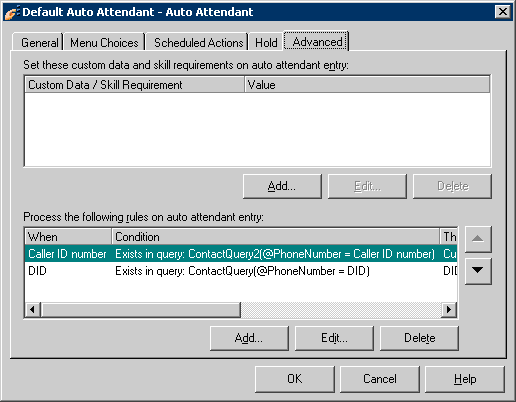
The following information is displayed for each Call Classifier rule. Use the scroll bar to view all of the columns.
|
•
|
When. Description of the attribute on which to base the rule. |
|
•
|
Condition. Summary of the condition. The valid conditions are: |
|
•
|
Does not match: <value> |
|
•
|
Does not start with: <value> |
|
•
|
Exists in query: <value> |
|
•
|
Then change. Summary of all changes performed by the rule, as in: |
|
•
|
Change <field> to <value>, <field> to <value>, etc. |
|
•
|
And then. Final action summary. The valid final actions are: |
|
•
|
Continue with auto attendant |
|
•
|
Transfer to extension (from query) |
|
•
|
Send to voice mail (from query) |
Ordering Call Classifier rules
Viewing Call Classifier rules
Ordering Call Classifier rules
You can have Call Classifier apply several rules to a call in sequence. For example, the first rule could identify support calls by DID and attach the name of the product to the DID field, then the second rule could take the Caller ID and search your database to find the date of this customer’s last call, attaching that information to the Call Notes field. In order to have a rule process a call after another rule, make sure the rules are listed with the first rule to be processed at the top and the last rule to be processed at the bottom.
In the case of conflicts between rules, the highest-listed rule will be used first. For example, you have two call rules, one that handles calls from Caller ID (617) 555-1212 and one that handles calls to DID 5001. If a call comes in with Caller ID (617) 555-1212 and DID 5001, the call will be handled by whichever rule is listed first.
To reorder a Call Classifier rule in the list, select it and then click the Up or Down arrow button.
Viewing Call Classifier rules
Adding a Call Classifier rule to an auto attendant
Note: If no valid Call Classifier license is detected on the Wave Server, the fields described in the following steps are disabled.
|
1
|
In the Auto Attendants view, create a new auto attendant or double-click an existing auto attendant to edit it. The Auto Attendant dialog opens. |
|
2
|
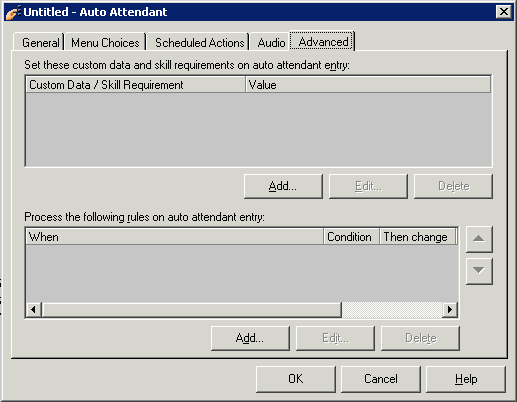
Click the Advanced tab. |
|
3
|
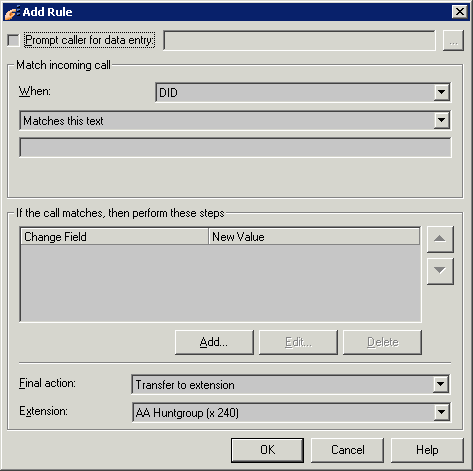
In the Process the following rules on auto attendant entry section, click Add to create a new rule (or select an existing rule and click Edit to modify it). The Add Rule dialog opens: |
|
4
|
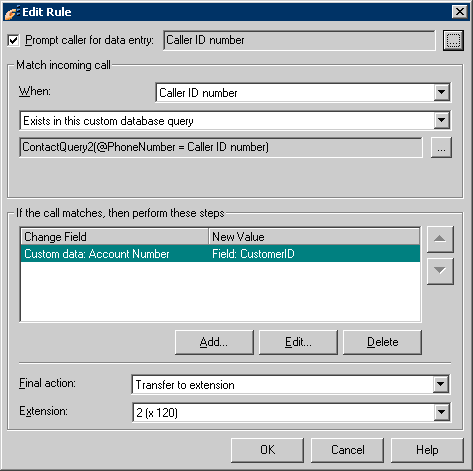
Select the Prompt caller for data entry checkbox to prompt callers to enter an identifying number, such as their phone number, account number, or support issue number. See Prompting the caller to enter an identifying number for more information on how to record the prompt that you want callers to hear, set up validation and database matching, and so forth. |
|
5
|
In the Match incoming call section, define when an incoming call will be affected by this rule: |
|
a
|
Select one of the following attributes by which to recognize an incoming call from the drop-down list: |
|
b
|
Select one of the following conditions from the drop-down list: |
|
•
|
Does not match this text
|
|
•
|
Does not begin with this text
|
|
•
|
Exists in this custom database query |
Note: Configuring a rule that includes a custom database query requires additional steps. See Using custom database queries in Call Classifier rules.
|
c
|
Enter the text to compare on in the text box. |
|
6
|
In the If the call matches, then perform these steps section, you define the steps that will occur if the incoming call matches the condition, for example setting a custom variable, adding call notes, and so forth. A rule can contain one or more steps. |
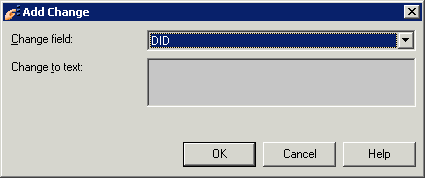
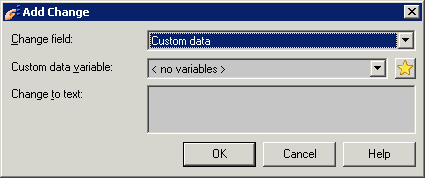
Click Add to create a new step (or select an existing step and click Edit to modify it). The Add Change dialog opens:
|
7
|
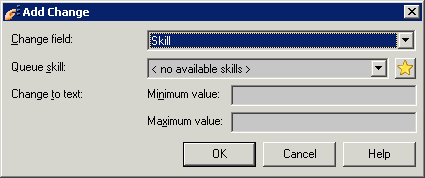
Select the Change field from the drop-down list. Depending on the Change field that you select, you will need to enter the following information: |
|
•
|
DID, Caller ID number, Caller ID name, Call notes, Account code. Enter the Change to text. The specified field will be updated with the text that you enter here. |
|
•
|
Custom data. Select the Custom data variable to modify from the drop-down list, or click  to create a new custom variable. (For more about creating and using custom data variables, see Chapter 2 in the Wave Contact Center Administrator Guide.) to create a new custom variable. (For more about creating and using custom data variables, see Chapter 2 in the Wave Contact Center Administrator Guide.) |
Enter the Change to text. The custom data variable will be updated with the text that you enter here.
|
•
|
Skill. Select the Queue skill to attach as a requirement to the call from the drop-down list, or click  to create a new skill. (For more about creating and using skill requirements for call routing, see Chapter 3 in the Wave Contact Center Administrator Guide.) to create a new skill. (For more about creating and using skill requirements for call routing, see Chapter 3 in the Wave Contact Center Administrator Guide.) |
For Minimum value and Maximum value, enter the range (from 0 to 100) that an agent’s skill value must be within to qualify for taking the call.
Click OK to return to the Add Rule dialog.
|
8
|
Select the Final action from the drop-down list. This action will be performed after all of the steps in the rule have been performed. |
|
•
|
Transfer to extension. Select the Extension from the drop-down list. |
|
•
|
Continue to next rule. Call processing will continue with the next rule (if any) defined for this auto attendant. |
|
•
|
Send to voice mail. Select the Extension from the drop-down list.
|
|
•
|
Continue with auto attendant. Call processing will continue according to this auto attendant’s configuration. |
|
•
|
Transfer to extension (from query). Select this option to transfer the call to the extension returned by your custom database query, and then select the Extension from the drop-down list. |
|
•
|
Send to voice mail (from query). Select this option to transfer the call directly to the extension returned by your custom database query, and then select the Extension from the drop-down list. |
Note: See Using custom database queries in Call Classifier rules for more about creating and testing custom database queries.
|
9
|
Click OK to save the rule and return to the Auto Attendant dialog. |
Call Classifier requirements
Viewing Call Classifier rules
Prompting the caller to enter an identifying number
Using custom database queries in Call Classifier rules
Viewing Call Classifier information in the Call Monitor
Prompting the caller to enter an identifying number
You can have Call Classifier prompts callers to enter an identifying number, such as their phone number, account number, or support issue number. Call Classifier can then identify the caller based on that number, and attach the number to the call in any supported field, such as Caller ID, Call Notes, a Custom Data variable, and so forth. The number can then be viewed by the users who answer the call via the ViewPoint Call Monitor.
You can also choose to only prompt the caller for information when it is missing—if the information field is already populated, the caller will not prompted. For example, if you prompt callers to enter a phone number to populate the Caller ID number field, the prompt will be skipped for calls that already contain a Caller ID number. In this way all your calls will have a populated Caller ID field, without disturbing the majority of callers with unnecessary prompts.
Important! Your prompt should remind callers to press # after completing their entry to let the system know they have finished. If the caller doesn't do this, Wave will wait up to 10 seconds for additional input.
If the caller does not enter any information when prompted
If the caller does not enter the requested information when prompted, Call Classifier inserts a value of -2 into the corresponding variable. You can set up a rule which matches on "-2" and either delete this value, or substitute a value that is meaningful for your call flow, and then continue processing the call with any subsequent rules. See Adding a Call Classifier rule to an auto attendant.
To use caller prompting
|
1
|
In the Edit Rule dialog, select the Prompt caller for data entry checkbox. |
|
2
|
Click the  button. The Edit Rule Prompt dialog opens. button. The Edit Rule Prompt dialog opens. |
|
3
|
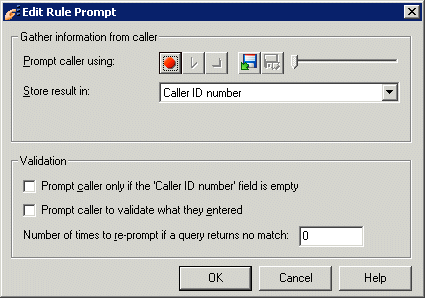
In the Gather information from caller section, use the audio controls to record the prompt that you want callers to hear (for example, “Please enter your account number, followed by the pound sign”), or import an existing audio file. (See Using the audio controls for details.) |
|
4
|
From the Store result in drop-down list, choose one of the following fields in which to store the information provided by the caller in response to the prompt. |
Note: Any data already in the field will be overwritten.
|
•
|
Custom data. If you choose this option, select an existing Custom data variable from the drop-down list, or click  to create a new custom variable. (For more about creating and using custom data variables, see Chapter 2 in the Wave Contact Center Administrator Guide.) to create a new custom variable. (For more about creating and using custom data variables, see Chapter 2 in the Wave Contact Center Administrator Guide.) |
|
5
|
In the Validation section, to use caller prompting only when the desired information is not present, select the Prompt caller only if __ is empty checkbox. For example, if you selected Caller ID number in step 4, then Call Classifier will only prompt callers to enter a number when the Caller ID number field of the call is empty. Callers will not be prompted when there is a number in the Caller ID number field. |
If Prompt caller only if __ is empty is not selected, callers are prompted to enter a number, even if a number is already present in the field. Note that any number entered by the caller will overwrite the number that came in with the call.
|
6
|
To play the number entered back to the caller, and prompt the caller to confirm it or reenter it, select the Prompt caller to validate what they entered checkbox. If Prompt caller to validate what they entered is not selected, the number is accepted as entered, without repeating it back to the caller for confirmation. |
For example, if every incoming caller must have a valid issue number, and a caller’s issue number does not exist in your Issues database, you can configure Call Classifier to prompt the caller to reenter it. The reenter prompt is repeated on failed matches for the number of times that you specify. If there is still no match, the call continues with no change to the field that would have been updated.
To use this feature, enter the Number of times to re-prompt if a query returns no match. If you do not want to reprompt callers if no match is found, set this field to 0.
Call Classifier requirements
Viewing Call Classifier rules
Adding a Call Classifier rule to an auto attendant
Using custom database queries in Call Classifier rules
Viewing Call Classifier information in the Call Monitor
Using custom database queries in Call Classifier rules
You can use custom database queries in Call Classifier rules to query your existing databases to identify callers, and then attach information to calls or transfer callers to different extensions based on the results of the database query.
For example, you could compare the incoming Caller ID number to all the phone numbers in your contact database. If there is a match, you could then add information to the Call Notes associated with the call from that contact record, for example the date and order number of the customer’s last purchase. The agent taking the call will then see that information in the Notes pane of the ViewPoint Call Monitor.
Call Classifier can query any Microsoft OLE DB supported database, for example Microsoft Access, SQL Server, Excel, Oracle, and so forth.
|
•
|
For proper operation, this database should NOT be on the Wave Server. You can make an ODBC connection with a database on a server on your network. |
|
•
|
While Call Classifier supports Excel as a data source, if an Excel comma-separated values (CSV) file is opened for editing when Call Classifier tries to access it, the query will fail. Make certain that Call Classifier has exclusive access to an Excel CSV file while processing calls. |
There are two ways to perform a custom database query:
|
•
|
With a stored procedure or MS Access query. With this option, you specify the name of a stored procedure or query that you have created in your database. |
|
•
|
With a dynamic SQL query. With this option, you specify a full dynamic SQL “Select” statement. |
Using a custom database query in a Call Classifier rule consists of the following tasks:
|
•
|
Configuring each database connection as a system data source via the Windows ODBC Data Source Administrator (Control Panel > Settings > Admin Tools > Data Sources (ODBC)). For details on how to add a system data source, see the ODBC Data Source Administrator Help. |
Caution! Several Vertical system data sources may be listed in the ODBC Data Source Administrator, for example “InstantOffice_Hardware”, “InstantOffice_IOAgent”, “IACDRep”, “CMSDatabase”, “CRQLog”, “CallRecorder_DSN”, and so forth. Do NOT modify these data sources.
Defining and testing the database query
Attaching the query results to the call as data
Routing the call based on the query result
Merging multiple SQL data fields into a single result field
Setting up a stored procedure or query in your database
Replacing many Call Classifier rules with a database query
Call Classifier requirements
Viewing Call Classifier rules
Adding a Call Classifier rule to an auto attendant
Prompting the caller to enter an identifying number
Viewing Call Classifier information in the Call Monitor
Defining and testing the database query
|
1
|
In the Auto Attendants view, create a new auto attendant or double-click an existing auto attendant to edit it. The Auto Attendant dialog opens. |
|
2
|
Click the Advanced tab. |
|
3
|
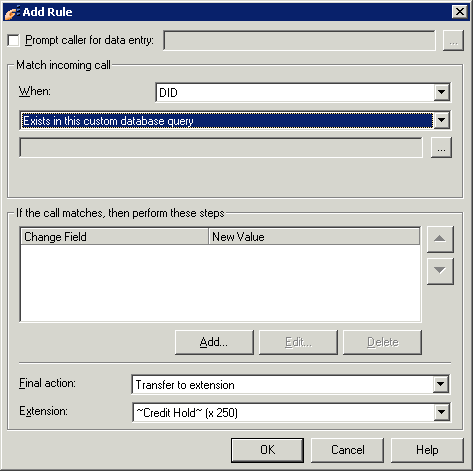
In the Process the following rules on auto attendant entry section, click Add to create a new rule (or select an existing rule and click Edit to modify it). The Add Rule dialog opens. |
|
4
|
In the Match incoming call section, define when an incoming call will be affected by this rule: |
|
a
|
Select one of the following attributes by which to recognize an incoming call from the drop-down list: |
|
•
|
Caller ID number or Caller ID name |
|
b
|
Select Exists in this custom database query from the drop-down list. |
|
5
|
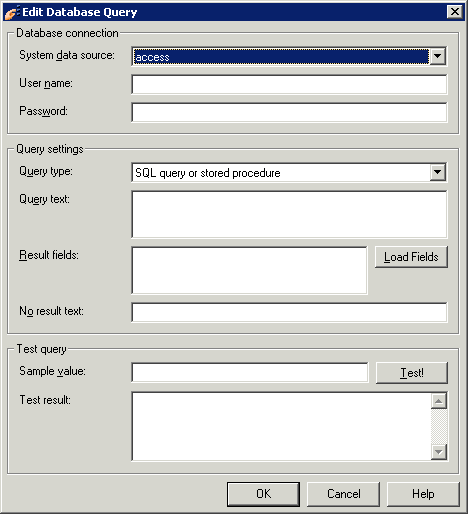
Click  to open the Edit Database Query dialog. to open the Edit Database Query dialog. |
|
6
|
In the Database connection section, select the database that you want to query from the System data source drop-down list. (You must have previously configured your database connections as system data sources via the Windows ODBC Data Source Administrator before they will be listed here. See your Windows documentation for more information.) |
Caution! Several Vertical system data sources may be listed in the System data source drop-down list, for example “InstantOffice_Hardware”, “InstantOffice_IOAgent”, “IACDRep”, “CMSDatabase”, “CRQLog”, “CallRecorder_DSN”, and so forth. Do NOT select these data sources.
|
7
|
Enter the Username and Password required to access the selected database. Leave these fields blank if no user name or password is required. |
|
8
|
In the Query settings section, select the Query type: |
|
•
|
Microsoft Access query. With this option, Call Classifier queries your database using a custom stored procedure or query within the database. To use this option, you must first create the stored procedure or query, as described in Setting up a stored procedure or query in your database. |
Enter the following information:
|
•
|
Query name. Enter the name of your query, for example “CallerID Query”. The name must match exactly for the query to work. |
|
•
|
Input parameter. Enter the name of the input parameter expected by your query, for example “PhoneNumber”. The name must match exactly for the query to work. |
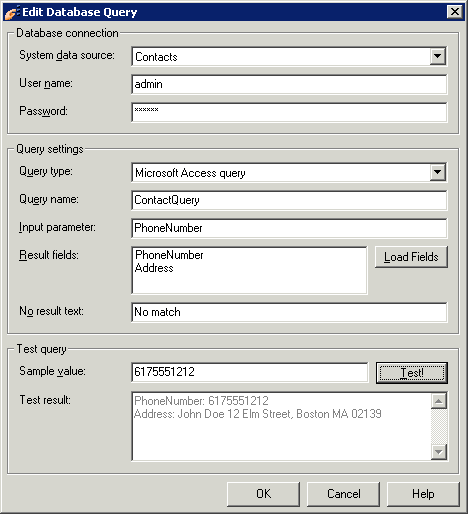
Go to step 9.
|
•
|
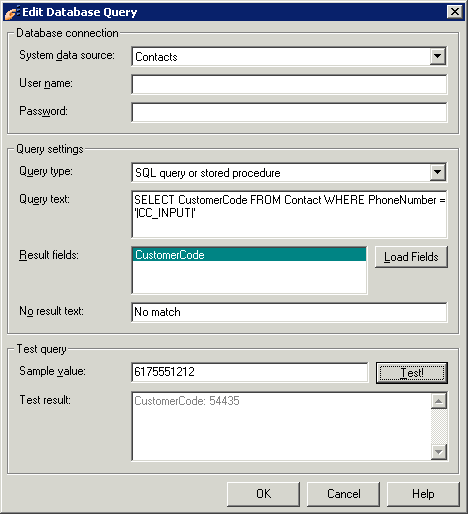
SQL query or stored procedure. With this option, Call Classifier queries your database using a dynamic SQL query that you specify here, or a custom stored procedure or query within the database. If the latter, you must first create the stored procedure or query, as described in Setting up a stored procedure or query in your database. |
Enter the Query text:
|
•
|
For a dynamic SQL Query. Enter your SQL Select statement. Insert the string |CC_Input| where the input data will go, as in the following example: |
SELECT Field2, Field3 FROM Table1 WHERE Field1 = ‘|CC_Input|’
Note that when you query an SQL database, you can merge multiple fields. For details, see Merging multiple SQL data fields into a single result field.
|
•
|
For a query or stored procedure. Enter the name of your custom stored procedure or query, for example “myStoredProcedure”. The name must match exactly for the query to work. |
|
9
|
In the No result text field, enter the text message to return when no match is found in your database. |
Important! This field must be filled in or the query will fail to run.
|
•
|
Result fields. Displays the names of the fields returned from the Query Text. (You must enter text in the No Result Text field before the Load Fields button will work.) |
|
11
|
In the Test Query section, verify that the query works using the following fields: |
|
•
|
Sample value. Enter a sample input parameter. |
|
•
|
Test!. Click to test the query. |
|
•
|
Test result. Displays the result of the query. |
If the test query does not succeed, check syntax and spelling. For a stored query or procedure, make sure that the spelling of the Input parameter and each Result field is exactly the same as in the database procedure.
When you have verified that the query works, click OK to return to the Add Rule dialog.
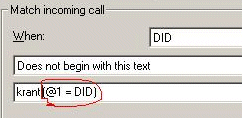
Note: After creating a Call Classifier rule that uses an MS Access custom database query, unexpected text may be displayed in the text box below the Condition in the Add Rule dialog. This behavior occurs for any defined condition, as in the following example. This unexpected text is harmless and does not affect the Call Classifier rule in any way.
Attaching the query results to the call as data
Routing the call based on the query result
Merging multiple SQL data fields into a single result field
Setting up a stored procedure or query in your database
Replacing many Call Classifier rules with a database query
Using custom database queries in Call Classifier rules
Attaching the query results to the call as data
You can choose to attach one or more of a database query’s Result fields (as specified in the Edit Database Query dialog) to the call. Any information already in a field (such as a Caller ID number) will be overwritten when this rule executes.
|
1
|
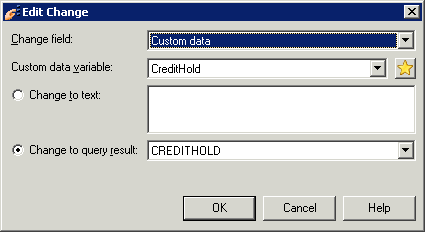
In the Add Rule dialog, select the entry for the query in the If the call matches section, and then click Edit. The Edit Change dialog opens: |
|
2
|
In the Change field drop-down list, select the field associated with the call that you want to set or change with the results of the database query. |
To change the value of a Custom data variable with the results of the database query, select it from the drop-down list, or click  to create a new custom variable. (For more about creating and using custom data variables, see Chapter 2 in the Wave Contact Center Administrator Guide.) Make sure that the variable type matches the expected result. For example, if the database query returns text information, the variable must be of type String.
|
3
|
Select the Change to query result checkbox, and then select the query name from the drop-down list. |
Defining and testing the database query
Routing the call based on the query result
Merging multiple SQL data fields into a single result field
Setting up a stored procedure or query in your database
Replacing many Call Classifier rules with a database query
Using custom database queries in Call Classifier rules
Routing the call based on the query result
If your query retrieves an extension number, you can route the call to that extension when the rule executes using the Final action drop-down list in the Add/Edit Rule dialog as described in step 8 of Adding a Call Classifier rule to an auto attendant.
You can route the call so that it rings the extension, or send the call straight to the extension’s voice mail. Select either Transfer to extension (from query) or Send to voice mail (from query).
Defining and testing the database query
Attaching the query results to the call as data
Merging multiple SQL data fields into a single result field
Setting up a stored procedure or query in your database
Replacing many Call Classifier rules with a database query
Using custom database queries in Call Classifier rules
Merging multiple SQL data fields into a single result field
When querying a SQL database, you can merge two or more data fields into a single result field. For example, if a customer’s address is split across several fields, you can merge them into one result that can then display the full customer address in Call Notes associated with a call.
You can use the merge syntax when specifying a SQL Select statement in Call Classifier or when creating a stored procedure in the SQL database.
The syntax for merging fields is:
Field1 + Field2 <...+ Fieldn> AS NewField
where “NewField” is the result field that you then enter in Result fields.
You can concatenate spaces, punctuation marks, vertical bars, and other characters in the syntax string to separate the fields.
The following example concatenates an address from several fields into one result:
SELECT Street + ' ' + City + ', ' + State + ' ' + Zip AS Address FROM Table1 WHERE Phone1 = '|CC_Input|'
You then enter “Address” in Result fields.
Defining and testing the database query
Attaching the query results to the call as data
Routing the call based on the query result
Setting up a stored procedure or query in your database
Replacing many Call Classifier rules with a database query
Using custom database queries in Call Classifier rules
Setting up a stored procedure or query in your database
If your Call Classifier rule executes a SQL stored procedure or Microsoft Access query, you must create the stored procedure or query in your database before Call Classifier can use it.
This section describes how to create a stored procedure using Microsoft SQL Server and a database query using Microsoft Access. To create queries using other databases, refer to the documentation for your database or the Microsoft Access documentation.
Note: This section does not apply to you if your Call Classifier rule executes a dynamic SQL query, as described in Using custom database queries in Call Classifier rules.
Creating a SQL stored procedure
Creating a Microsoft Access query
Defining and testing the database query
Attaching the query results to the call as data
Routing the call based on the query result
Merging multiple SQL data fields into a single result field
Replacing many Call Classifier rules with a database query
Using custom database queries in Call Classifier rules
Creating a SQL stored procedure
This section describes how to create a stored procedure using Microsoft SQL Server for use in a Call Classifier rule. For detailed information, see the Microsoft SQL Server documentation.
|
•
|
Use a tool such as Microsoft SQL Query Analyzer to open your SQL database and add a new stored procedure. |
|
•
|
Your stored procedure must have a single input parameter that corresponds to the DID, Caller ID Name, Caller ID Number, Call Notes, Account Code, Custom Data, or Skill being passed by Call Classifier. The stored procedure must return a named recordset. In the following example, the stored procedure is named “myStoredProcedure”, the input parameter is called “@CallerID”, and the returned recordset field is called “Last Order”. |
CREATE PROCEDURE myStoredProcedure
@CallerID as varchar(15)
AS
BEGIN
SELECT TableName.CompanyName + TableName.LastOrder as "Last Order"
FROM TableName
WHERE TableName.PhoneNumber = @CallerID
END
Creating a Microsoft Access query
Setting up a stored procedure or query in your database
Creating a Microsoft Access query
This section describes how to create a Microsoft Access query for use in a Call Classifier rule. For detailed information, see the Microsoft Access documentation.
|
•
|
When creating a query, you must add the table or tables that contain the field with the data to which the information from the call (DID, Caller ID, and so forth) will be compared, and the field with the results that you want to attach to the call. |
|
•
|
Similarly, you must add the field with the data to which the information from the call (DID, Caller ID, and so forth) will be compared, and the field with the results that you want to attach to the call. |
|
•
|
Define the name of the input parameter that represents the information sent by Call Classifier, for example the caller’s phone number. Call Classifier can send the following input parameters: |
Creating a SQL stored procedure
Setting up a stored procedure or query in your database
Replacing many Call Classifier rules with a database query
As you deploy Call Classifier rules, you may find yourself creating many rules to process individual DID numbers, Caller ID numbers, or other static values, to the point where the number of rules becomes hard to manage. For example, you might have ten or more Call Classifier rules, each processing a different DID number.
As an alternative you can place the values you are checking (DID numbers, Caller IDs, and so forth) in an Microsoft Access table you create, and then use a single Call Classifier rule with a custom database query to perform the same processing as multiple individual rules.
The following example creates a Microsoft Access table and a single Call Classifier rule to look up a caller’s DID and return the extension to which the call will be transferred:
|
1
|
Create a table in a Microsoft Access database called “DID” with two fields, “DID” and “Ext”. |
|
2
|
Populate the table with a row for every DID number, with each row containing the appropriate extension number to which calls to that number should be routed. |
|
3
|
Create a Access query called “DIDQuery” that takes as input a DID number and returns the corresponding extension number from the DID table. |
|
4
|
In Call Classifier, create one rule with a custom database query, that calls the DIDQuery based on the caller’s DID number, then transfers the caller to the extension returned as the query result. See Creating a Microsoft Access query for information about creating a Microsoft Access query. |
Defining and testing the database query
Attaching the query results to the call as data
Routing the call based on the query result
Merging multiple SQL data fields into a single result field
Setting up a stored procedure or query in your database
Using custom database queries in Call Classifier rules
Viewing Call Classifier information in the Call Monitor
In order for users and agents to view the information attached to calls by Call Classifier, they must set up the ViewPoint Call Monitor as follows:
|
•
|
To view Call Notes, make sure the Notes pane is showing by choosing View > Notes Pane. (You can also display Call Notes in the Notes column.) |
|
•
|
Make sure that the following columns are displayed in the Call Monitor. To do so, while in the Call Monitor choose View > Current View > Show Columns, and then select the relevant column: |
|
•
|
To view the DID information, make sure the DID column in showing. |
|
•
|
To view Caller ID number and name, make sure the Number column is showing. |
|
•
|
To view Custom Data, make sure the appropriate Custom Data column is showing. A Custom Data variable must first be defined as described in Using custom data variables before it will be available in the Show Column list. |
Call Classifier requirements
Viewing Call Classifier rules
Adding a Call Classifier rule to an auto attendant
Prompting the caller to enter an identifying number
Using custom database queries in Call Classifier rules


 to create a new custom variable. (For more about creating and using custom data variables, see Chapter 2 in the Wave Contact Center Administrator Guide.)
 to create a new skill. (For more about creating and using skill requirements for call routing, see Chapter 3 in the Wave Contact Center Administrator Guide.)

 button. The Edit Rule Prompt dialog opens.
 to create a new custom variable. (For more about creating and using custom data variables, see Chapter 2 in the Wave Contact Center Administrator Guide.)
 to open the Edit Database Query dialog.


 to create a new custom variable. (For more about creating and using custom data variables, see Chapter 2 in the Wave Contact Center Administrator Guide.) Make sure that the variable type matches the expected result. For example, if the database query returns text information, the variable must be of type String.