Open topic with navigation
1. Before You Begin
Before you configure your Wave system, make sure the following installations and records are complete:
|
•
|
Cabling and hardware installations |
|
•
|
Trunk (or service) confirmation letter from your phone service provider |
|
•
|
Your Configuration and Design Worksheets (from your Vertical Communications reseller) on trunking, extensions, incoming and outgoing call flow, voice mail access, and your dialing plan |
To manage your Wave system, you need a client workstation with the following minimum configuration:
|
•
|
A PC running Microsoft Windows 2000, Windows XP, or Windows Server 2003 and at least 256MB of RAM |
|
•
|
LAN or WAN connectivity through an Ethernet card or modem |
|
•
|
Microsoft Internet Explorer 6.0 Service Pack 1 |
Important! Some of the Management Console applets display dialogs, warnings, and panels automatically. If you have installed a browser pop-up blocker on your client PC, these pop-ups may not appear. You can usually configure blocker software to allow pop-ups from specific domains or IP addresses.
General Settings roadmap
You use the General Settings applet to set many system-wide Wavesettings. This topic provides links to information about the tasks you can accomplish via the various General Settings tabs.
System tab
|
•
|
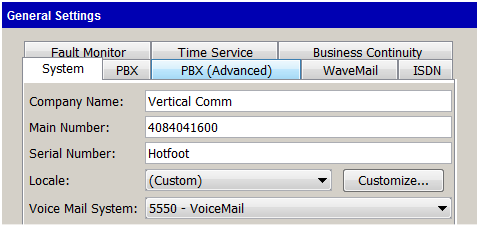
Company Name, Main Number, Serial Number, Voice Mail System. See Entering basic system information. |
Note: During system installation, you will already have used the General Settings applet to enter some basic system information.
|
•
|
Enable IMPulse Instant Message Service. See PBX Feature Configuration. |
|
•
|
Telephone Ringer Volume: |
|
•
|
Edge 700 minimum ringer volume. See Before You Begin. |
PBX tab
|
•
|
Enable Public Address. See Enabling Public Address. |
|
•
|
Allow Automatic Phone Relocation. See Enabling automatic phone relocation. |
|
•
|
Enable DSS/BLF updates when the user’s phone is active on any line. See Enabling DSS/BLF updates when the user’s phone is active on any line. |
|
•
|
User shows off-hook in ViewPoint when using any line button on phone. . |
|
•
|
Night Answer Service. See Configuring Night Answer. |
|
•
|
Fax Redirect Service. See Configuring Fax Redirect. |
PBX (Advanced) tab
|
•
|
When dialing, wait up to ___ seconds for next digit to be entered. See Configuring dialing time-out. |
|
•
|
Require external access code to dial emergency numbers. See Requiring an access code for emergency number dialing. |
|
•
|
Enable Call Return ___ Trunk Access Code (TAC). See Enabling call return for external calls. |
Caller name display format. See Before You Begin.
Note: If you change the display format, all Wave phones that are not on a call will reboot immediately.
WaveMail tab
ISDN tab
|
•
|
Outbound Caller ID, Inbound Caller ID. See Configuring system-wide ISDN settings. |
Fault Monitor tab
|
•
|
View Fault Monitor Error Logs. See Viewing the Fault Monitor Error Logs. |
Time Service tab
Business Continuity tab
Entering basic system information
Note the following about the information you enter according to the following instructions:
|
•
|
Company Name and Main Number are both used in your external Caller ID. |
|
•
|
The Wave Server Serial Number is used by Global Manager to identify each Wave Server uniquely. Also, your Vertical Technical Support representative may request it while troubleshooting a problem. |
|
•
|
The Locale that you specify enables appropriate locale-specific system settings including ring cadence, minimum analog hook flash, tone set, line impedance, trunk locale, and so forth. For more about changing the Locale setting, see Setting and viewing System Locale Settings. |
|
•
|
Voice Mail System specifies the extension that users dial, or trunks group use, to reach the voice mail hunt group. The default VoiceMail extension is 550. If you want to use a different extension to access voicemail, see Configuring the VoiceMail extension. |
To enter the basic system information
|
1
|
If necessary, click the Administration tab of the Management Console. |
|
2
|
Click General Settings, located in the General Administration section. |
|
4
|
Enter your Company Name. |
|
5
|
Enter your company’s Main Number, for example 6173540600. You cannot enter parentheses, spaces or dashes. |
|
6
|
Enter the entire Serial Number of the Wave Server. The serial number is located on the side of the chassis, and is in the following format, where AA is an alphabetical value and n is a numerical value: |
AAnnnnnnnnnn
|
7
|
If the Locale setting is correct for your system, go to step 8. If not, select your locale from the drop-down list. |
When you change the Locale setting, you are reminded that you may need to update any area codes that you have already defined in the First Digit Table to reflect new area code requirements for the selected locale.
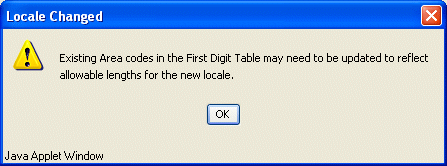
For more about editing the First Digit Table, see Setting the home area code.
Caution! The Customize button allows you to customize the advanced settings for the locale specified. The default advanced settings for a locale should work for you unless you have a unique environment. These are expert settings that should not be modified unless you are instructed to do so by your Vertical Technical Support representative. For more about the advanced settings for a locale, see Setting and viewing System Locale Settings.
Click OK to continue.
|
8
|
Select the Voice Mail System extension used to reach the voice mail hunt group. The default is 550 (which is adequate for most systems) but you can map it to a different pilot number (see Configuring the VoiceMail extension.) |
|
9
|
Click Apply to save your changes. |
|
10
|
Click Done to return to the Management Console. |
Verifying installed components
You can verify that all of your installed cards and modules are recognized by the Wave system and functioning properly by using the Chassis View applet. Chassis View shows all cards and modules installed in the Wave chassis; LEDs display status dynamically.
To verify installed components
|
1
|
If necessary, click the Administration tab of the Management Console. |
|
2
|
Click Chassis View, located in the General Administration section. |
|
3
|
Make sure all the cards and modules you have installed are visible in the graphical representation of your Wave chassis. |
Important! Your Chassis View will look different from the examples below depending on the Wave Server model, Integrated Services Card (ISC), and installed cards and modules.
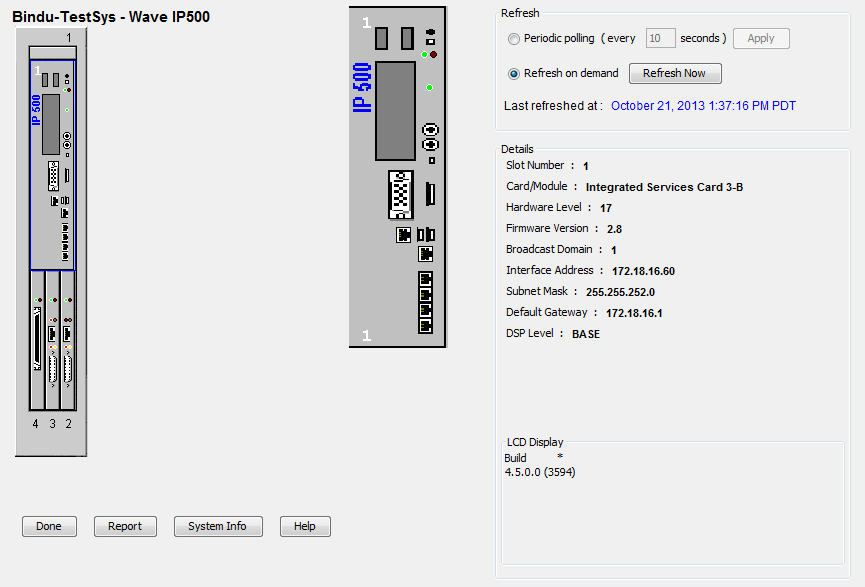
On a Wave IP 500 Server with an ISC3-B, the Chassis View might look like this:
On a Wave IP 2500 Server with an ISC3-A, the Chassis View might look like this:
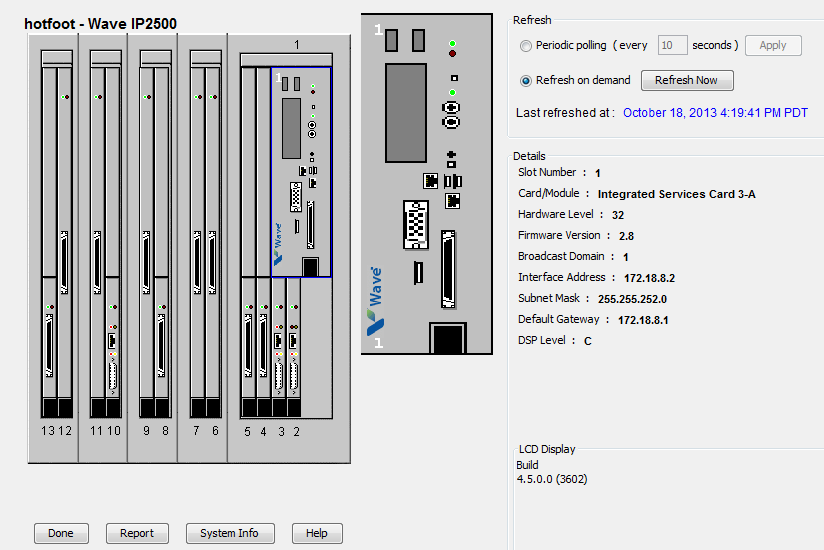
Position the cursor on a card or module to display an expanded version of it, along with statistics for that card or module, to the right of the representation of the entire chassis. Clicking a card or module takes you to the appropriate configuration applet.
|
4
|
If a card or module is not visible in Chassis View, check the physical LEDs to make sure they are green (on and operational). |
If the physical LEDs are red (nonoperational):
|
a
|
Shut down and then power off the Wave system. |
|
b
|
Reseat the card or module. |
|
c
|
Restart the system, reopen your browser window, and check Chassis View again. |
|
d
|
Verify that the components that were not visible now show as functioning in Chassis View. |
|
5
|
Click Done to return to the Management Console. |
Adding accounts and passwords
To secure your Wave system against unauthorized configuration, you must remove the default account and replace it with a new account.
By default, only individuals with enterprise-level access can configure the Wave system using the Management Console.
The Access Permissions applet contains a list of all the Management Console applets and the access level required to use them. You can use the Access Permissions applet to change the level of access granted to manager- and user-level accounts. For more information about configuring access permissions, see Configuring access permissions.
See also the following topics that may apply to your environment:
To replace the default Wave accounts
|
1
|
If necessary, click the Administration tab of the Management Console. |
|
2
|
Click Password Administration, located in the General Administration section. The Password Administration applet opens. |
|
3
|
Click New to open the Add New User dialog. |
The first user you create will be an enterprise-level user. Enterprise-level access is the most comprehensive. It allows an administrator to perform all of the Wave administrative functions, including changing and configuring access permissions. You will need at least one account with enterprise-level access to configure everything in your Wave system.
|
4
|
Enter a User Name for the account. |
The user name can be up to 20 characters and can use any combination of alphanumeric characters and exclamation points (!), underscores (_), and dashes (-). However, the first character may not be a numeral.
|
5
|
Enter the user’s Full Name. |
The full name can be up to 32 characters and can use any combination of characters, including spaces.
|
6
|
Enter a Password and confirm it in the appropriate fields. |
The password can be from 3 to 60 characters in length, and can use any combination of characters except spaces.
Important! See Protecting Your Phone System Against Toll Fraud for important information about enhancing system security via secure passwords.
|
7
|
Choose Enterprise from the Access Level drop-down list. |
|
8
|
Click OK to close the dialog. |
The information you have specified will appear in the account list in the Password Administration applet.
|
9
|
Repeat steps 3 through 8 to create additional accounts. (For accounts with lower access levels, choose Manager or User instead of Enterprise in step 7.) |
|
10
|
Click Done to return to the Management Console. |
|
11
|
To secure your Wave system, you must log off and log on again with your new enterprise-level user name and password, then return to the Password Administration applet and delete the default accounts. |
Caution! Be sure to keep a record of the new account passwords. Once you remove the default accounts, the only access will be through the new accounts. If you lose your enterprise-level password, you must reinstall and reconfigure your system to gain access.
Configuring access permissions
Access permissions for most of the Management Configuration applets can be customized. One of three access levels—enterprise, manager, and user—can be selected for each applet. When a logged-on user does not have permission to use an applet, its icon appears dimmed to indicate that the applet is unavailable.
Note: The Access Permissions and Password Administration applets are fixed at the enterprise level and cannot be modified.
To configure access permissions
|
1
|
If necessary, click the Administration tab of the Management Console. |
|
2
|
Click Access Permissions, located in the General Administration section. The Access Permissions applet opens. |
|
3
|
Scroll through the list to find the applet that you want to modify. (Applets are arranged alphabetically by name.) |
The Access Permissions and Password Administration applets do not appear in this list, because they cannot be modified.
|
4
|
Select a permission level from the Access Permissions drop-down list for each applet you want to modify. |
|
5
|
Click Apply to save your changes. |
|
6
|
Click Done to return to the Management Console. |
Setting the message-waiting dial tone duration
The stutter dial tone indicates that a Voice Mail message is waiting on phones that do not have a message-waiting lamp.
In General Settings, PBX (Advanced) tab, you can specify the duration of the dial tone stutter in the Stutter Dial Tone Duration (Seconds) drop-down list.

Suppressing ringing on any digital phone that is receiving a page
You can suppress the ringer on any digital phone if a page is being played on that phone. This is a system-wide option that applies to all phones.
To do so, in General Settings, click the PBX (Advanced) tab and then select the Suppress ring if receiving page checkbox.

Configuring the time service
The time service polls a specified time server to keep accurate time on the Wave Server for all Wave components.
Note: SIP phones generally get their time settings from the Wave Server, but may require an entry in their configuration files to handle a time zone offset. See the Vertical Edge 5000 Installation and Configuration Guide for information on how to make this entry in the phone’s configuration file.
To configure the time service settings
|
1
|
If necessary, click the Administration tab of the Management Console. |
|
2
|
Click General Settings, located in the General Administration section. |
|
3
|
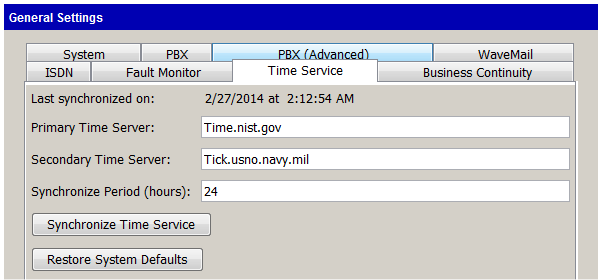
On the Time Service tab, the last time the Wave Server was resynchronized is displayed at the top of the tab. |
|
4
|
Enter the domain names of the desired time servers in the Primary Time Server and Secondary Time Server fields. |
Note: You must enter the full name of the time server. Two commonly used time servers are time.nist.gov and tick.usno.navy.mil.
|
5
|
Enter the interval (in hours) between each time server poll in the Synchronize Period (hours) field. |
|
6
|
Click Synchronize Time Service. This polls the time server immediately. |
|
7
|
To verify that the Wave Server was resynchronized, refresh your browser window and click the Time Service tab again. If Last synchronized on has been updated, resynchronization was successful. |
|
8
|
To restore the defaults in each of the Time Service fields, click Restore System Defaults. |
|
9
|
Click Apply to save your changes. |
|
10
|
Click Done to return to the Management Console. |
Joining the Wave Server to a Windows domain
For security and management reasons, it may be necessary to join the Wave Server to a Windows domain.
Before doing so:
|
•
|
Verify that the domain policy that will apply to the Wave Server will not force Microsoft Windows Updates to occur on the Wave Server—this can cause the Wave Server to become inoperable. |
Important! All updates for the Wave Server—including Windows Updates—should be applied via Vertical-provided software updates. Vertical works with Microsoft to include all Microsoft updates in regular General Hot Fix packages provided to Wave customers.
|
•
|
Make sure that the domain policy will not change file permissions or install any additional software on the Wave Server. |
For information on Microsoft's Group Policies and how to manage them, see the Microsoft documentation for Windows domains.
Note: Adding the Wave Server to a Window domain according to the following instructions requires that you restart the Wave Server for the change to take effect.
To join the Wave Server to a Windows domain
|
1
|
Before beginning, make sure that the Wave Server is connected to the same network as the domain controller and can ping the domain controller. The DNS server for the Wave Server should already be a domain DNS server. |
|
2
|
In the Global Administrator Management Console, click IP Network Settings, located in the Data Administration section. |
|
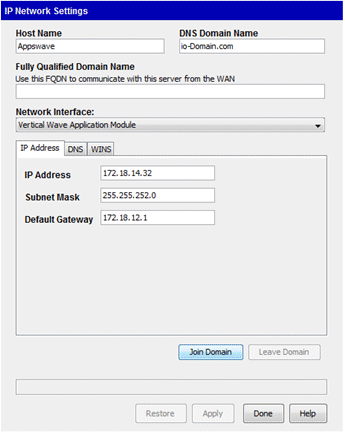
3
|
In IP Network Settings, click Join Domain. |
|
4
|
Enter the domain name and credentials for a valid domain administrator account, and then click OK. The Wave Server will be joined to the domain if: |
|
•
|
The Wave Server can communicate with the domain controller. |
|
•
|
The credentials you entered are valid. |
|
•
|
The account you are using has permission to join systems to the domain. |
|
5
|
Restart the Wave Serverto complete this process. |
Note: Once joined to the domain, you still need to use local credentials to log in to the Wave Server. To use domain accounts to log in to the Wave see Using Windows Active Directory accounts to administer Wave.
Using Windows Active Directory accounts to administer Wave
If your Wave Server is joined to a Windows domain according to the steps in the previous section, you can use Active Directory accounts to administer Wave.
|
1
|
Ask your domain administrator to create a domain security group on the domain controller. (See the Microsoft documentation for Windows domains for detailed steps on how to do this.) |
|
2
|
To enable this security group to administer Wave, on the local desktop on the Wave Server, click Start > All Programs > Administrator Tools > Computer Management. |
|
3
|
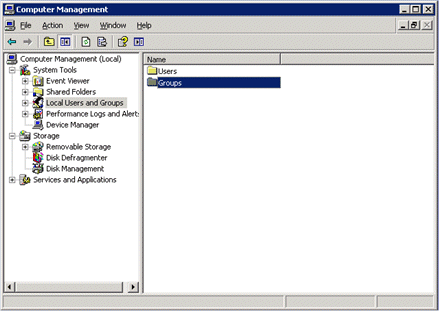
In Computer Management, click Local Users and Groups, and then double-click Groups. |
|
4
|
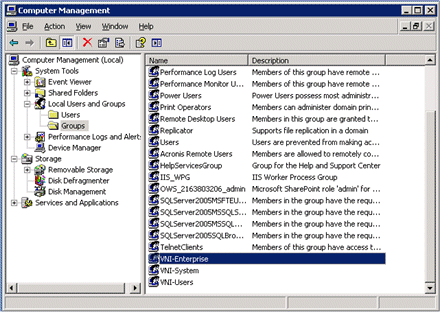
Scroll to the bottom of the list of groups and double-click VNI-Enterprise. |
|
5
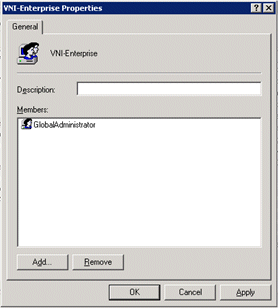
|
Click Add to add your domain security group to this local VNI-Enterprise group. |
|
6
|
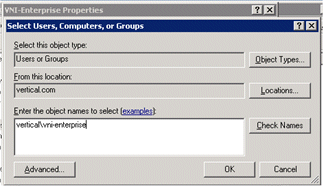
Type in the exact name—including the domain name—of your domain security group and then click OK. |
|
7
|
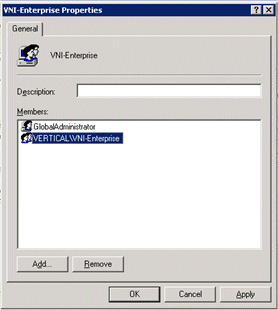
Verify that your domain security group now shows up in the list of members: |
|
8
|
Click OK, and then exit Computer Management. |
Logging on to Wave using domain credentials
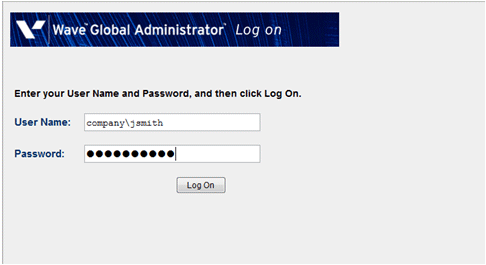
Any users who are listed in or added to your domain security group will now be able to log on to the Global Administrator Management Console using their domain credentials and administer Wave. Their specific credentials are handled in Active Directory.
For example, John Smith has a domain account of jsmith on the domain Company.local. He can log in to Global Administrator Management Console using Company\jsmith as his user name and his domain password:
Note: Active Directory integration applies only to Wave administrators --- it does not extend to ViewPoint usage or voicemail login for regular users.


