Open topic with navigation
1. Configuring your e-mail provider for WaveMail
Before you can configure WaveMail mailboxes for an individual users, you must perform the following tasks to configure your e-mail provider. Note that in this version, the supported e-mail providers are Microsoft Exchange 2007 Service Pack 2 (SP2), Microsoft Exchange 2010, and Microsoft Exchange 2013.
|
•
|
Create the WaveMail user impersonation account in Windows. |
|
•
|
Add the permission to impersonate to the WaveMail user via the Exchange Management Shell to give impersonation privileges to WaveMail. |
|
•
|
Create an Exchange mailbox for the WaveMail user via the Exchange Management Console. |
|
•
|
Configure your e-mail provider as a WaveMail provider via the General Settings applet in the Global Administrator Management Console. |
Important! Even if you perform the steps in this section correctly, an underlying Microsoft Exchange configuration issue may cause one or both of the following problems:
|
•
|
You cannot add a WaveMail provider using the impersonation account. |
|
•
|
WaveMail cannot used the impersonation account to access configured WaveMail mailboxes |
See Troubleshooting WaveMail issues.
To configure Microsoft Exchange for WaveMail
|
1
|
Click Start > Active Directory Users and Computers. |
|
2
|
Create the WaveMail impersonation user account. The password for this account should be set to not expire. |
|
3
|
Click Start > Exchange Management Shell. |
|
4
|
Depending on your version of Microsoft Exchange, do one of the following to add the permission to impersonate to the WaveMail user that you created in step 2. |
Note: The name that you specify in the -User parameter below must exactly match the user name that you entered for the WaveMail user account in step 2.
Important! If you do not specify the following information accurately, Microsoft Exchange will not be configured correctly and WaveMail synchronization will not work. Be absolutely certain that you type or copy/paste the following text EXACTLY as specified—do not introduce extra quotation marks or new lines. Also, be sure to use the information for your version of Microsoft Exchange.
|
•
|
Microsoft Exchange 2007 SP2: |
Enter the following and then click Enter:
Get-ExchangeServer | where {$_.IsClientAccessServer -eq $TRUE} | ForEach-Object {Add-ADPermission -Identity $_.distinguishedname -User (Get-User -Identity WaveMail | select-object).identity -extendedRight ms-Exch-EPI-Impersonation}
Enter the following and then click Enter:
Get-MailboxDatabase | ForEach-Object {Add-ADPermission -Identity $_.DistinguishedName -User WaveMail -ExtendedRights ms-Exch-EPI-May-Impersonate}
|
•
|
Microsoft Exchange 2010 or 2013: |
Enter the following and then click Enter:
New-ManagementRoleAssignment -Name _suImpersonateRoleAsg -Role ApplicationImpersonation -User WaveMail
|
5
|
Click Start > Exchange Management Console. |
|
6
|
Expand Recipient Configuration > Mailbox, and then choose Actions > New Mailbox. Follow the onscreen instructions to create a new User Mailbox for the WaveMail impersonation user account that you created in step 2. |
To configure your e-mail provider as a WaveMail provider
|
1
|
If necessary, click the Administration tab of the Management Console. |
|
2
|
 Click General Settings, located in the General Administration section. Click General Settings, located in the General Administration section. |
|
3
|
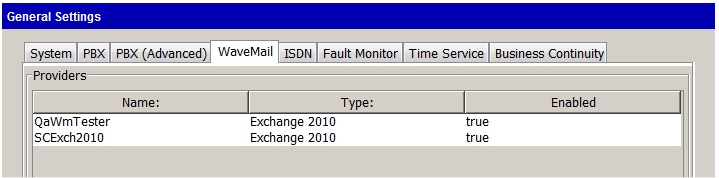
Select the WaveMail tab. Any e-mail providers that have already been configured are listed. |
|
4
|
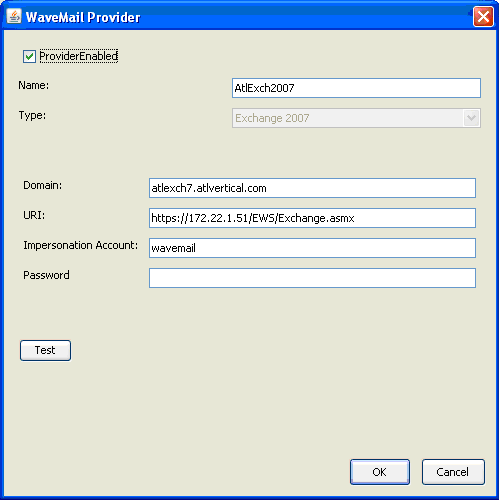
Click New to add a new e-mail provider. The WaveMail Provider dialog opens: |
|
5
|
Enter the Name of this e-mail provider, for example, the name of the Exchange Server. |
|
6
|
Select the version of your e-mail provider from the Type drop-down list. |
Important! Be sure to select the entry for your version of Microsoft Exchange—selecting the wrong version will prevent WaveMail from operating correctly. Note that you cannot change an e-mail provider’s type after you create it.
|
7
|
Enter the following information: |
|
•
|
Domain. Domain for user accounts on the Exchange Server, for example “mycompany.com”. The format of the domain name that you enter here depends on the version of Microsoft Exchange that you are using as your e-mail provider: |
Note: There are many different ways to configure domains in Exchange, and the examples provided below may not apply in your environment. If you are not sure how to enter your domain name here, contact Wave Technical Support.
|
•
|
Exchange 2007 SP2: Typically, you enter the external domain name, for example “abccompanies.com”. |
|
•
|
Exchange 2010 or 2013: Typically, you enter the internal domain name, for example “abcmanufacturing.local”. |
|
•
|
URI. Uniform Resource Indicator for WaveMail to use to connect to the Exchange Server, for example: |
https://mail.mycompany.com/EWS/Exchange.asmx
|
•
|
Impersonation Account. User name for the Exchange impersonation user account used by WaveMail to synchronize with all other Exchange accounts on the Exchange Server. The user name and password that you enter here must exactly match what you specified when you created the impersonation user account. |
|
•
|
Impersonation Password. Password for the Exchange impersonation account used by WaveMail. |
Note: This password can be up to 128 characters long. All characters except “^” are allowed.
|
8
|
Select the Provider Enabled checkbox to enable WaveMail synchronization on this e-mail provider. One or more e-mail providers can be enabled at the same time. If this checkbox is not selected, synchronization on any WaveMail mailboxes defined for this provider does not occur. |
|
9
|
Click Test to verify that WaveMail can successfully communicate with the Exchange Server as configured with the current settings. If the test fails, WaveMail mailboxes on that e-mail provider will not be synchronized until the problem is resolved. |
Possible causes for failure include:
|
•
|
Incorrect Exchange version. Be sure to select your version of Exchange (see step 6). |
|
•
|
Invalid domain. The domain you specify must exactly match what is in Exchange (see step 7). |
|
•
|
Invalid URI. Use the “Exchange.asmx” form—do not substitute variants like “Services.wsdl” (see step 7). |
|
•
|
Incorrect impersonation account name. Make sure that the impersonation account name exactly matches what is in Exchange (see step 7). Also, verify that the -User parameter exactly matches what is in Exchange when you grant impersonation rights to the WaveMail user account via the Exchange Management Shell (see step 4). |
|
•
|
Incorrect impersonation password. Make sure that the impersonation account password exactly matches what is in Exchange. See step 7. |
|
10
|
When the new e-mail provider configuration is working correctly, click OK. |
After you complete these tasks, go to Configuring a user's WaveMail mailbox.